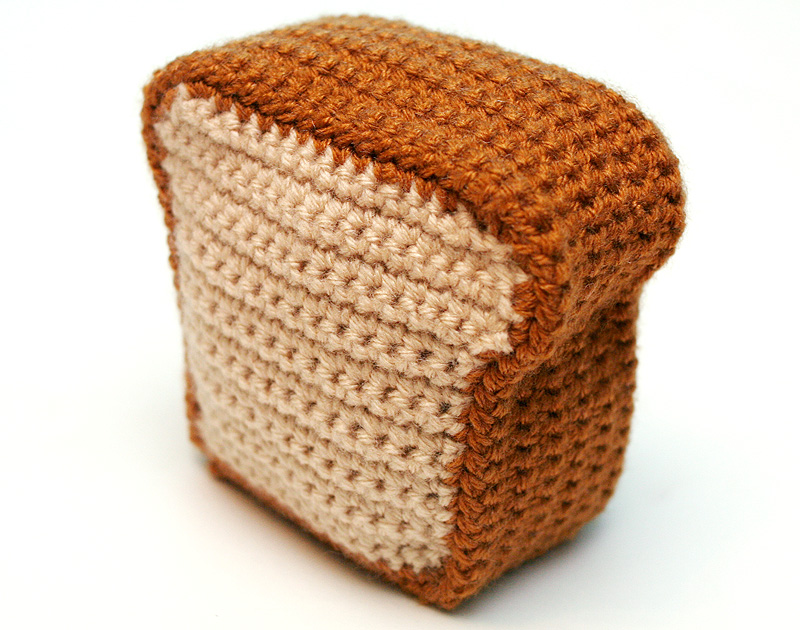
Bread Loaf Letter-Organizer: That Thing You Never Knew You Needed…. Until NOW.
I know this is late for Mother’s Day makers, but I couldn’t decide what to make my mom this year. I finally decided to attack this funny desk-top bread loaf last night! It’s a squishy adorable faux loaf to help you organize your mail, postcards, and stray pieces of paper.
My video is more like a vlog than a tutorial, I think. I didn’t know how it would all turn out, and you can see me change my mind about certain things and try different methods for stuff. I hope it’s interesting and not frustrating :). In the end, I decided I would take this loaf apart, and use a styrofoam sheet in that center section, so that I can stab the wire arches through the crochet and into the styrofoam. This will aid not only in stability of the whole loaf, but also stability for the wires so that they’re not just swimming in Polyfil. I would also use a stronger wire than jewelry wire, because jewelry wire is SO soft and malleable, but I need to do a bit more research on that.
Without further ado… here is the free pattern (which I might keep tweaking later, who knows!).
Materials List
- Crochet Hook: I used an H8/5.0mm hook for worsted weight yarn
- Lion Brand Vanna’s Choice in Honey – 2 balls
- Lion Brand Vanna’s Choice in Beige – 1 ball
- 14 gauge jewelry wire (or stronger wire of a similar gauge)
- Polyfil stuffing
- Optional: 1″ or 2″ thick styrofoam sheet (the kind of styrofoam that is holey and you can poke some wires into), or, small amount of cardboard
- scissors or yarn cutter
- tapestry needle for weaving in ends
Gauge
15 sc x 19 rows = 4 inches x 4 inches
Abbreviations
ch(s) = chain(s)
rnd(s) = round(s)
sc = single crochet
sk = skip
sl st = slip stitch
st(s) = stitch(es)
( ) = work everything in the parentheses into the next stitch
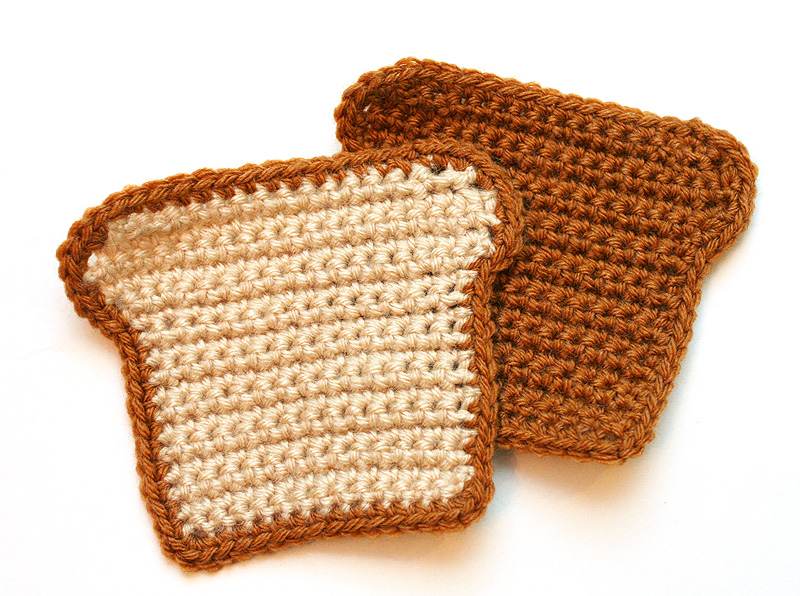
Bread Slice A (2-colors) – make tw0
– With Beige, ch 15.
Row 1: Sk 1st ch, 14 sc. (14)
Rows 2 – 12: Ch 1, turn. 1 sc in each st. (14)
Row 13: Ch 1, turn. (2 sc), (2 sc), 10 sc, (2 sc), (2 sc). (18)
Row 14: Ch 1, turn. (2 sc), 16 sc, (2 sc). (20)
Row 15: Ch 1, turn. 1 sc in each st. (20)
Row 16: Ch 1, turn. Sc2tog, 16 sc, sc2tog. (18)
Row 17: Ch 1, turn. Sc2tog, sc2tog, 10 sc, sc2tog, sc2tog. (14)
– Break off Beige. Join Honey. You’ll now work a border of sc around the whole slice. The pattern is as follows, but I’ll also include a graphic below.
Rnd 1:Ch 1, turn. 13 sc evenly. (2 sc) in the last st of the Row. (2 sc) 4 more times. Sk next st. Then work 11 sc evenly down the side of the Slice. In the corner, (3 sc), then work 12 sc evenly across. in The last st of the row, (3 sc). Sk the 1st st of the next side of the Slice, then work 11 sc evenly. Sk 1 st, then work (2 sc) 4 times. Work 1 sc into the same st as 1st sc of the rnd, then sl st to 1st sc to join.

– Break off and weave in all ends.
Bread Slice B (1-color) – make two
– With Honey, repeat the instructions for Bread Slice A above, but you don’t have to break off or change colors for the crust. Just keep working the whole pattern with Honey, however, when you break off this time, break off leaving a yard of yarn for sewing. Weave in other ends.
– You will now add on to Bread Slice B, to create the depth for your bread loaf.
– Join Honey into the bottom corner of Bread Slice B.

Rnd 1: Ch 1 and work 1 sc in each st. Sl st to 1st sc to join. (72)
Rnds 2-12: Ch 1, turn. 1 sc in each st. Sl st to 1st sc to join. (72)
– Break off leaving a yard of yarn for sewing.
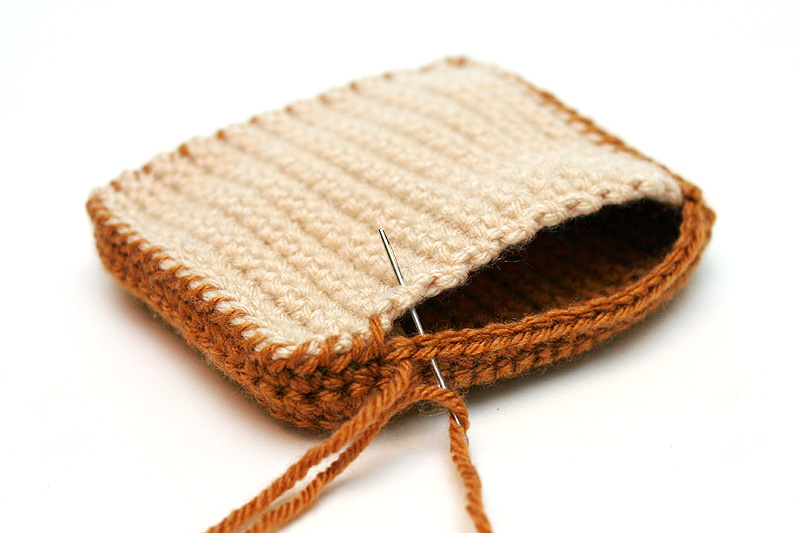
– You should now have 2 Bread Slice B’s that look like bowls, and 2 Bread Slice A’s that will be sewn on top. Whip stitch each Bread Slice A to the top of Bread Slice B, stuffing lightly before sewing all the way around. Stuff conservatively and do not over-stuff. We will now call this piece the Half Loaf.
– To exaggerate the shape of the Half Loaf, I run stitches through the whole piece and cinch them up. Unfortunately, I forgot to take a photo for this, so you may need to watch the video, since it’s a bit difficult to explain.
Bread Base
Top of Bread Base:
– With Beige, ch 17.
Row 1: Sk 1st ch, work 16 sc evenly across. (16)
Rows 2-22: Ch 1, turn. 1 sc in each st. (16)
– Break off and weave in ends.
Bottom of Bread Base:
-With Honey, repeat pattern for Top of Bread Base, but don’t break off at the end.
* NOTE, I used stuffing in this particular project, but if I did it again, I would use a 1″ or 2″ styrofoam sheet to stuff the Bread Base instead of Polyfil. I would therefore probably have to adjust how many rounds I’d work next in order to make sure I had enough coverage for the styrofoam.
Rnd 1: Ch 1, turn. Sc evenly all the way around your rectangle. Sl st to 1st sc to join. (74)
Rnds 2-4: Ch 1, turn. 1 sc in each st. Sl st to 1st sc to join. (74)
– Break off leaving a yard of yarn for sewing.
-Sew Top of Base to Bottom of Base, stuffing lightly before sewing up completely.
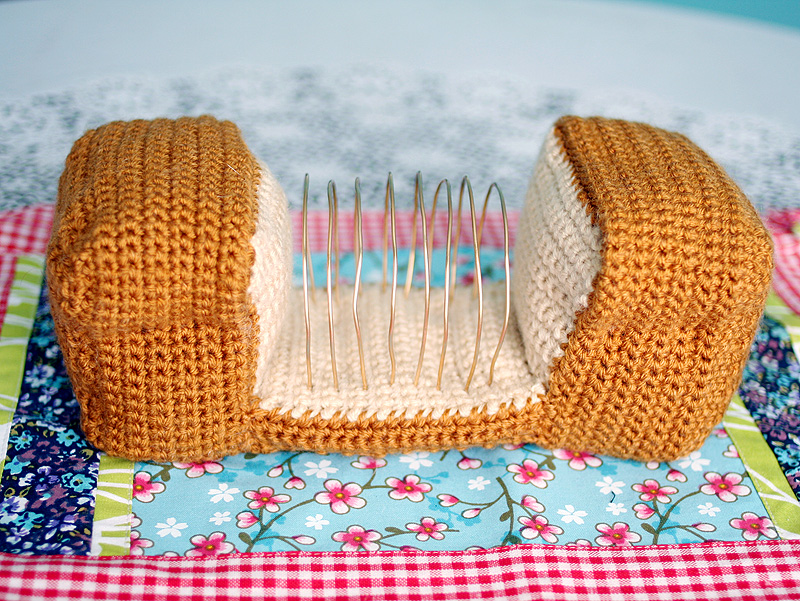
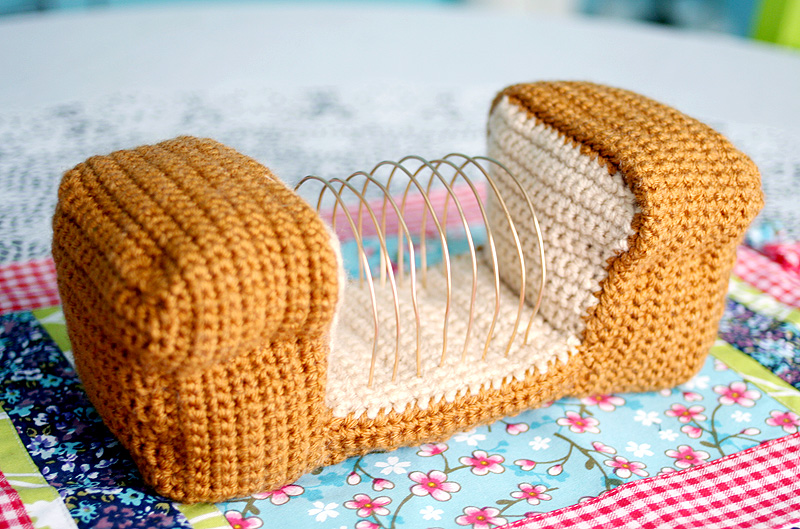
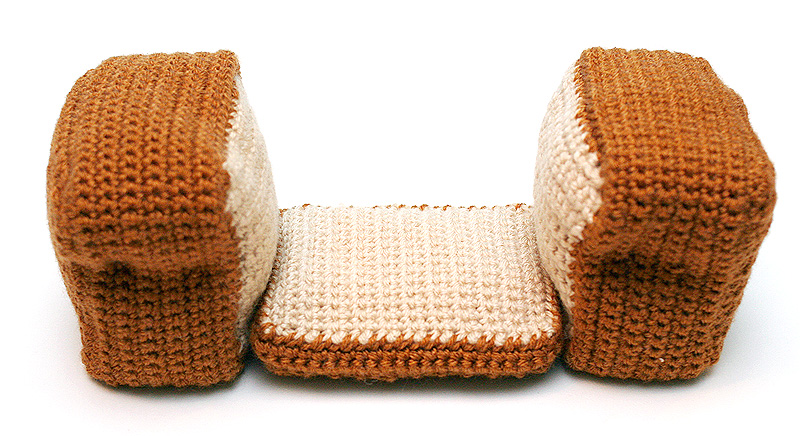
– Now you will sew the Bread Base to each Half Loaf. Arrange the pieces like photo below. Where Beige parts meet Beige parts, use Beige yarn for sewing. Where Honey parts meet Honey parts, use Honey for sewing.
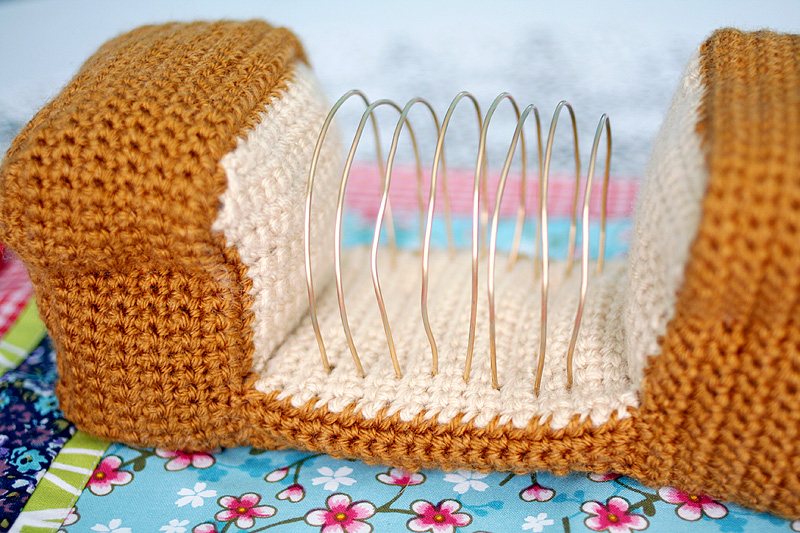
– Cut 10 inch pieces of wire and bend them into an arch. Insert the wire arch into the Bread Base to create the partitions for your letters. I made 8 arches, but this number is up to you. To secure the wires down, you can also dip them in glue before inserting them, but I would arrange them all first so that you’re sure they’ll look nice.
– If you used stuffing in the Bread Base, you will see that the wires are really wobbly since they don’t have anything to anchor them down, so I really encourage you to look into that styrofoam! With stuffing, the Loaf is still operational, but just doesn’t feel extra sturdy.
– If this is a gift, you can wrap the loaf in a big plastic treat bag, just like a real loaf of bread!