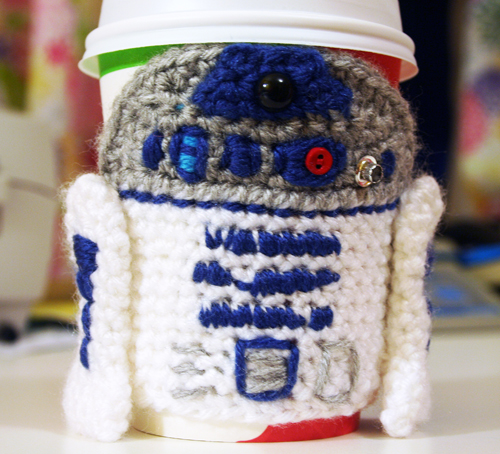
Okay, so I crochet food-themed stuff, but upon rare occasion, I’ll do something a little different because I enjoy the challenge.
One of my customers (I dunno if you wanna be anonymous or if you want me to link your blog or tumblr!), asked if an R2D2 coffee cup cozy would be possible. She asked me this months and months ago, and I sketched a few ideas, but never had time to execute them.
Until now! I think he came out pretty cool!


I used acrylic yarn, a small red button, a silver eyelet, and a safety eye with the post snapped off. He’s washable and totally usable!
This is a one-off project, and I won’t be making more. If you want to try to crochet your own R2 cozy, find a basic pattern for a coffee cup cozy, make a semi-circle for his head, and the legs… well, okay, I’ll give ya the pattern I threw together behind the cut ;). I apologize in advance if there are any errors. Nobody has tested the pattern yet!
R2D2 Coffee Cup Cozy (modeled using a Starbucks tall-sized cup)
Yarns used:
Vanna’s Choice in White
Vanna’s Choice in Silver Heather
Vanna’s Choice in Colonial Blue
A teeny tiny bit of Vanna’s Choic in Aqua for accents
(You could easily substitute the worsted weight yarns of your choice)
I used an H hook for this project.
Body:
With white yarn, ch 32 and sl st to 1st ch to form loop, making sure there are no twists in your chain.
Rounds 1-4: Ch 1 and sc in same st. Work 31 more sc evenly around. Sl st to 1st sc to join. (32 sts)
Round 5: Ch 1 and work (2 sc) into same st. Work 15 sc evenly. Work (2 sc) in next st, and 15 sc evenly around. Sl st to 1st sc to join. (34 sts)
Rounds 6-8: Ch 1 and sc in same st. Work 33 more sc evenly around. Sl st to 1st sc to join. (34 sts)
Round 9: Ch 1 and work (2 sc) into the same st. Work 16 sc evenly. Work (2 sc) into next st, and 16 sc evenly around. Sl st to 1st sc to join. (36 sts)
Rounds 10-11: Ch 1 and work sc in the same st. Work 35 more sc evenly around. Sl st to 1st sc to join. (36 sts) Break off and weave in ends.
You should have a tube that grows wider at the top to accommodate the shape of a paper cup. I often have an empty cup with me when I make cozies, so I can fit the cozy as I go. You want it to be snug enough to stay on while the cup is full of liquid, but you also want to be able to get it on and off fairly easily.
Head:
With grey yarn, ch 10.
Row 1: Sk 1st ch and work 9 sc evenly across. (9 sts)
Row 2: Ch 1, turn. (2 sc), 7 sc, (2 sc). (11 sts)
Row 3: Ch 1, turn. (2 sc), (2 sc), 7 sc, (2 sc), (2 sc). (15 sts)
Rows 4-5: Ch 1, turn. Sc evenly across. (15) Don’t break off yet. Create an sc border around the top to even the curve out on the top of R2’s head. You can eyeball it, or follow what I did below:
Along the edge of Rows 1-5, work (2 sc), 1 sc, (2 sc), (2 sc), 1 sc, then across the top of Row 1, work 9 sc, then along the side, work 1 sc, (2 sc), (2 sc), 2 sc. Sl st to 1st sc of Row 5. Break off leaving enough yarn to whipstitch the bottom, straight edge of R2’s head to the top of his body. There will be a seam on his body, so remember to keep the seam in the back and sew his head onto the front.
Legs: Make 2. He technically has 3, so you can make 3 if you like and sew the 3rd leg to the back of the cozy.
With white yarn, either make a magic circle or ch 3 and sl st to 1st ch to form a loop.
Round 1: Ch 1 and work 6 sc into the loop. Don’t join rounds. (6 sts)
Round 2: Work [(2 sc), 1 sc] 3 times. (9 sts)
Rounds 3-4: Work 9 sc evenly around. (9 sts)
Round 5: Work [sc2tog, 1 sc] 3 times. (6 sts)
Rounds 6-10: Work 6 sc evenly around. (6 sts)
Round 11: Work (2 sc) 6 times. (12 sts)
Rounds 12-13: Work 12 sc evenly around. (13 sts).
Break off leaving about 10 inches of yarn for sewing. Squish the leg flat and sew the bottom closed in a straight line.
Before sewing his legs on, you might want to embellish them with blue yarn first. I just went crazy with some random embroidering (clearly, I am not an embroidery person). You could also cut out blue felt pieces. The same comment goes for the rest of his decorations. Using washable fabric glue and cutting out felt would probably be the easiest/quickest way to put on the details, but you could also go crazy with embroidery like I did. Buttons and other findings are also a fun way to embellish!
This pattern is intended for your personal use only and not for creating items to sell. Please do not sell this pattern or re-post it without my permission. I posted the pattern simply to celebrate your love for Star Wars. Thank you!


