Gingerbread Man Brooch
/ | 5 Comments on Gingerbread Man Brooch
Head:
With Honey and H hook, make magic circle, or ch 3 and sl st to 1st ch to form ring.
Round 1: Ch 2 and work 10 hdc into circle. Sl st to top of 1st hdc to join. (10 sts)
Round 2: Ch 2, work (2 hdc) 10 times. Sl st to top of 1st hdc to join. (20 sts)
Round 3: Ch 2, [(2 hdc), 1 hdc] 10 times. Sl st to 1st hdc to join. (30 sts) Do not break off. Continue to work in rows for the body.
Body:
Row 1: Ch 2 and hdc in same space (go thru both loops to avoid making a hole), 4 more hdc evenly across. (5 sts) Turn.
Rows 2-3: Ch 2, 5 hdc. Turn. (5 sts). Do not break off. Continue to work on one of the legs.
Leg #1:
Row 4: Ch 2, and 2 hdc evenly, leaving remaining sts unworked (2 sts). Turn.
Row 5: Ch 1, skip one hdc, and (3 sc) and sl st in last hdc. Break off.
Leg #2:
With wrong side of the cookie facing you, insert hook into 2nd to last hdc of body Row 3.
Row 1: Repeat Row 4.
Row 2: Ch 1, turn. 3 sc in 1st stitch. Sl st in last st and break off.
Arms:
Insert hook where head and body join and work moving away from the head.
Row 1: Ch 2 and hdc in same space. Hdc in next hdc. Turn. (2 sts)
Row 2: Ch 2, and hdc in same space. Hdc in next hdc. Break off.
Repeat Rows 1-2 on the other side of the body.
Weave in all ends, making sure especially that there isn’t a big hole in the middle of the face where your magic ring was.
To work the white Icing, insert hook into crotchal area (I find this is the most logical place to hide any inconsistency), and with White, sl st evenly along the edge of the cookie. Exercise control while you sl st around. These sl sts should NOT warp the cookie in any way. If your cookie is starting to curl inward, you are sl st’ing too tightly or too far apart. You do want the sl sts to look as uniform as possible. When you go all the way around and get back to the crotchal area, I cut the yarn and just pull the tail all the way up and out of the top of the cookie and then use a tapestry needle to weave it back down to the back of the cookie to tie off and weave in the end. I think this looks more clean than breaking off the normal way, but you can figure out what works best for you, too.
To work the Smile, use Pink and sl st evenly along the spaces between Rnd 2 and Rnd 3 of the head, which form a perfect smile guide. Break off and weave ends into the back of the cookie.
Glue on eyes and pompoms!
My Crocheted Gingerbread Village at Imagiknit
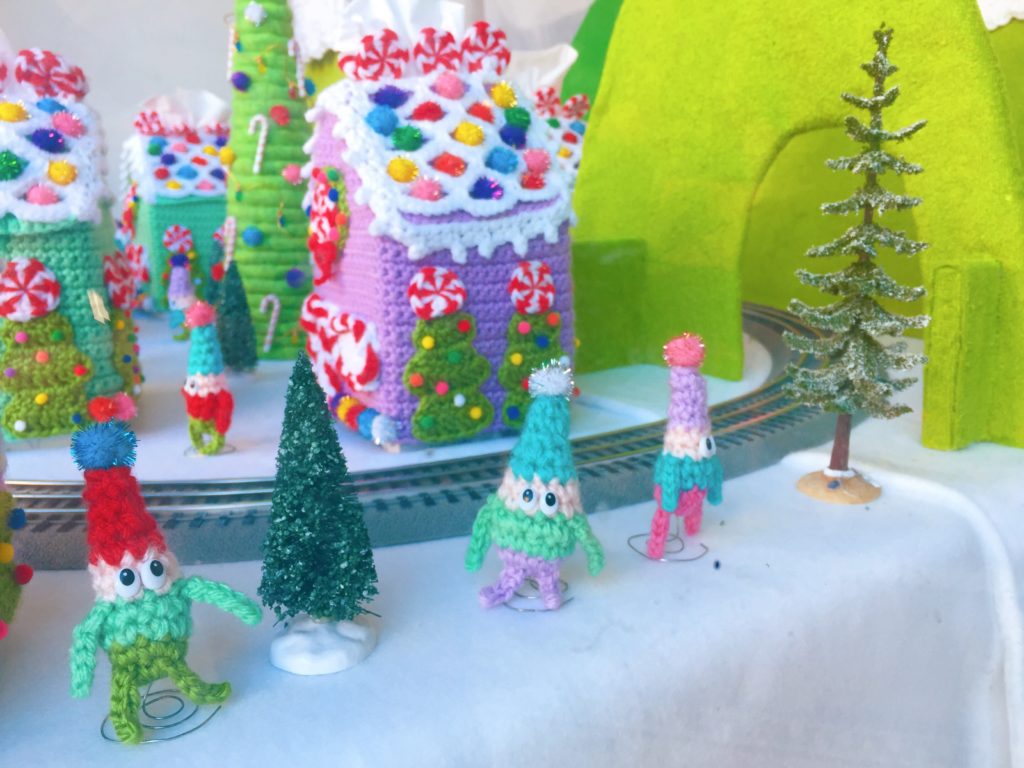
/ | 24 Comments on My Crocheted Gingerbread Village at Imagiknit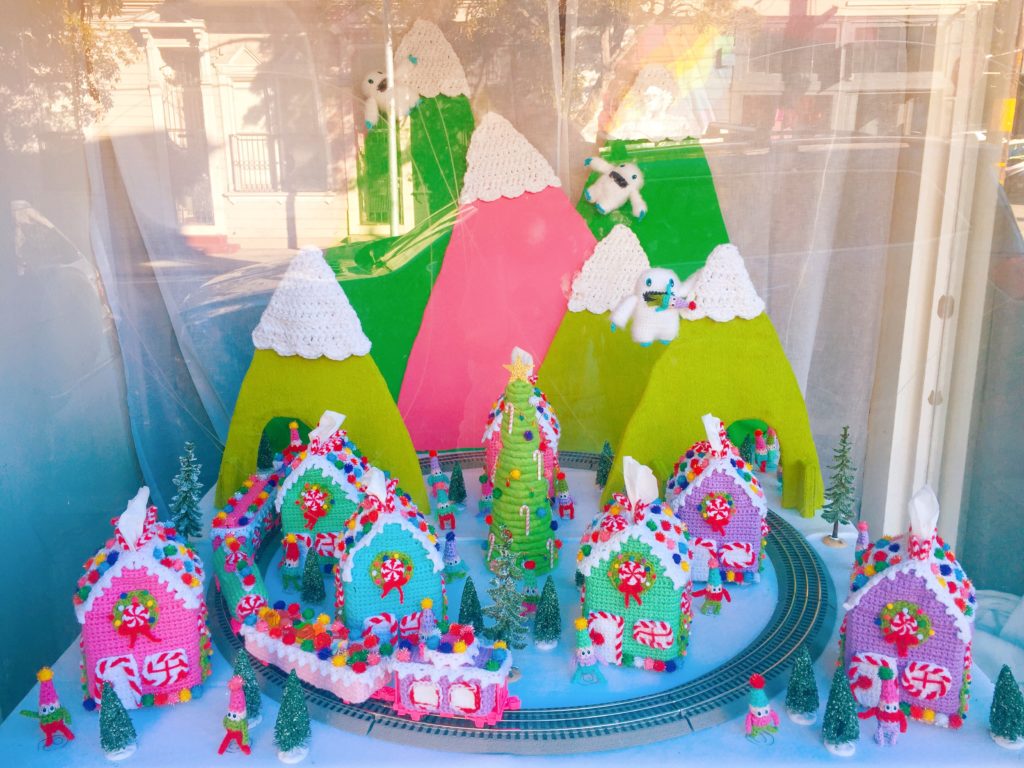 If you’ve been following my social media at all, you’ll know that I designed and crocheted this little pastel gingerbread village for my local yarn shop, ImagiKnit, here in San Francisco. With a full-time job, I definitely would not have been able to pull this off without help from two of my trusty crochet elves and my bff. It was a team effort! And we made a village!
Here’s a video of it in action, because the coolest part of the display is the yarn-bombed electric train!

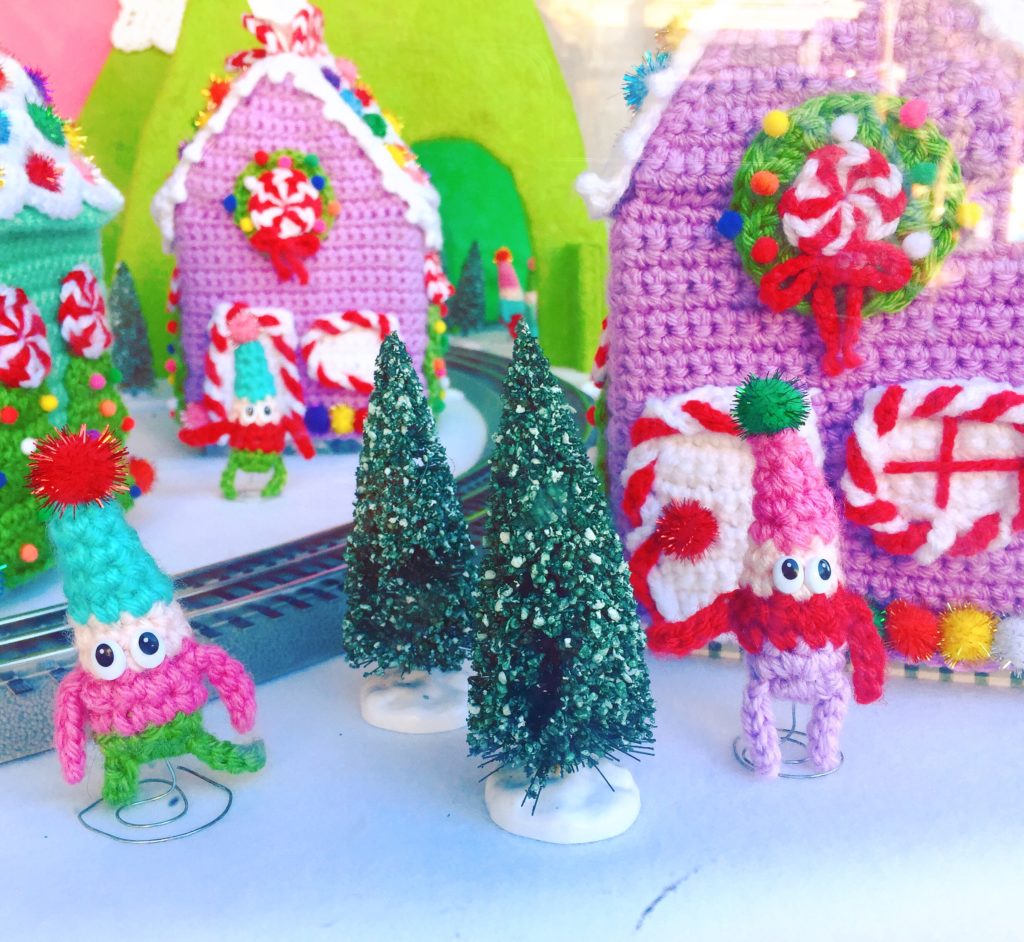
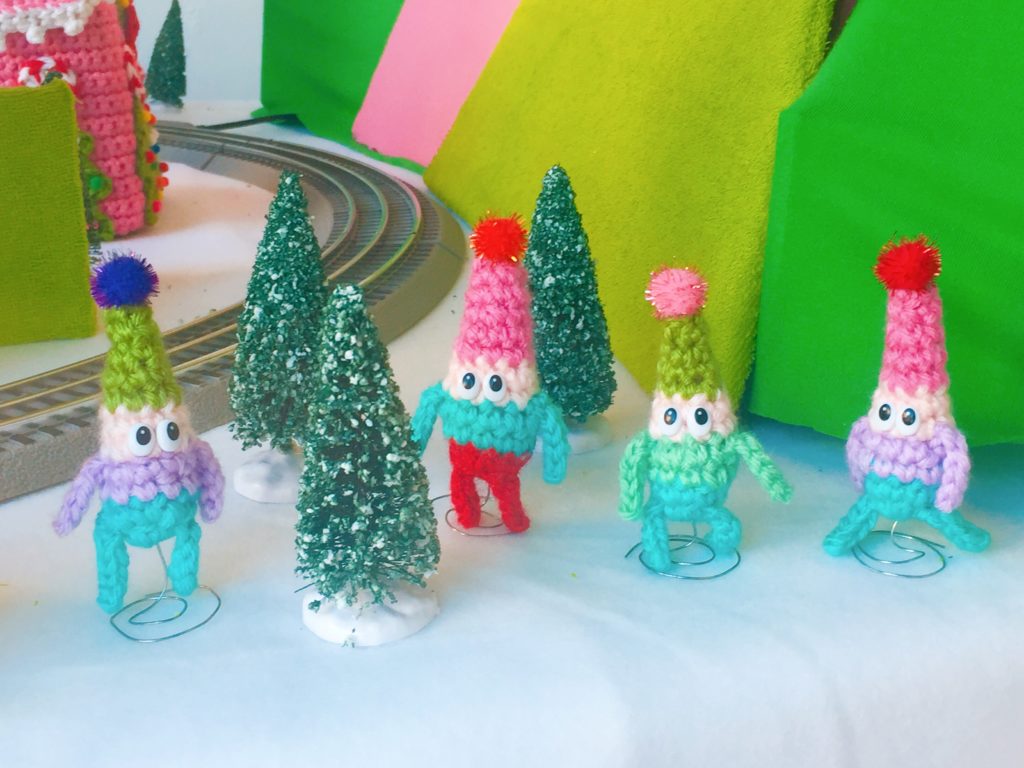
The little people/elves that inhabit this village were heavily inspired by Mochimochi Land’s gnomes. I made little wire stands for them so that they could stand up in the display.
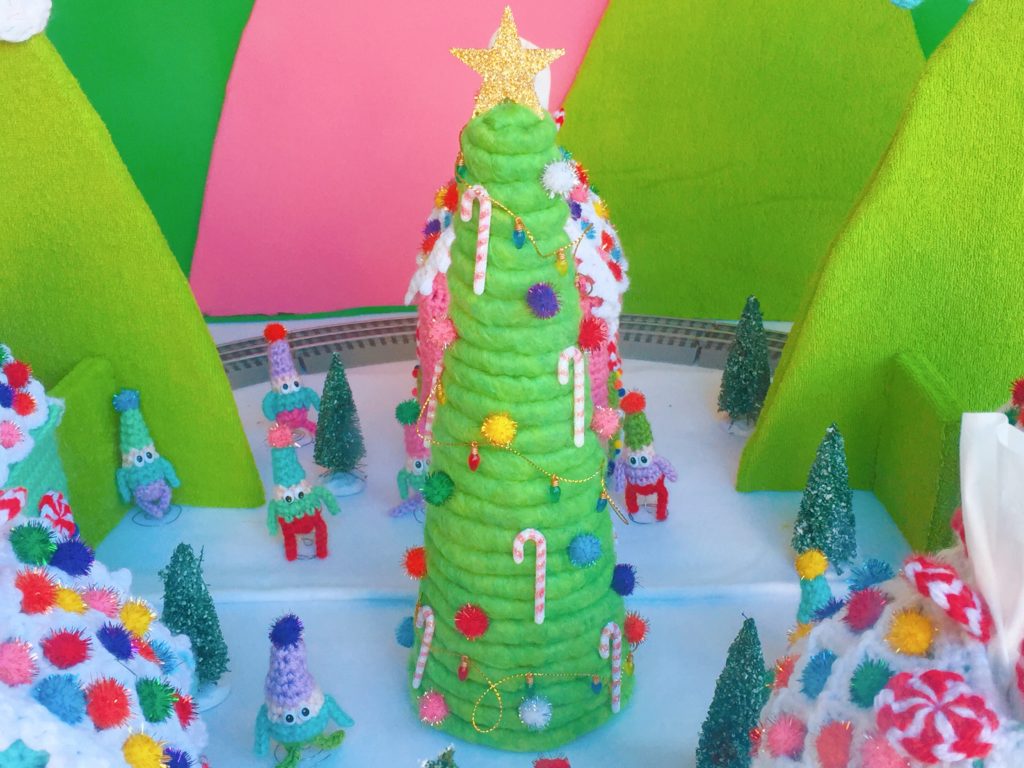
Manda helped me lay out the village, and we decided that a Big Tree in the center would be perfect. Time was really not on my side, so while I would’ve loved to crochet a tree, I decided to yarn-wrap a styrofoam cone instead. Still cute!
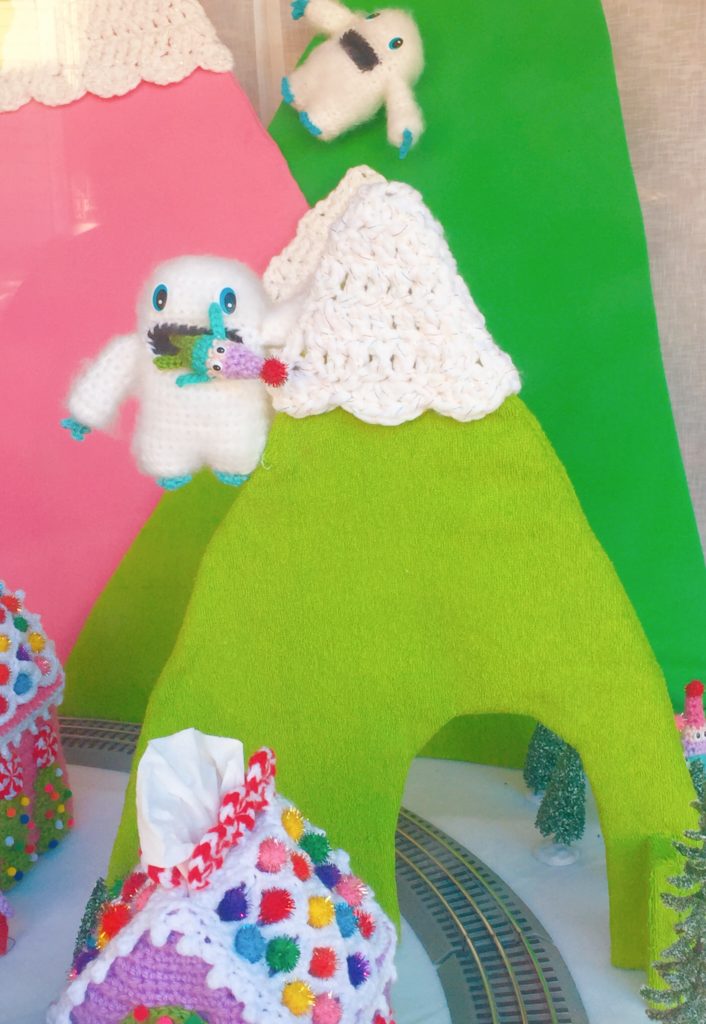
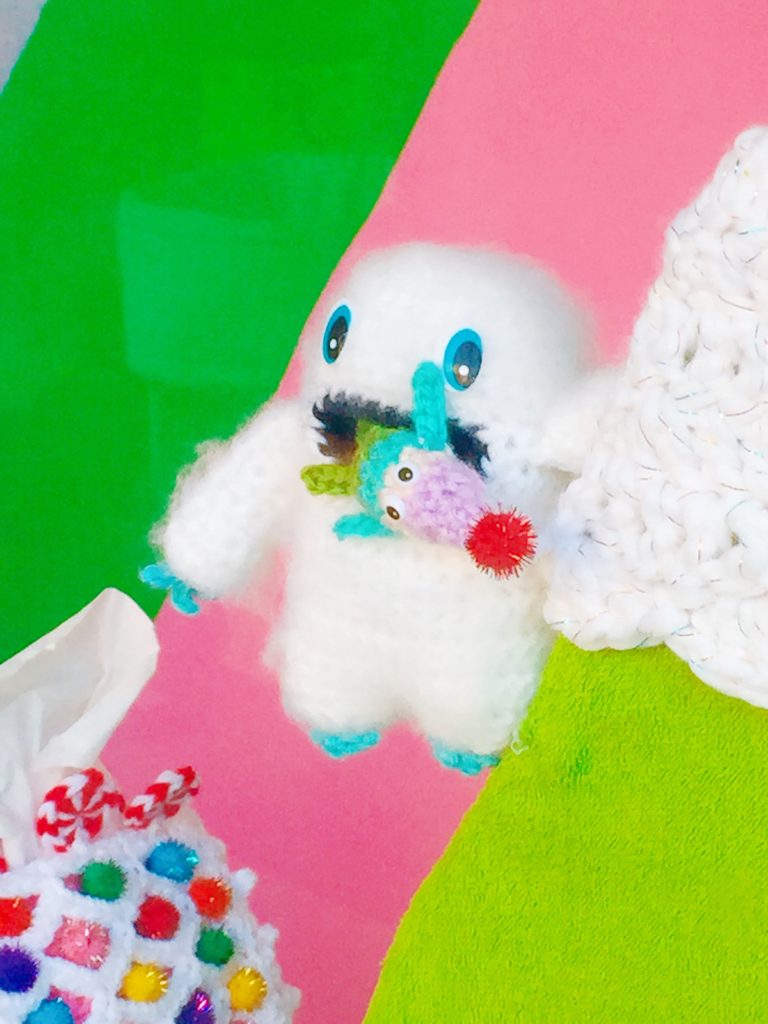
And no snowy village is complete without abominable snowmen or yetis! This pattern is based on the Abominable Snowman crochet class I have on Creativebug, but this one is a bit smaller and constructed slightly differently. While I was taking photos of the window, a woman and her son were watching the train go around. When her son realized that the monster was eating a person, he said he didn’t like it! Sorry, kiddo!
I hope that if you’re a Bay Area local, you’ll get a chance to stop by ImagiKnit. If the train isn’t going, just ask them! I’ll provide links to various crochet patterns in this project in the next few blog entries.
Free Crochet Pattern: French Fry Purse
/ | 34 Comments on Free Crochet Pattern: French Fry Purse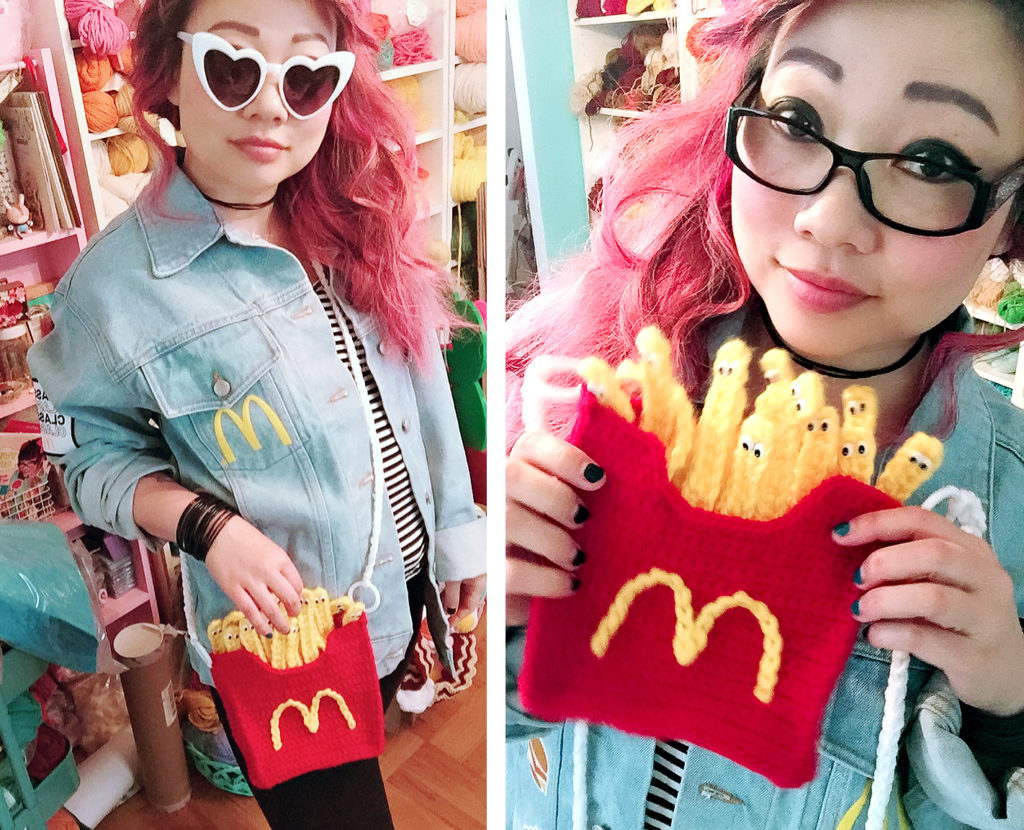 McDonald’s (!!!) approached me to help promote global #McDelivery Day, which is this Thursday, July 19! Order McDonald’s via UberEats on Thursday whenever lunch starts (10:30am or 11:30am depending on where you live), and you’ll get the chance to order FREE McDonald’s swag while supplies last at participating locations! I’m particularly into the bandana, socks, and t-shirts, and I’m running an enamel pin giveaway on my Instagram!
To celebrate, I decided to make myself a french fry purse, because I still believe that McDonald’s fries are THE BEST FRIES. You can either make this a handbag or a cross body. I had people vote on Instagram, and the cross body won. Basically you can make the strap what ever length you want ;).
If you end up getting goodies on McDelivery Day, let me know what you picked! (P.S. This jean jacket is rad! Thank you, Ronald!)
Free Crochet Pattern: Bomb Pop Pen Cozy
/ | 20 Comments on Free Crochet Pattern: Bomb Pop Pen Cozy![]()
Happy National Bomb Pop Day!
I know the day is almost over, but, to be honest, I had no idea it was National Bomb Pop Day until I was already at work and saw someone post about it on my Instagram feed!
I made these Bomb Pop Pen Cozies last year, and now you can make some, too! I don’t have step-out photography, so hopefully some of you will be able to follow along just with text. When I get the chance to shoot step-out photography, I’ll probably remove the pattern from my blog and then put it in my Etsy shop. Please enjoy it until then!
Windows for Harvey – my crocheted ice cream cone window installation!
/ | 6 Comments on Windows for Harvey – my crocheted ice cream cone window installation!
It was Harvey Milk’s birthday on May 22nd, and in celebration, the Castro neighborhood here in San Francisco hosts Windows for Harvey, a celebration in which local merchants host art installations inspired by Harvey and his legacy. This year’s theme was “equality,” and the Castro Fountain asked if I would create an installation for their window.

I sketched and envisioned A LOT of different concepts before deciding on this one. A big part of me wanted to make a bunch of smaller items to fill the window, so that people might be more willing to purchase a piece of it at a lower price. But ultimately, I felt like the big triple scoop ice cream cones would make a bigger and more fun visual impact. They are over 5 feet tall!
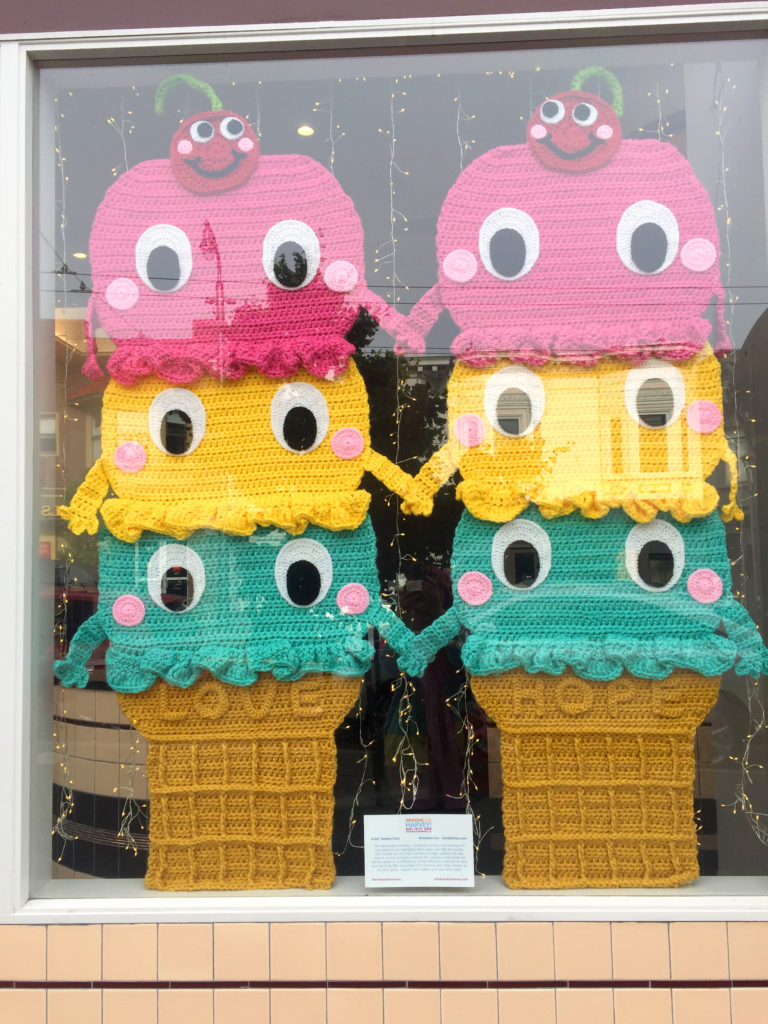
This is from my artist statement/description posted in the window:
“For Harvey Milk’s birthday, I wanted to crochet a treat that was not only sweet but also highlighted Milk’s legacy and fight for equality. Both crochet and ice cream can have nostalgic qualities that take many of us back to a more innocent time, perhaps a time before we became aware of our differences, or that difference could ever be seen as a bad thing. Milk encouraged us to embrace each other, whether we are pink, yellow, or green, and to always give each other hope.”

Big crochet is super floppy and a little heavy, so I backed both pieces in thick foam board. Manda helped me out a lot by cutting the board, since I was so short on time.
Today is the last day you can view it. I think I’m supposed to take it down tonight! Sorry I wasn’t able to blog about it sooner! If anyone local to SF is interesting in purchasing it, you can always email me. I still haven’t quite figured out the pricing, but I’d sell them together or as individual ice cream cones. Manda wants to keep them, but our house already has a lot of crochet :).
Welcome!


Learn to Crochet w/ Me!

Fun Affiliates!