So…do you guys remember how last year I sketched a project for my Auntie Mary? This is highly representative of how I unfortunately prioritize my crafting work: my friends/family come dead last, and all my business stuff comes first. So poor Auntie Mary has waited over a year for this cozy she requested for her bathroom box of disposable hand towels! I’m the worst!!! I hope she still uses them? But I think it came out super cute!
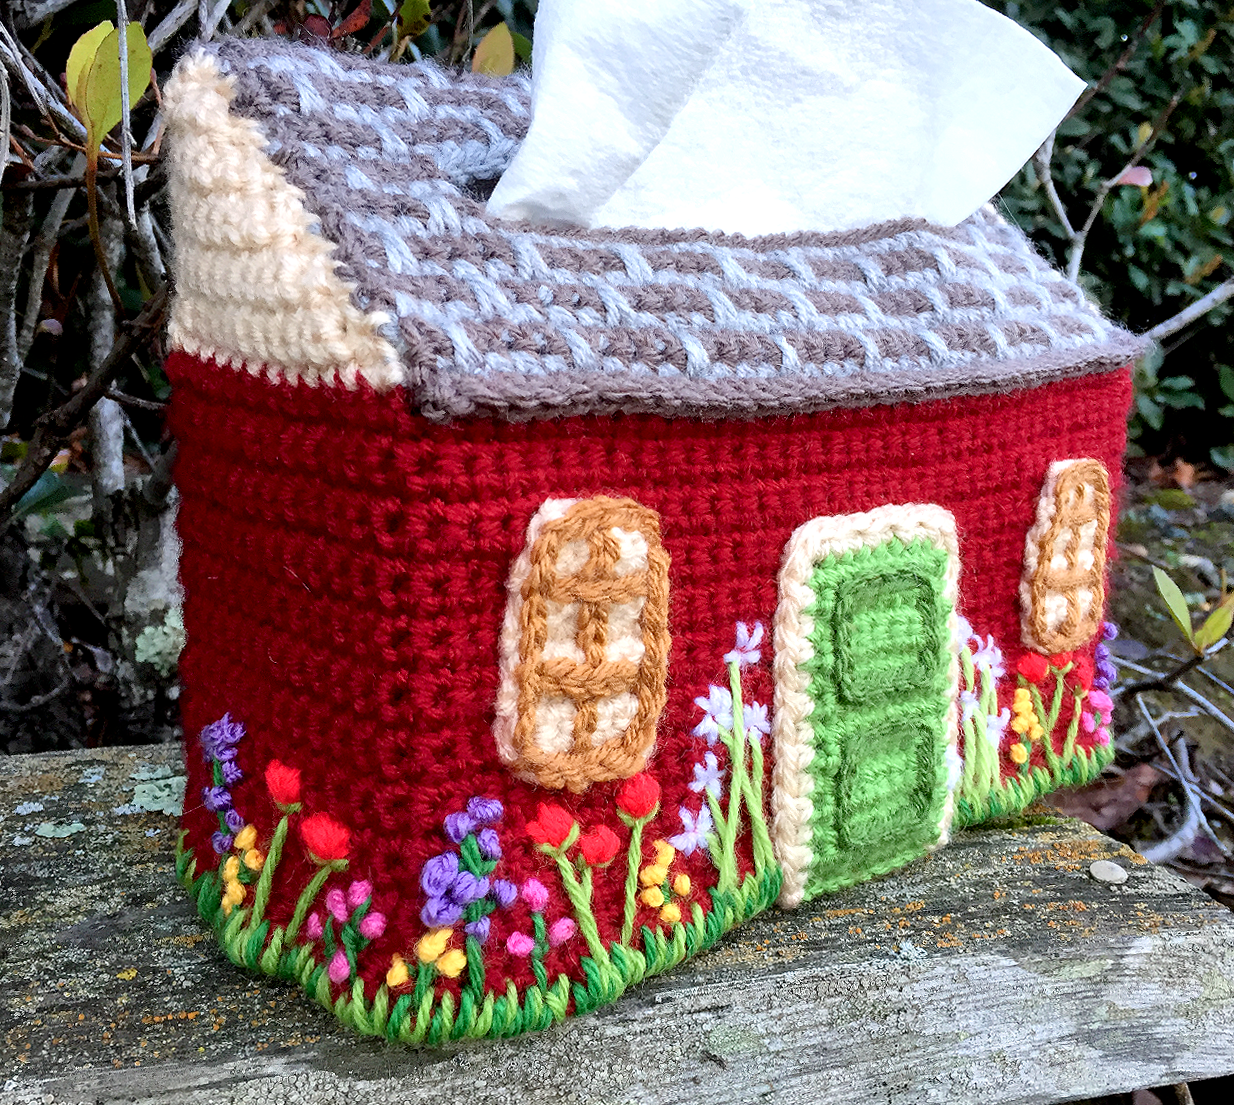
I was still in kind of a rush to finish. I was sewing on the grass just minutes before she arrived at my parents’ house on Christmas Day. I probably would have put another window on the sides of the house and worked on those green shutters, but those are pretty easy additions for future projects. I also skipped the chimney due to time, but I don’t think the finished project really needed it.

I am really NOT the world’s greatest or most experienced embroiderer, but I gave it a shot with these wee flowers. It was pretty fun! I am sure you could get wildly more creative here if you’ve done more embroidery before. All I basically know is straight stitch, satin stitch, and the french knot!


I’m not sure how many people buy these disposable hand towels, but if you do, now you can make a cute lil cover for it!
This reminds me a lot of fairy houses and gnome stories. I kind of want a little adorable village with different shapes and sizes of Kleenex cottages… would be a fun group project…!
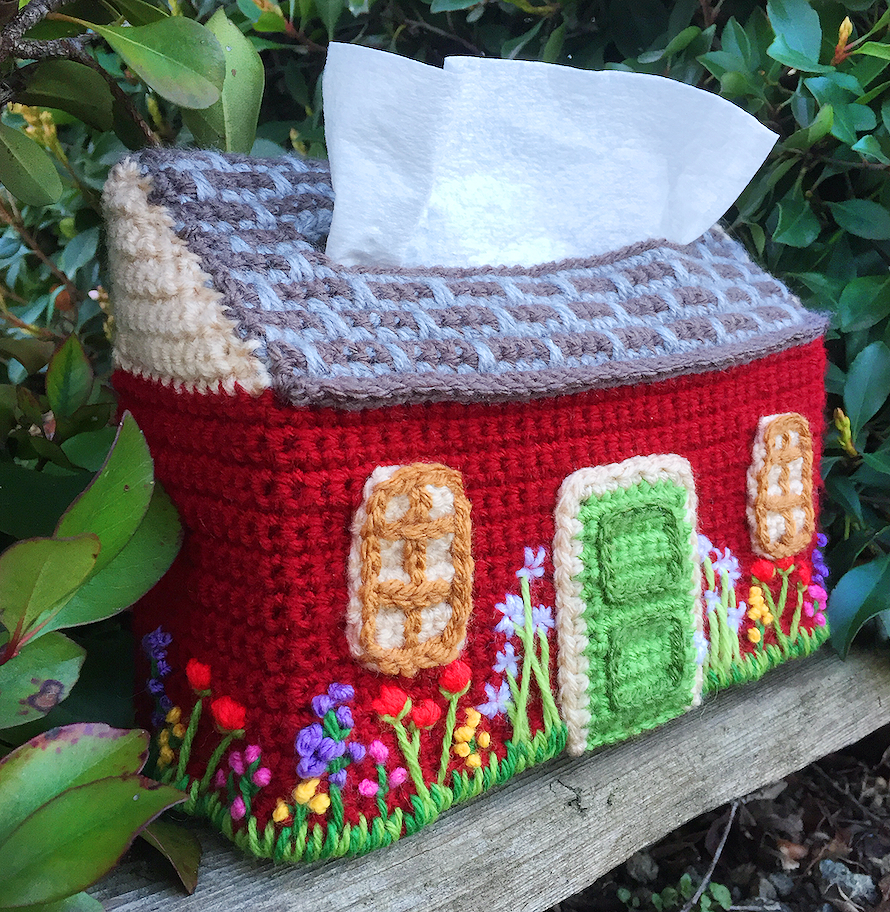
Here is the box in a slightly different setting. I went a little crazy snapping photos really quickly before putting this in a gift bag!

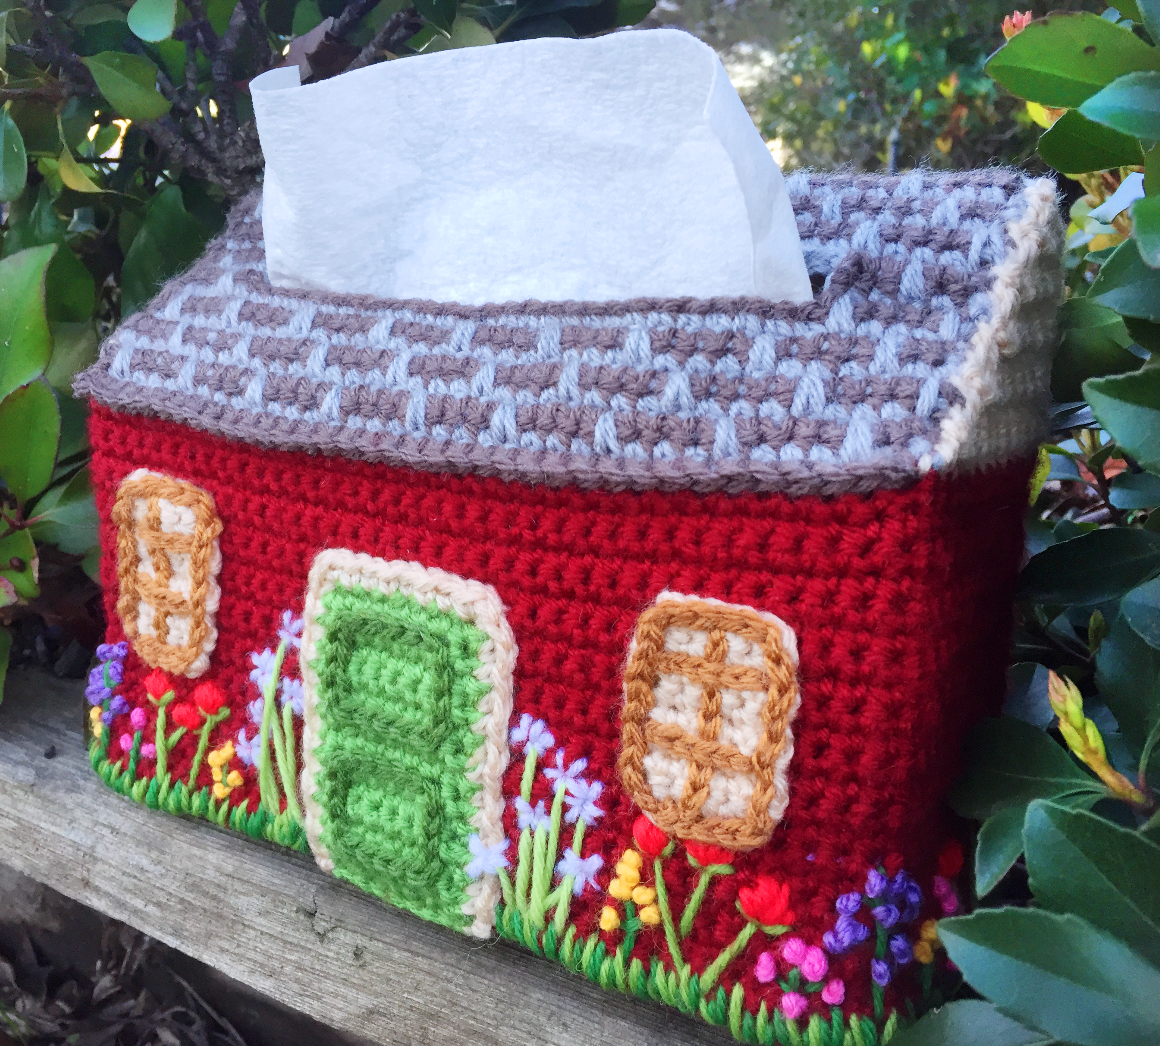
Unfortunately, I don’t have step-by-step photography for this one, so please rely on the photos to figure out what goes where. I think it should be pretty straightforward! Can’t wait to see your unique versions!

What You’ll Need
-Worsted weight yarn in a variety of colors for the base of your house (sorry I didn’t record any yardage!). I used Lion Brand Vanna’s Choice in Cranberry (Red), Taupe (Dark Grey), Silver Heather (Light Grey), Beige (Beige), Honey (Tan), Fern, (Light Green), Kelly Green, (Dark Green)
– Light worsted or sport weight yarn in a variety of colors for your flowers. I used a mixture of Cascade 220, Plymouth Encore Worsted, and Universal Classic Worsted Yarn. This is a great moment for stash-busting!
– H8/5.00mm crochet hook
– Scissors
– Tapestry needle
– Disposable hand towel box (aff. link)
Gauge
With Vanna’s Choice: 16 sc x 20 rows = 4 in. x 4 in.
Abbreviations in U.S. Crochet Terms
ch(s): chain(s)
rnd(s): round(s)
RS: right side
sc: single crochet
sc2tog: single crochet 2 together
sc3tog: single crochet 3 together
sk: skip
sl st: slip stitch
st(s): stitch(es)
WS: wrong side
YO: yarn over
Stitch Refresher
sc2tog (single crochet 2 together) – Insert hook into desired stitch, YO, pull through one loop. Insert hook into next stitch, YO, pull through one loop. YO and pull through all 3 loops.
sc3tog (single crochet 3 together) – Insert hook into desired stitch, YO, pull through one loop. Insert hook into next stitch, YO, pull through one loop. Insert hook into next stitch again, YO, pull through one loop. YO and pull through all 4 loops.
spike stitch – This is essentially an elongated sc. For this pattern, work your spike stitch into the 2nd row below. For a more detailed tutorial, check out this link from Craftsy.
Base
– With Red and H hook, ch 96. Making sure there are no twists in the ch, st to 1st ch to form loop. This fit around the circumference of the box.
Rnd 1: Ch 1, sc evenly around. Sl st to 1st sc to join. (96)
Rnds 2-22: Ch 1, turn. Sc evenly around. Sl st to 1st sc to join. (96)
– Break off Red. Join Join Dark Grey.
Back of Roof
Row 1: Ch 1 and work 36 sc evenly. Leave remaining sts unworked. (36)
Rows 2-12: Ch 1, turn. 36 evenly. (36)
– Drop Dark Grey, but do not break off. Join Light Grey. You’ll be carrying the Dark Grey along.
Front of Roof
– You will now begin to work in a brick-like pattern to mimic shingles on the front of the cozy. It’s not a legit brick stitch…..it’s a sort of fakey one using long sc’s.
Row 13: Ch 1, turn. (RS) 36 sc evenly. (36)
– Drop Light Grey and carry along. Pick up Dark Grey.
Row 14: Ch 1, turn. 36 sc evenly. (36)
– Drop Dark Grey and carry along. Pick up Light Grey.
Row 15: Ch 1, turn. [3 sc, spike stitch] 9 times. (36)
– Drop Light Grey and carry along. Pick up Dark Grey.
Row 16: Repeat Row 14.
– Drop Dark Grey and carry along. Pick up Light Grey.
Row 17: Ch 1, turn. 1 sc, [spike stitch, 3 sc] 8 times, spike stitch, 2 sc. (36)
– Drop Light Grey and carry along. Pick up Dark Grey.
Rows 18-19: Repeat Rows Rows 14-15
– After Row 19, drop Light Grey and carry along. Pick up Dark Grey.
Row 20a: This will be a bit weird row. In this short row, you’ll start creating the opening for the paper towels. Ch 1, turn. 5 sc evenly. Leave remaining sts unworked. (5)
– Break off Dark Grey. Pick up Light Grey.
Row 21a: Ch 1, turn. 2 sc, spike stitch, 2 sc. (5)
– Break off Light Grey.
– Turn piece over so that the WS is facing.
Row 20b: Starting from the first free stitch from Row 19, count 27 sts and insert your hook. This means you will be working into the last 5 sts of Row 19. Re-join Dark Grey and work 5 sc. (5)
– Break off Dark Grey. Join Light Grey.
Row 21b: Ch 1, turn. 1 sc, spike stitch, 3 sc. (5)
– Break off Light Grey.
– Turn the piece so that the WS is facing.
Row 22: Re-join Dark Grey to the right edge of Row 21a. 5 sc, ch 26 not too tightly and sk 26 sts in the current row. Sc evenly in the last 5 sts. (36)
– Drop Dark Grey and carry along. Join Light Grey.
Row 23: Ch 1, turn. 3 sc, spike stitch, 1 sc, 26 sc evenly in the 26 chs, spike stitch, 3 sc, spike stitch. (36)
– Drop Light Grey and carry along. Pick up Dark Grey.
Rows 24-29: Repeat Rows 16-17, then Rows 14-15, Then Rows 16-17 again.
– Break off and weave in all ends.
– Now connect the Front of Roof to Base. Put the whole cozy on your paper towel box with the RS facing outside. You’ll be using sc to sew the edge (Row 29) of Front of Roof to the top of the Base (unworked stitches of Rnd 22). With the front of the house facing you, count 12 free sts on the right side of the Base. Begin sc’ing Base to Front of Roof with Dark Grey for 36 sts evenly. You will use up all the Front of Roof sts, and there should be 12 more free sts on the other side of the Base when you are done. The WS of this connecting row should be showing on the outside of the roof. Break off and weave in ends.
– You’ll now fill in those triangular gaps. You can do this in a contrasting color or one of the colors you’ve already used.
Triangular Side Panels
– Start with the back of the house/cozy facing you. You’ll be working on the gap that’s on the left side of the house first. With Beige, pull out a 16 inch yarn-tailand then join into the next free stitch on the Back of Roof.
Row 1: Ch 1, 12 sc evenly. (12)
Row 2: Ch 1, turn. sc2tog, 10 sc. (11)
Row 3: Ch 1, turn. 9 sc, sc2tog. (10)
Row 4: Ch 1, turn. sc2tog, 8 sc. (9)
Row 5: Ch 1, turn. 7 sc, sc2tog. (8)
Row 6: Ch 1, turn. sc2tog, 6 sc. (7)
Row 7: Ch 1, turn. 5 sc, sc2tog. (6)
Row 8: Ch 1, turn. sc2tog, 4 sc. (5)
Row 9: Ch 1, turn. 3 sc, sc2tog. (4)
Row 10: Ch 1, turn. sc2tog, 2 sc. (3)
Row 11: Ch 1, turn. 3sc2tog. (1)
– Break off leaving about 16 inches of yarn. You can use both yarn ends to sew the sides of the triangle to the Back of Roof and Front of Roof and then weave in ends. The triangle probably won’t look like a perfect fit, but once you sew it in, it should be fine.
To work the other/right side, pull out about 16 inches of Beige first, and with the front of the house facing you, insert your hook into the next free stitch. You are simply going to do the reverse of the previous Triangular Panel.
Row 1: Ch 1, work 12 sc evenly. (12)
Row 2: Ch 1, turn. 10 sc, sc2tog. (11)
Row 3: Ch 1, turn. sc2tog, 9 sc. (10)
Row 4: Ch 1, turn. 8 sc, sc2tog. (9)
Row 5: Ch 1, turn. sc2tog, 7 sc. (8)
Row 6: Ch 1, turn. 6 sc, sc2tog. (7)
Row 7: Ch 1, turn. sc2tog, 5 sc. (6)
Row 8: Ch 1, turn. 4 sc, sc2tog. (5)
Row 9: Ch 1, turn. sc2tog, 3 sc. (4)
Row 10: Ch 1, turn. 2 sc, sc2tog. (3)
Row 11: Ch 1, turn. sc3tog. (1)
– Break off leaving about 16 inches of yarn. You can use both ends to sew the sides of the triangle to the Back of Roof and Front of Roof and then weave in ends.
– Now your box is completely covered!
Door
With Light Green, unravel about 16 inches of yarn and then ch 9.
Row 1: sk 1st ch and work 8 sc evenly. (8)
Rows 2-13: Ch 1, turn. 8 sc evenly. (8)
– Break off and weave in this end. Keep the 16 inch end for sewing the bottom of the door to the house later.
For a border, with Beige, join into the side of Row 1.
Rnd 1: Ch 1, work 1 sc into the side of each row (13 sts) until you reach the top. Work (3 sc) into the 1st st of Row 13. Work 6 sc evenly and then (3 sc) into the last st of the row. Continue to work sc evenly down the other side of the door (13 sts).
– Break off leaving about 24 inches of yarn for sewing. Weave in the short end.
– Cut off about a yard of Dark Green and embroider squares onto the door if you like for some detail.
– Then sew Door to house.
Window (Make 2)
– With Beige, ch 6.
Row 1: Sk 1 st ch, work 5 sc evenly. (5)
Rows 2-8: Ch 1, turn. 5 sc evenly. (5)
– Break off and weave in ends.
– Surface sl st or embroider with Tan to create a grid/frame and to also sew Window to house.
Window Shutters (Make 4, so you can have 2 for each window)
- With Light Green, ch 4.
Row 1: Sk 1 st ch, work 3 sc evenly. (3)
Rows 2-7: Ch 1, turn. 3 sc evenly. (3)
– Sl st a border all the way around this rectangle. It can help keep the window shutters flat, rather than curly.
– Break off leaving about 24 inches of yarn for sewing.
– Sew a shutter to each side of both Windows.
Garden
Here’s where you can use your creativity, your imagination, your embroidery skills, and all your bits and bobs of yarn. I sketched out my entire house and garden first, so that I knew what color schemes and flower heights/patterns that I wanted. I suggest you do that, too, if you are into symmetry. If not, just go crazy! I am sure your garden will turn out beautifully! You could also use felt to create a white picket fence, or maybe a little mail box. Or maybe even make some lil bunnies or kitties hiding out. So many possibilities!! I really hope you explore them! Don’t forget to tag me on social media so I can check it out :).