It was my birthday on Wednesday, and it seemed like a really great time to share my cupcake/mini-cake hair clip pattern with you guys! I designed these little cakes to be somewhat short and low profile, so that they look good as a hair accessory. The best part of all is that you can use real cupcake toppers to decorate your mini cakes, which gives you tons of options for gifts and holiday outfits!


The video tutorial is also up on my YouTube channel! The typed-out pattern is below. For a printer-friendly PDF with more how-to photos, please check out the pattern in my Etsy shop!
What You’ll Need: (I recommend that all the yarn you use for this project be the same weight and brand to ensure a good fit for all the pieces, unless you are good at maintaining the same gauge with different yarns.)
– Worsted weight yarn in 1 or 2 Frosting Colors (FC1 and FC2) – In my photos, I’m using Lion Brand Vanna’s Choice in Chocolate and also White – (approx. 15 yards of each, or 30 yards total if using 1 color)
– Worsted weight yarn in 1 Cake Color (CC) – In my photos, I’m using Lion Brand Vanna’s Choice Baby in Pink Poodle – approx. 20 yards
– Worsted weight yarn in Red – In my photos, I’m using Lion Brand Vanna’s Choice in Scarlet
– H8/5.0mm crochet hook
– small amount of Polyfil
– scissors
– tapestry needle
– hot glue
– optional: 5mm mini pompoms for sprinkles, or beads/sequins/cabochons, plastic cupcake toppers, and glue or needle/thread that is appropriate for attaching your cupcake decorations
– optional: hair clip or headband for wearing your cupcake on your head!
Abbreviations:
BLO: back loops only
ch(s): chain(s)
dec: decrease
rnd(s): round(s)
sc: single crochet
sk: skip
sl st: slip stitch
st(s) : stitch(es)
( ): work everything inside the parenthesis into the next stitch
[ ]: work everything inside the brackets the number of times indicated
Notes:
– The Right Side of your work should always be the outside of your project.
– When you decrease/dec in this pattern, always use the invisible decrease. Pick up a loop from the next st, pick up a loop from the following st, YO, pull through 2 loops, YO, pull through 2 loops.
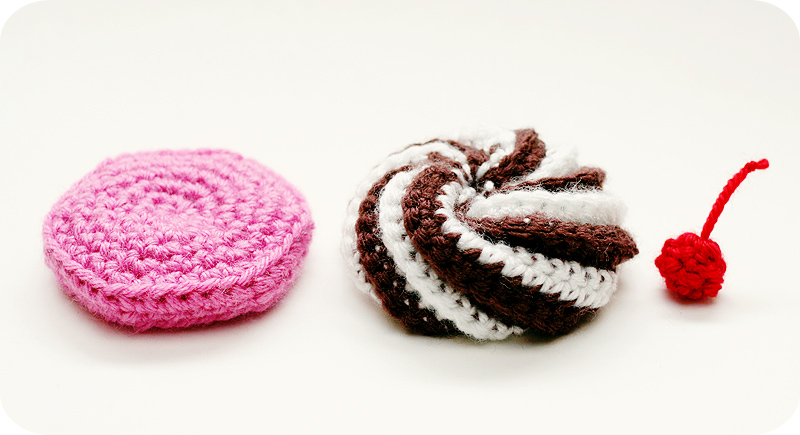
Cake:
With CC and H Hook, make magic ring, or ch 3 and sl st to 1st ch to form ring.
Rnd 1: Ch 1, 6 sc into loop. (6) Don’t join rnds. Work in a spiral.
Rnd 2: (2 sc) 6 times. (12)
Rnd 3: [(2 sc), 1 sc] 6 times. (18)
Rnd 4: [(2 sc), 2 sc] 6 times. (24)
Rnd 5: [(2 sc), 3 sc] 6 times. (30)
Rnd 6: [(2 sc), 4 sc] 6 times. (36) Sl st to next st join.
Rnd 7: Ch 1, in BLO, 36 sc evenly around. Sl st to 1st sc to join. (36)
Rnd 8: Ch 1, in both loops, 36 sc evenly around. Sl st to 1st sc to join. (36)
Rnd 9: Ch 1, in BLO, [dec, 4 sc] 6 times. (30) Don’t join rnds for rest of Cake.
Rnd 10: Working in both loops, [dec, 3 sc] 6 times . (24)
Rnd 11: [dec, 2 sc] 6 times. (18)
Rnd 12: [dec, 1 sc] 6 times. (12). Stuff with Polyfil very lightly. You want just enough to keep the shape, but you don’t want to make it too puffy. It should just look like a little hockey puck.
Rnd 13: dec 6 times. Sl st to next st to join. (6) Break off leaving about 10 inches of yarn. Weave needle thru front loop of remaining 6 sc and pull to close. Tie off. If your cake seems too puffy (mine often does), put a stitch or two through the very center of the cake and tie off again. Weave in ends.
Frosting:
You can either work Frosting in 1 color or 2 colors. If using 2 colors, simply work 2 rows in 1 color, and 2 rows in the next color.
With FC1 and H hook, ch 21.
Row 1: Sk 1st ch, work 20 sc evenly across. (20)
WORK REST OF PATTERN IN BLO.
Row 2: Ch 1, turn. (2 sc), 17 sc evenly across, dec. (20) If working 2 colors, drop FC1 and join FC2. You don’t have to carry FC1 along. Just leave it for now and pick it up after working next 2 rows in FC2, and keep alternating colors every 2 rows.
Row 3: Ch 1, turn. Dec, 17 sc evenly across. (2 sc). (20)
Alternate Rows 2 and 3 until you’ve completed 22 Rows.
If you are working in one color only, break off leaving a yard of yarn for sewing.
If you are working with 2 colors, work one more Row, Row 23, which is a repeat of Row 3, and then break off leaving a yard of yarn for sewing.
To form a tube, sew the last row of Cake to the first row of Cake, using a double-whipstitch to mimic the look of a row of single cochet. Tie off, but don’t cut any yarn, and keep the yarn on the tapestry needle.
To close one end of the tube, weave your needle in and out of the edge around the open hole. Go in and out about every other row. You can also tuck all your loose ends inside the tube so that you don’t have to weave them in later. This is where you can also hide the visible yarn loops from changing yarn colors. Pull tight to draw the opening closed. It should look like a nice spiral. Tie off to secure. Don’t cut yet.
Poke your needle through the center of the spiral and all the way though to the other/open side of the tube. Close up this end of the tube as you did before, weaving in and out, drawing closed, tying off. Tuck all your loose ends inside the tube so that you don’t have to weave them in later. You should now have a nice spirally frosting blob that fits perfectly on top of your Cake.
Cherry
Pull out about 8 inches of Red, and with H hook, make magic circle, or ch 3 and sl st to 1st ch to form ring.
Rnd 1: Ch 1, 6 sc into ring. (6) Don’t join rnds.
Rnds 2 – 3: 6 sc evenly around. (6) Sl st to next st to join. Break off leaving about 10 inches of yarn.
Wrap 8-inch yarn tail around your finger and then stuff it inside Cherry.
With tapestry needle, use 10-inch yarn tail to weave through remaining 6 sts and pull tight to close. Tie off. Then poke tapestry needle through bottom center and up through top center, pulling all the yarn through. Determine how long you want your cherry stem to be and tie a knot there. Trim yarn close to end of knot.
Assembly
I highly recommend hot glue to assemble your cupcake. So all you need to do is glue Frosting on top of Cake, and then Cherry on top of Frosting!
Then you can go nuts with decorating your little cupcake however you wish! I like using FabriTac for pompoms and GemTac for little seed beads and bugle beads. If you are attaching a hair clip to the bottom, I also recommend hot glue.