I think some of y’all are thinking really far ahead for the holidays and already asking me to re-post the turkey tissue box cozy pattern :). I like your style!
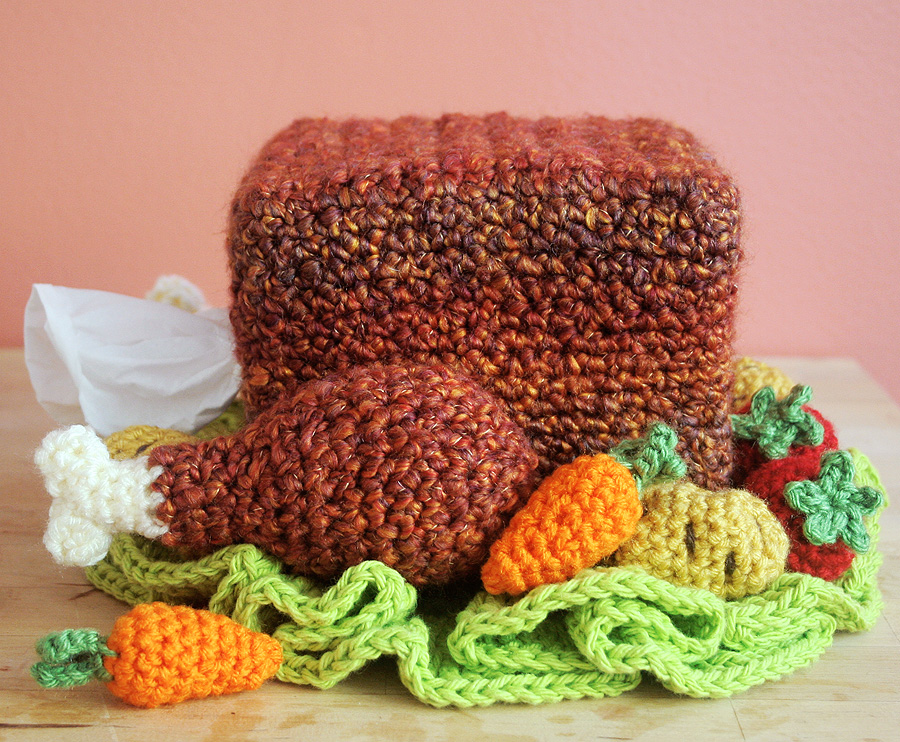
“In my family’s house, holiday time means Turkey Time! And you know me: I like my crochet decorations to be useful, so here is my pattern for a Turkey Tissue Box Cozy, complete with roasted veggie accents that you can turn into pins, hair clips, or magnets, plus a ruffled lettuce garnish that is actually a dish cloth. This tissue cozy will be a savory and festive accent for your home and is also a fantastic hostess gift!”
Materials List
- Crochet Hook, size J10/6.0mm, H8/5.00mm, and G6/4.00mm
- Lion Brand® Homespun® in Wild Fire – 1 skein
- Lion Brand® Vanna’s Choice® Baby in Lamb – approx. 20 yards
- Polyfill stuffing
- Scissors
- Tapestry needle
- Cube-shaped tissue box
- Optional: stitch markers, hot fabric glue sticks and glue gun
- Optional yarn:
- Cherry Tomatoes
- Lion Brand® Vanna’s Choice® in Scarlet – approx. 10 yards per Tomato
- Lion Brand® Vanna’s Choice® in Fern – approx. 2 yards per Tomato
- Baby Carrots
- Red Heart® Super Saver® in Pumpkin – approx. 8 yards per Carrot
- Lion Brand® Vanna’s Choice® in Fern – approx. 2 yards per Carrot
- Potatoes
- Lion Brand® Vanna’s Choice® in Mustard – approx. 15 yards per Potato
- Lion Brand® Vanna’s Choice® in Chocolate – approx. 1 yard per Potato
- Lettuce Dish Cloth
- Lily® Sugar ‘n Cream® in Hot Green – 2 balls
Gauge
Lion Brand® Homespun® with J hook: 13 sc x 13 rows = 4 inches x 4 inches
Lion Brand® Vanna’s Choice® with H hook: 15 sc x 19 rows = 4 inches x 4 inches
Lily® Sugar ‘n Cream® with H hook: 15 sc x 16 rows = 4 inches x 4 inches
Special Stitches
inv dec (invisible decrease): Insert hook into FLO of next st, then insert hook into FLO of following st. [YO and pull through 2 loops] twice. Decrease complete.
Notes
For all pieces in this project, the right side of your work should show on the outside.
Abbreviations
BLO = back loop only
ch(s) = chain(s)
dc = double crochet
FLO = front loop only
hdc = half double crochet
rnd(s) = round(s)
sc = single crochet
sk = skip
sl st = slip stitch
st(s) = stitch(es)
tr = triple crochet
[ ] = repeat what is inside the brackets the number of times indicated
Turkey
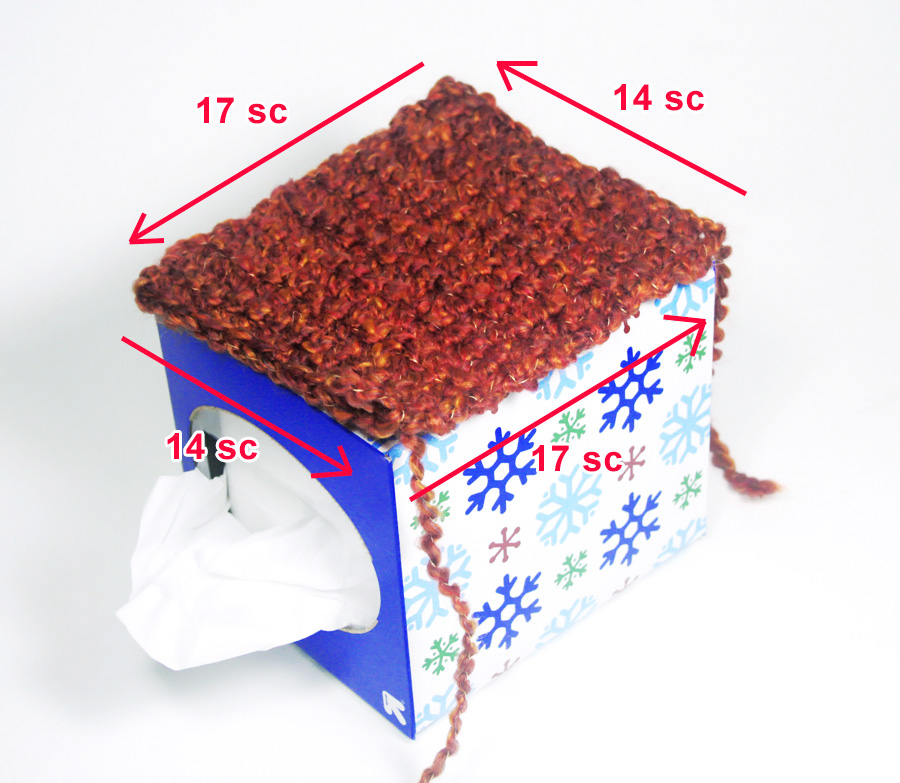
– Turn tissue box onto its side with the tissue sticking out horizontally. Make sure the opening slit of the tissue box is also oriented horizontally, not vertically. This is the orientation we will use as our model for the cozy. (Photo 1)
– With J hook and Wild Fire, ch 15.
Row 1: Sk 1st ch and sc evenly across. (14)
Rows 2 – 17: Ch 1, turn. Sc evenly across. (14) You’ve completed the top of the cozy. It should fit perfectly on the side of the box that we have now made the “top.” Continue working in the round around the rectangle you just made in order to crochet the four sides of the cozy. One of the sides will include the opening for the tissue.
– You may want to put a marker here to remind you how many rounds you will be working and to remind you where the beginning of each round is.
Rnd 1: Ch 1 and work 17 sc evenly down the edge of Rows 1-17 (1 sc each for 17 rows). On the short edge of the rectangle, work 14 sc evenly. Then work 17 more sc down the other long edge of the rectangle, and then 14 sc again across the short edge. (62) (Photo 2)
Rnds 2 – 8: Keep sc’ing evenly around, without joining rounds, to avoid a visible seam.
Rnd 9: In this rnd, create the opening for the tissue. 17 sc evenly down the long side. 2 sc evenly down the short side, ch 10 (not too tightly since you’ll be crocheting in these later), sk 10 sc, then work 2 more sc to finish the short side. Continue to sc evenly around as before. Fit the cozy onto the tissue box to make sure that your tissue opening actually lines up with the opening on the box. It should be fairly centered. If it’s not, you can add or subtract a few sc’s before your ch 10. (Photo 3)

Rnd 10: Continue to sc evenly around. When you reach the ch 10, and if you find that it’s hard to see where the chains are in the boucle, just remember to work 10 sc evenly across those 10 chs.
Rnds 11 – 17: Keep working sc evenly around. After Rnd 17, fit the cozy onto your box. If the cozy seems too tall, you can always undo a round. If the cozy seems too short, add more rnds. Make sure your last round ends at the corner of the box for the cleanest look. Sl st to the next sc, break off, and weave in all ends. Keep the cozy on the box for now as you crochet and position Legs.
Legs: Make two
– With Wild Fire and J hook, make magic circle, or ch 3 and sl st to 1st ch to form ring.
Rnd 1: Ch 1 and work 6 sc into ring. Sl st to 1st sc to join. (6)
Rnd 2: Ch 1 and work 2 sc in each st around. Sl st to 1st sc to join. (12)
Rnd 3: Ch 1. [2 sc in next st, 1 sc each in next 2 sts] 4 times. Sl st to 1st sc to join. (16)
Rnd 4: Ch 1. [2 sc in next st, 1 sc each in next 3 sts] 4 times. Sl st to 1st sc to join. (20)
Rnds 5 – 8: Ch 1 and work sc evenly around. Sl st to 1st sc to join. (20)
Rnd 9: Ch 1. [inv dec, then 1 sc each in next 3 sts] 4 times. Sl st to 1st sc to join. (16)
Rnd 10: Ch 1. [inv dec, then 1 sc each in next 2 sts] 4 times. Sl st to 1st sc to join. (12)
– Start stuffing with polyfill. You don’t have to stuff too tightly. You just need enough to keep the drumstick’s shape.
Rnd 11: Ch 1. [inv dec, 1 sc in next st] 4 times. Sl st to 1st sc to join. (8)
Rnds 12-14: Ch 1. Work sc evenly around, stuffing lightly as you go. Sl st to 1st sc to join. (8) Break off Wildfire and join Lamb. Switch to H hook.
Rnds 15 – 18: Ch 1. Work sc evenly around, stuffing lightly as you go. Sl st to 1st sc to join. (8) Last chance to stuff!
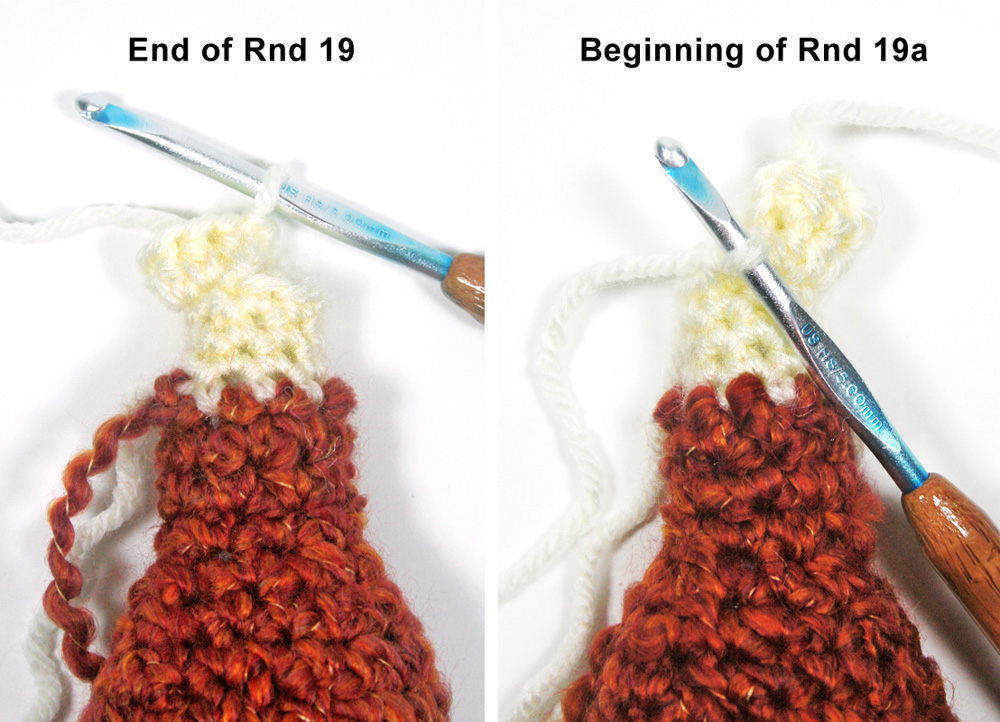
Rnd 19: In this rnd, you’ll start to create the first of two round nubs for the end of the Drumstick. Ch 2. Work 2 hdc in each of next 4 sts. Sk next 4 sts and sl st to 1st hdc to join. (8) (Photo 4)
Rnd 20: Ch 1. inv dec 4 times. Sl st to 1st sc to join. (4) Break off.
Rnd 19a: To make the second nub, re-join your yarn into the next free stitch of Rnd 18, and then work 2 hdc in each of 4 remaining sts. Sl st to 1st hdc to join. (8)
Rnd 20a: Repeat Round 20. (8) Break off. Weave in all ends. Skip to Assembly now if you choose to not crochet any veggies.
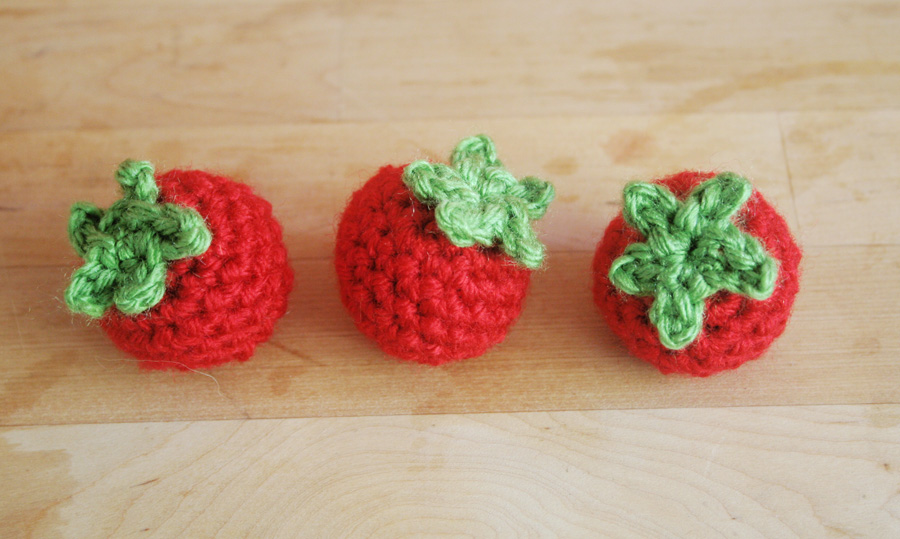
Cherry Tomato: Make as many as you like. Each Tomato uses approx. 10 yards of Scarlet and approx. 2 yards of Fern.
– Unravel 3 yards of Scarlet, cut it, and set it aside to use as stuffing later.
– With H hook and Scarlet, make magic circle, or ch 3 and sl st to 1st ch to form ring.
Rnd 1: Ch 1 and work 6 sc into ring. (6) Don’t join rnds.
Rnd 2: [2 sc in next st] 6 times. (12)
Rnd 3: [2 sc in next st, 1 sc in next st] 6 times. (18)
Rnds 4 – 6: Work 18 sc evenly around. (18)
Rnd 7: [inv dec, 1 sc in next st] 6 times. (12)
-Wrap the 2 yards of Scarlet you set aside around two fingers to create a small ball of yarn and stuff it inside Tomato.
Rnd 8: Inv dec 6 times. Sl st to next st to join. (6) Break off leaving about 10 inches of yarn. Weave through remaining 6 sts with tapestry needle and pull to close. Tie off and weave in end.
Tomato Top: Make the same number as Cherry Tomatoes.
– With H hook and Fern, make magic circle, or ch 3 and sl st to 1st ch to form ring.
Rnd 1: [Ch 3, sk 1st ch, 1 sl st each in remaining 2 chs, sl st into ring to join] 5 times.
– Break off leaving about 12 inches of yarn for sewing and sew Tomato Top to top of Cherry Tomato. Weave in ends.
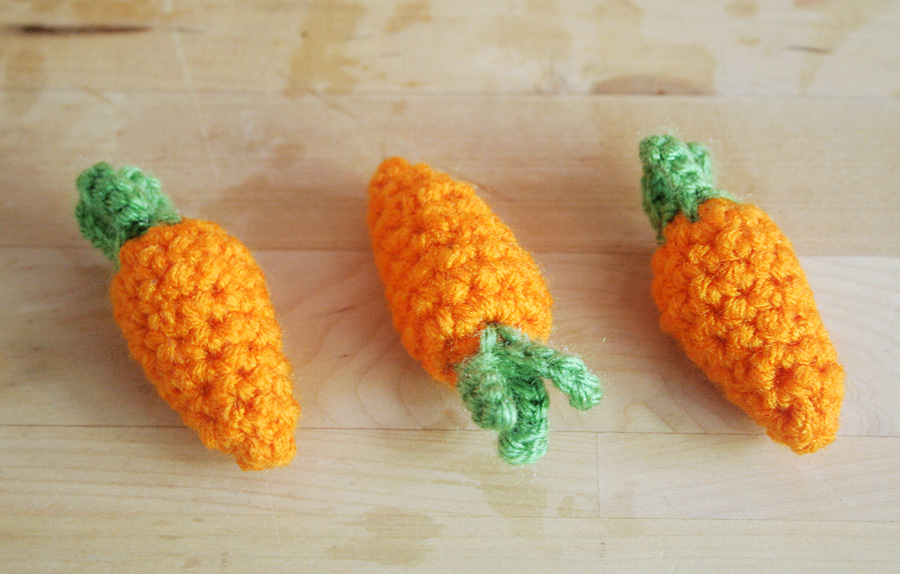
Baby Carrot: Make as many as you like. Each Carrot uses approx. 8 yards of Pumpkin and approx. 2 yards of Fern.
– Unravel 2 yards of Pumpkin, cut it, and set it aside to use as stuffing later.
– With H hook and Pumpkin, make magic circle, or ch 3 and sl st to 1st ch to form ring.
Rnd 1: Ch 1 and work 6 sc into ring. (6) Don’t join rnds.
Rnd 2: [2 sc in next st] 6 times. (12)
Rnds 3 – 4: Work 12 sc evenly around. (12)
– You’ll now decrease for the rest of the pattern. [inv dec, 1 sc each in the next 5 sts] 3 times. At this point, you should snip off some of the 2 yards of yarn you set aside to begin stuffing the Carrot. As you continue to decrease, keep stuffing a little whenever you can before the opening gets too small. [Inv dec, 1 sc each in the next 5 sts] 3 more times, until you have 6 sts remaining. Sl st to next sc to join. Make sure you’ve stuffed the carrot as much as possible. Break off leaving about 10 inches of yarn. Weave through remaining 6 sts with tapestry needle and pull to close. Tie off and weave in end.
Carrot Top: Make the same number as Baby Carrots.
– Insert G hook through top and center of Carrot and bring hook back up through Rnd 1 of Carrot, between any 2 the sts from that Rnd. Join Fern. (Photo 6)
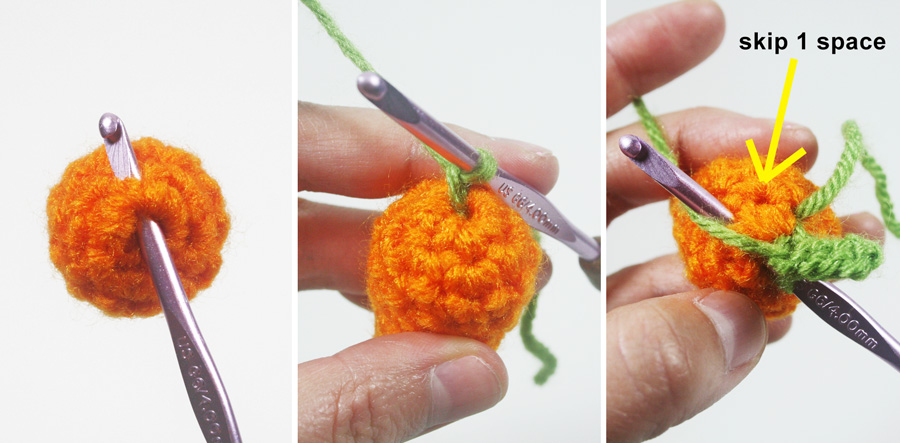
LEAF: Ch 5, sk 1st ch, and sl st in each of 4 remaining chs. Insert hook through top and center of Carrot again and bring hook back up through Rnd 1 of Carrot, skipping 1 space first. The 6 sc’s of Rnd 1 create 6 spaces for you to insert your hook. You’ll only be using 3 spaces to make 3 leaves, so that’s why you skip 1 space. Then sl st to join.
– Repeat LEAF 2 more times. Break off and weave in ends.
Potato: Make as many as you like. Each Potato uses approx. 15 yards of Mustard and approx. 1 yard of Chocolate.
– Unravel 5 yards of Mustard, cut it, and set it aside to use as stuffing later.
– With H hook and Mustard, make magic circle, or ch 3 and sl st to 1st ch to form ring.
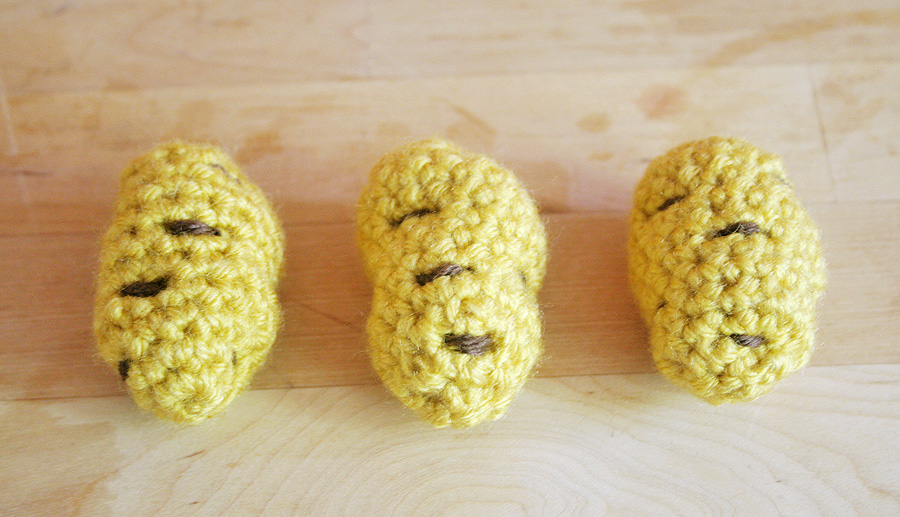
Rnd 1: Ch 1 and work 6 sc into ring. (6) Don’t join rnds.
Rnd 2: [2 sc in next st] 6 times. (12)
Rnd 3: [2 sc in next st, 1 sc each in next 3 sts] 3 times. (15)
Rnds 4 – 9: At the beginning of Rnd 4, you may want to use a stitch marker to help count your rnds. Work 15 sc evenly around. (15)
Rnd 10: [inv dec, 1 sc each in next 3 sts] 3 times. (12)
-Wrap the 5 yards of Mustard you set aside around three fingers to create a ball of yarn and stuff it inside Potato.
Rnd 11: inv dec 6 times. Sl st to next st to join. (6) Break off leaving about 10 inches of yarn. Weave through remaining 6 sts with tapestry needle and pull to close. Tie off and weave in end.
– Thread about a yard of Chocolate on a tapestry needle and embroider stitches in a horizontal direction all over the potato to create the “eyes.” I stitch over each eye 3 times. Tugging on the yarn as the needle travels through the potato to the next “eye” will warp the potato and give it a nice lumpy-bumpy look. The potato will also get lumpier if after working one eye, you thread your needle through the center of the potato and work your next eye on the other side of the potato. Tie off and weave in both ends when you’re done. (Photo 7)

Lettuce Dish Cloth
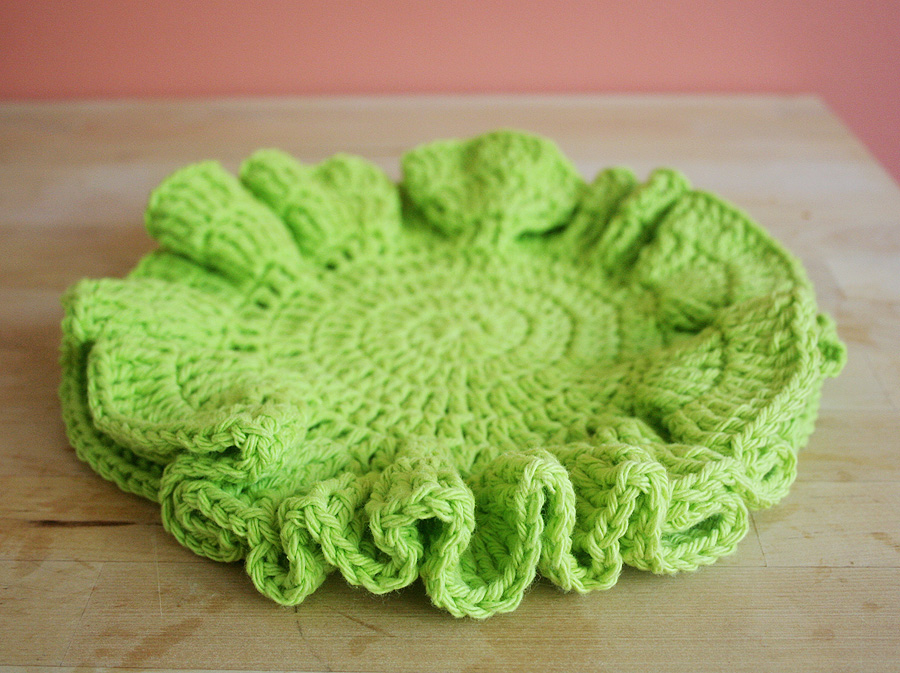
– With H hook and Hot Green, make magic circle, or ch 4 and sl st to 1st ch to form ring.
Rnd 1: Ch 1. Into ring, work 2 sc, 1 hdc, 10 dc. (13) Don’t join rnds.
Rnd 2: [2 dc in next st] 13 times. (26)
Rnd 3: [2 dc in next st, 1 dc in next st] 13 times. (39)
Rnd 4: [2 dc in next st, 1 dc each in next 2 sts] 13 times. (52)
Rnd 5: [2 dc in next st, 1 dc each in next 3 sts) 12 times. 2 hdc in next st, 1 hdc in next st, then 1 sc each in next 2 sts. Sl st to next st to join. (65)
Rnd 6: Ch 4 and work 3 tr in each st around (65 times). Sl st to 1st tr to join. (195)
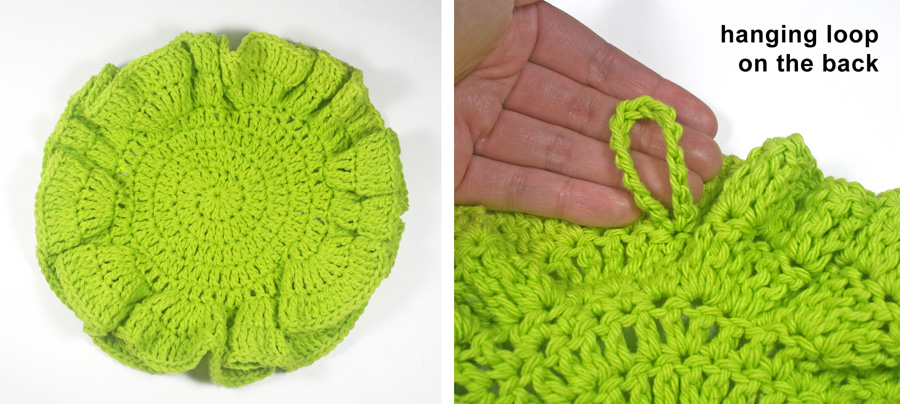
Rnd 7. To create a loop for hanging, ch 15 and sl st into BLO of same st. This leaves the front loop free to be worked at the end of this rnd. Your ruffle will hide the hanging loop. Ch 4 and work 2 tr in each st around (195 times). Sl st to 1st tr to join. (390) Break off and weave in ends.
Assembly
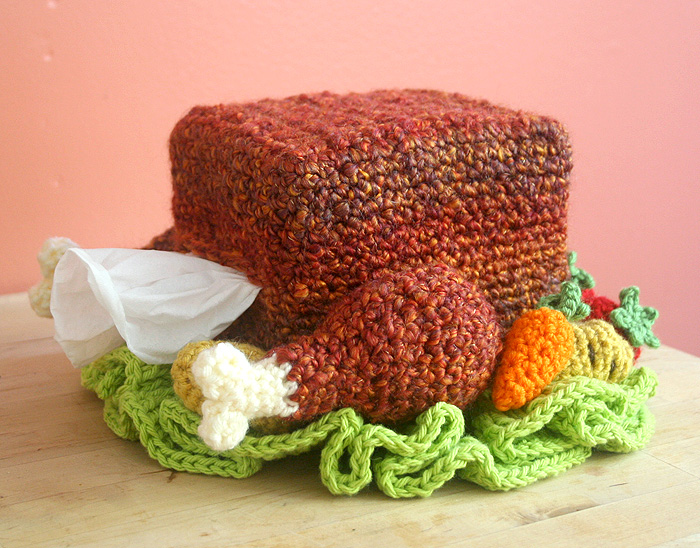
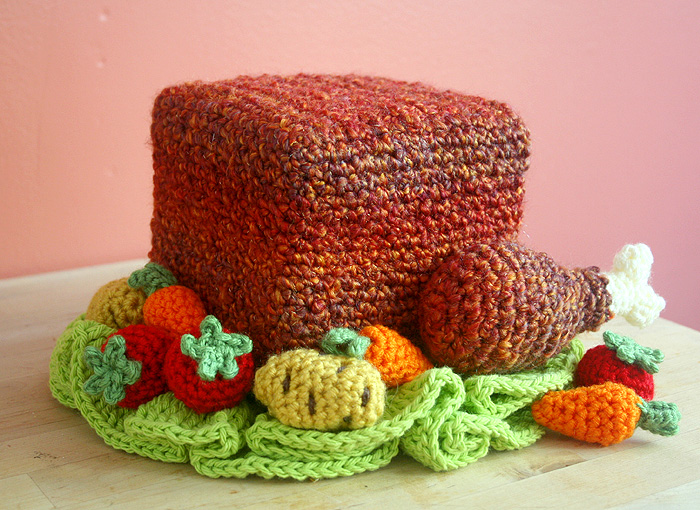
1. Using Wild Fire and tapestry needle, sew one Leg to each side of Turkey with the Lamb portion of Legs pointing in the same direction as the tissue coming out of the box. You can use whatever method you wish to attach the Legs, but here is mine: I position a Leg onto the Turkey while the Turkey is on still on the tissue the box. Then, while holding onto the Leg, I pull the Turkey off the box and pin the Leg in place from the inside of the cozy. I then sew the pieces together by working from the inside of the cozy, dipping my needle thru the Turkey and into the inside of the Leg and then back toward the inside of the Turkey to keep the stitches invisible from the outside. Don’t sew all the way to the end/bone of the Leg, since you want that part to stick out, and also don’t stitch too close or too far away from the edge of the Leg (Photo 9). Too close to the edge, and your Leg will pull on the cozy when you’re done sewing. Too far from the edge, and your Leg will droop and dangle. I find that it’s safe to start sewing closer to the center line of the Leg, fit the cozy on the box, and if the Leg is still droopy, stitch another row closer to the edge of the drumstick. If all the sewing drives you nuts, use hot glue!

2. Stick Lettuce Dish Cloth underneath your Turkey and then arrange your roasted veggies all around. If you glue magnets to the backs of your veggies and then place everything inside a clean roasting tin, you’ll have a really great present to give to someone for their kitchen: tissue cozy, fridge magnets, and dish cloth!