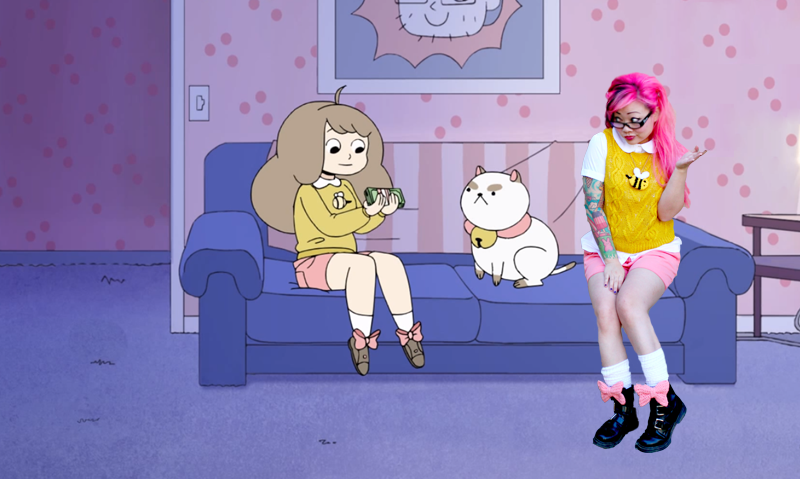
A couple gals on Instagram have been talking about the cartoon Bee and PuppyCat on YouTube, so I had to go see what the hubbub was all about.
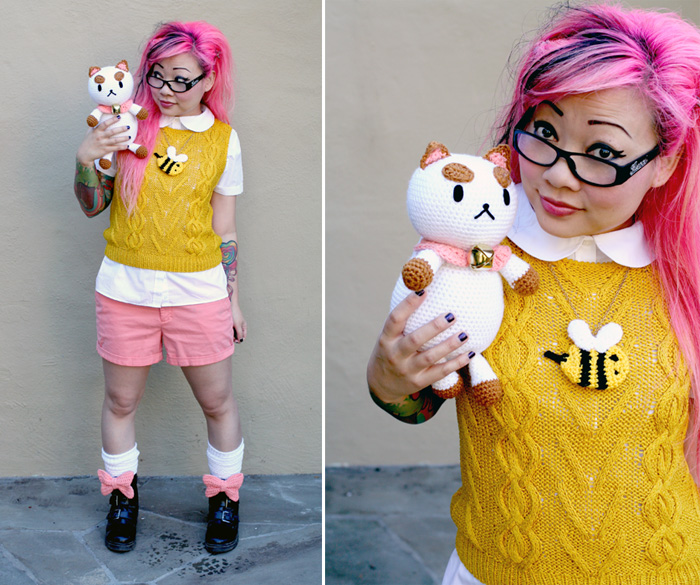
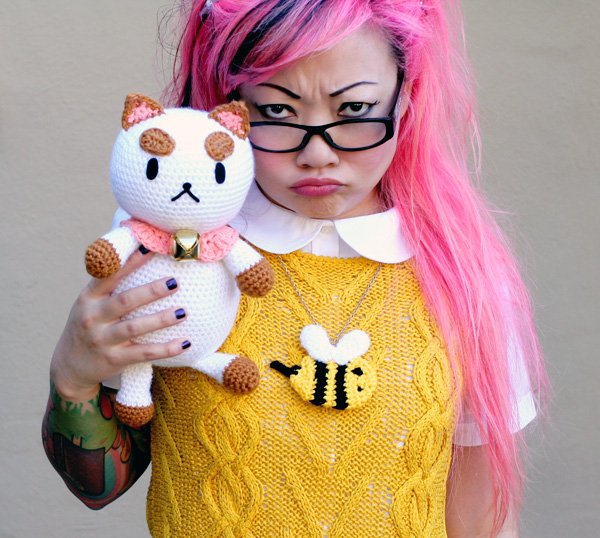
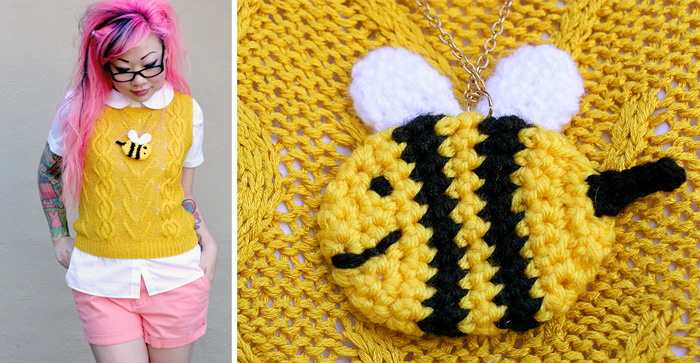
It is kind of weird, but oddly intriguing. I believe “surreal” is the word that fans use. Created by Natasha Allegri, an artist for Adventure Time, Bee and PuppyCat is about a girl named Bee and her adventures in this world and in an alternate world with her cat/dog/youdontreallyknow PuppyCat. After watching the episode online, I really wanted to put together an outfit inspired by the one that Bee wears! Unfortunately, I didn’t notice until too late that my bee necklace had turned the wrong way, so you can’t really see its cute smile! Oh well! C’est la bee.
I get really hot in long-sleeved sweaters, so I opted for a sweater vest. I also liked the idea of making the bee a necklace instead of an applique, so that each piece could be worn with other pieces. I then couldn’t decide if I wanted PuppyCat to be a hair piece or a plush, so I started with a plush!
Then I started getting crazy.
And then a bit crazier: BATTLEMODE!
I think my new goal should be that all my outfit posts will involve really bad animated gifs!
Anyway, I wrote down the crocchet pattern for the bee applique/necklace, the bows on my shoes, and….PuppyCat! (Or, just a regular cat, too, whatever you want!) I’ll do more specific photos for the bows in the next few days. I really like how those turned out!
Shirt: French Toast (school uniform!), Vest: Liz Claiborne via Etsy, Shorts: Victoria’s Secret, Boots: Forever21
What you’ll Need
- H8/5.00mm crochet hook
- Tapestry needle
- Scissors
- Yarn for Bee Necklace: worsted weight Yellow (I used Deborah Norville Everyday Soft Worsted in Lemon), worsted weight Black (I used Lion Brand Vanna’s Choice in Black), worsted weight White (I used Lion Brand Vanna’s Choice in White)
- Yarn for Boot Bows: worsted weight Pink (I used Lily Sugar n Cream in Tea Rose because it perfectly matched my shorts), shoe clips if you have them
- Yarn for Puppycat Hair Clip and/or Plush: worsted weight White (I used Lion Brand Vanna’s Choice in White), worsted weight Tan/Brown (I used Lion Brand Vanna’s Choice in Honey), worsted weight Black (I used Lion Brand Vanna’s Choice in Black), worsted weight Pink (I usedLily Sugar n Cream in Tea Rose ), black felt, fabric glue, small golden bell.
Special Stitches
inv dec, or invisible decrease: insert hook into FLO of next st, then insert hook into FLO st after that. [YO, pull through 2 loops] 2 times.
inv hdc dec, or invisible half double crochet decrease (I think I just made that up, but I don’t know what else to call it or how to indicate it!): YO, insert hook into FLO of next st, then insert hook into FLO of st after that. YO, pull through 2 loops. YO, pull through remaining 3 loops.
Notes
Whenever I crochet toys, I prefer the right side of the work to appear on the outside of the toy.
Bee (very similar to pattern for Goldfish Cracker pin except this time, you’ll turn after after ever round and not have to deal with that Next Stitch/Same Stitch stuff.)
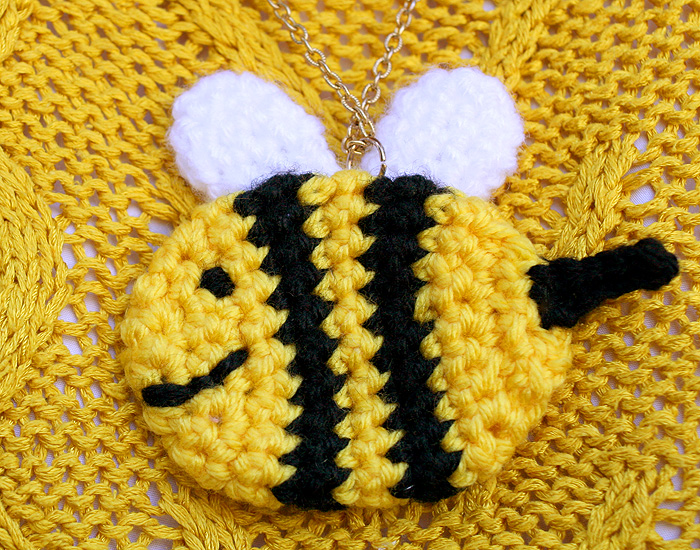
Body
With Yellow, make magic circle, or ch 3 and sl st to 1st ch to form ring.
Rnd 1: Work 6 sc into ring. Sl st to 1st sc to join. (6)
Rnd 2: Ch 1, turn. (2 sc) 6 times. Sl st to 1st sc to join. (12)
Rnd 3: Ch 1, turn. [(2 sc), 3 sc] 3 times. Sl st to 1st sc to join. (15)
Rnd 4: Ch 1, turn. [(2 sc), 4 sc] 3 times. Sl st to 1st sc to join. (18) Drop Yellow on the inside of the bee and pick up Black.
Rnd 5: Ch 1, turn. [(2 sc), 8 sc] 2 times. Sl st to 1st sc to join. (20)
Rnd 6: Ch 2, turn. Sc evenly around. Sl st to 1st sc to join. (20) Drop Black inside of the bee and pick up Yellow again.
Rnds 7-8: Ch 1, turn. Sc evenly around. Sl st to 1st sc to join. (20) Drop Yellow. Pick Black.
Rnds 9-10: Ch 1, turn. Sc evenly around. Sl st to 1st sc to join. (20) Break off Black. Pick up Yellow.
At this point, you can also weave in any loose ends you have so far, and also embroider an eye and a happy smile on the bee’s face so you can still hide any messy stuff inside.
Rnd 11: Ch 1, turn. [sc2tog, 8 sc] 2 times. Sl st to 1st sc to join. (18)
Rnd 12: Ch 1, turn. [sc2t0g, 4 sc] 3 times. Sl st to 1st sc to join. (15)
Rnd 13: Ch 1, turn. [sc2tog, 3 sc] 3 times. Sl st to 1st sc to join. (12)
Rnd 14: Ch 1, turn. sc2tog 6 times. Sl st to 1st sc to join. (6)
Break off Yellow, leaving about 10 inches of yarn. With tapestry needle, weave end through last 6 sts and pull to close. Tie off and weave in ends.
Stinger
Insert your hook into the back end and center of the bee and join Black. Ch 6. Sk 1st ch, then work 4 sl st. 1 sc in last ch and join with sl st back into the bee as close to where you inserted your hook to begin with without actually being in the same st. Break off and weave in ends.
Wings (Make 2)
With White, make magic circle, or ch 3 and sl st to 1st ch to form ring.
Right Side of work should show on outside of wing.
Rnd 1: Ch 1 and work 6 sc into ring. (6) Don’t join rnds.
Rnd 2: [(2 sc), 1 sc] 3 times. (9)
Rnd 3: Work 9 sc evenly. (9)
Rnd 4: sc2tog, 7 sc. (8)
Rnd 5: sc2tog, 6 sc. (7)
Rnd 6: sc2tog, 6 sc. (6) Sl st to next st to join.
Break off leaving 12 inches for sewing.
Assembly
1. I made the wings kind of long in shape so that there would be room to maneuver them around the back of the bee. Try to arrange the wings into a v-shape and then sew each wing to the back of the bee without any white stitches showing through to the front. You could also just weave and trim all the ends of the wings and then glue them to the back of the bee.
2. If you want to keep this as a pin or applique, you can glue on a pinback now, or you could sew the bee to a sweater now. I inserted a very large jump ring to the top and center of the bee’s body and then ran a necklace chain through it.
Shoe Bows (Make 2)
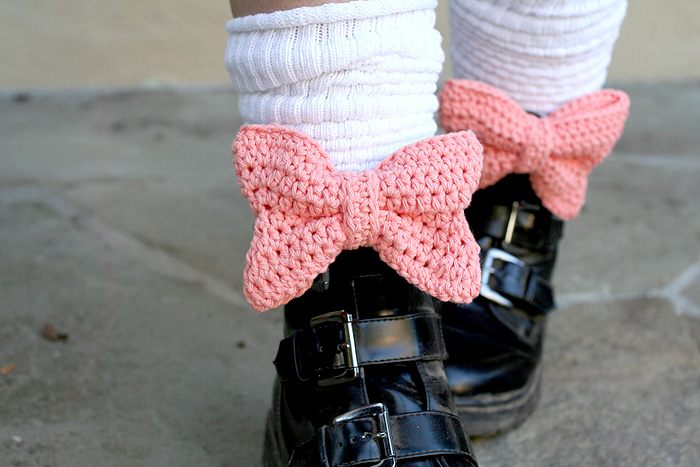
Main Part
With Tea Rose, ch 44 and sl st to 1st ch to form ring, making sure there is no twist in the chain.
Rnd 1: Ch 2 and work 44 hdc evenly around. Sl st to 1st hdc to join. (44) For the remainder of the Main Part, work the first hdc of the next rnd in the same st as your ch 2.
Rnd 2: Ch 2. 8 hdc evenly, inv hdc dec 3 times, 16 hdc evenly, inv hdc dec 3 times, 8 hdc evenly. Sl st to 1st hdc t0 join. (38)
Rnd 3: Ch 2. 6 hdc evenly, inv hdc dec 3 times, 14 hdc evenly, inv hdc dec 3 times, 6 hdc evenly. Sl st to 1st hdc to join. (32)
Rnd 4: Ch 2. 4 hdc evenly, inv hdc dec 3 times, 12 hdc evenly, inv hdc dec 3 times, 4 hdc evenly. Sl st to 1st hdc to join. (26)
Rnd 5: Ch 2. 4 hdc evenly, (2 hdc) 3 times, 12 hdc evenly, (2 hdc) 3 times, 4 hdc evenly. Sl st to 1st hdc to join. (32)
Rnd 6: Ch 2. 6 hdc evenly, (2 hdc) 3 times, 14 hdc evenly, (2 hdc) 3 times, 6 hdc evenly. Sl st to 1st hdc to join. (38)
Rnd 7: Ch 2. 8 hdc evenly, (2 hdc) 3 times, 16 hdc evenly, (2 hdc) 3 times, 8 hdc evenly. Sl st to 1st hdc to join. (44)
Rnd 8: Ch 2. Hdc evenly around. Sl st to 1st hdc to join. (44) Break off and weave in ends.
The seam will be the center back of your bow.
Center Band
Ch 13. Sk 1st ch and work 11 sc evenly across. In the last ch, work 3 sc. Working on the other side of your foundation chain, work 11 sc evenly across. Break off leaving 12 inches of yarn for sewing.
Assembly
1. Consider securing the shape of your bow first by pinching the center and running a threaded tapestry needle through the center a few times, making sure everything looks symmetrical. This way, the Main Part won’t move around while you sew on the Center Band.
2. Wrap the Center Band around the middle of the Main Part and sew the ends of the Center Band together at the back of the bow (where all the seams are). Tie off and weave in ends.
(I will do a separate post with photos for the bows and maybe a video a bit later.)
PuppyCat Plush
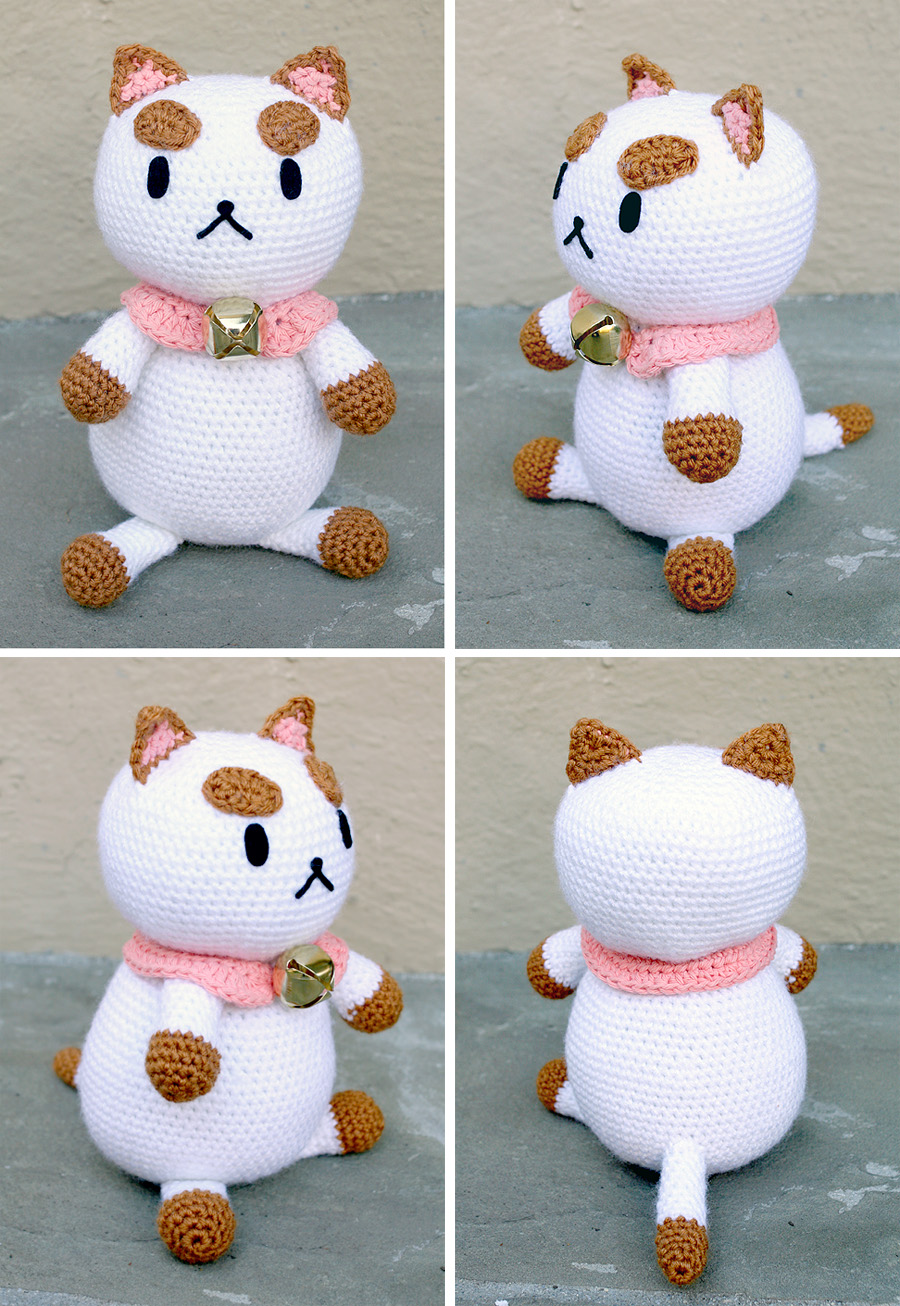
Head
Starting at the top of the Head, with White, make magic circle, or ch 3 and sl st to 1st ch to form ring.
Rnd 1: Ch 1, work 7 sc into ring. (7) Don’t join rnds.
Rnd 2: (2 sc), 7 times. (14)
Rnd 3: [(2 sc), 1 sc] 7 times. (21)
Rnd 4: [(2 sc), 2 sc] 7 times. (28)
Rnd 5: [(2 sc), 3 sc] 7 times. (35)
Rnd 6: [(2 sc), 4 sc] 7 times. (42)
Rnd 7: [(2 sc), 5 sc] 7 times. (49)
Rnd 8: [(2 sc), 6 sc] 7 times. (56)
Rnd 9: [(2 sc), 7 sc] 7 times. (63)
Rnds 10-20: Work sc evenly around. (63)
Rnd 21: [inv dec, 7 sc] 7 times. (56)
Rnd 22: [inv dec, 6 sc] 7 times. (49)
Rnd 23: [inv dec, 5 sc] 7 times. (42)
At this point, start to stuff the Head. Stuff firmly to round it out, and keep stuffing as you keep decreasing.
Rnd 24: [inv dec, 4 sc] 7 times. (35)
Rnd 25: [inv dec, 3 sc] 7 times. (28)
Rnd 26: [inv dec, 2 sc] 7 times (21)
Rnd 27: [inv dec, 1 sc] 7 times (14)
Rnd 28: [inv dec] 7 times. (7)
Sl st to next st to join. Break off leaving about 12 inches. With tapestry needle, weave end through remaining 7 sts and pull to close. Tie off and break off.
Ears (Make 2)
With Pink, ch 2.
Row 1: Sk 1st ch, work 1 sc in 2nd ch. (1)
Row 2: Ch 1, turn. (3 sc). (3)
Row 3: Ch 1, turn. 1 sc, (2 sc), 1 sc. (4) Break off.
With Brown, repeat Rows 1-3, but don’t break off.
Place Pink triangle in front of Brown triangle, and then sc the edges of the rows of both pieces together to form a border around the “V”. Ch 1 and work (2 sc) in the first st. Then 1 sc each in the next 2 sts. At the tip of the V, work (3 sc), then 1 sc in the next 3 sts. I then work one more sc into the 1st sc of Row 3. Break off Brown leaving about 12 inches of yarn for sewing and weave in other ends. The Pink part is the front of the ear, and the Brown part is the back. Sew Ears to top of Head.
Eyebrows (Make 2)
With Brown, Ch 5. Sk 1st 2 chs. Work 2 hdc evenly. In last ch, work 5 hdc. Now working on opposite side of chs, work 1 hdc In last ch, work 4 hdc, then sl st to 1st hdc to join. Break off leaving about 12 inches of yarn for sewing. Sew on to face at a slight downward, grumpy angle.
Eyes, Nose, and Mouth
I started to crochet and embroider these features, but everything looked off to me, so I succumbed to cutting them out of wool felt and gluing them on. All this is up to you and what you think looks good!
Body
Starting at the butt, with White, make magic circle, or ch 3 and sl st to 1st ch to form ring.
Rnds 1 – 21: Repeat Rnds 1-21 of the Head. (56)
Rnds 22 – 25: Sc evenly around. (56)
Rnd 26: [inv dec, 6 sc] 7 times. (49)
Rnds 27-28: Sc evenly around. (49)
Rnd 29: [inv dec, 5 sc] 7 times. (42)
Rnd 30: [inv dec, 4 sc] 7 times. (35)
Sl st to next st to join. Break off leaving bout 2 feet of yarn for sewing.
Stuff Body as much as you can!
Arms and Legs (Make 4)
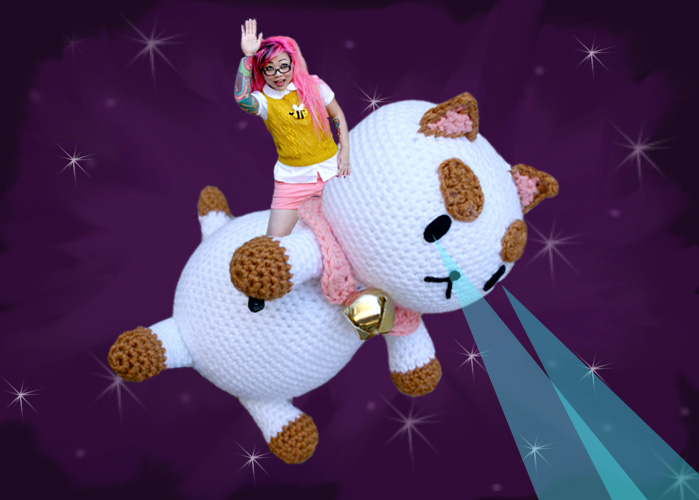
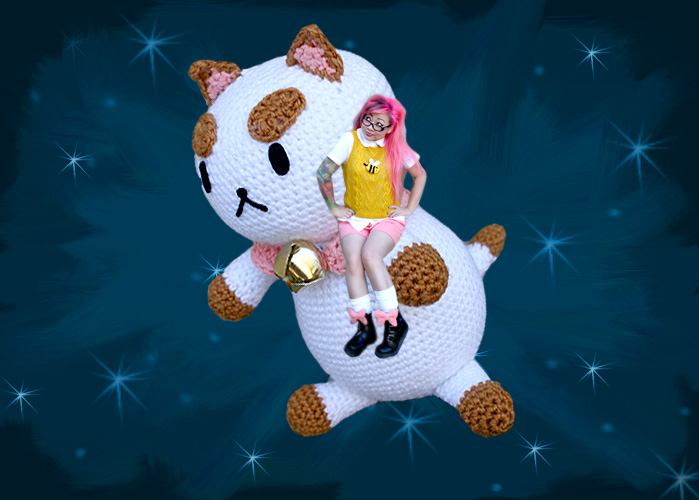
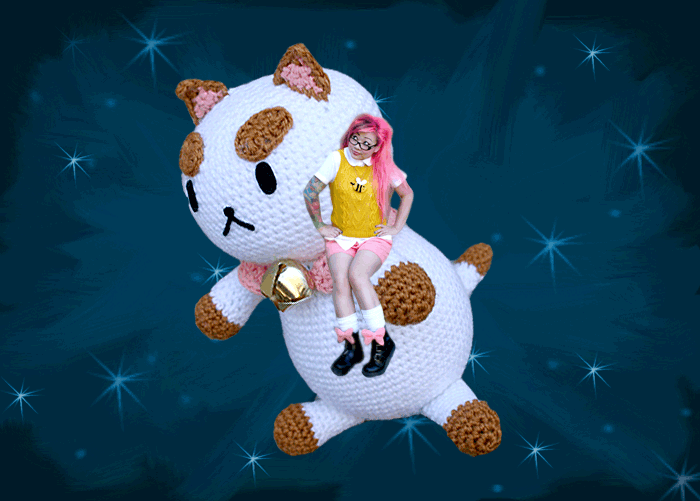
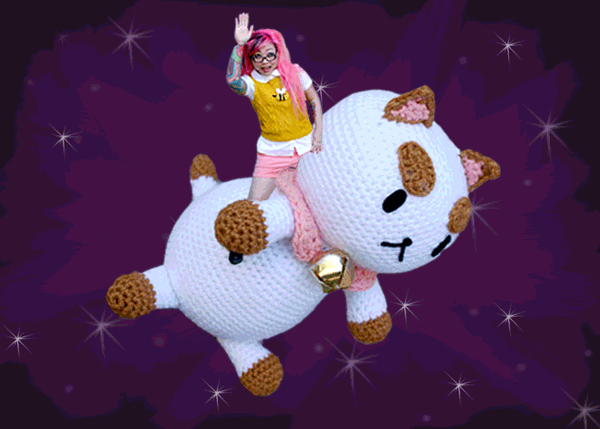
The thing about the arms and legs is … ultimately, you can vary the lengths of the limbs by adding more rounds. And you might need different length limbs depending on how you position your PuppyCat. For instance, if you place PuppyCat in a sitting position (Body attached to Head at an angle), you might work the arms and legs longer so that the arms reach the ground. If you place PuppyCat in a standing position or a laying down position, you can get away with shorter arms and legs. So, if you feel like it, you can actually decide what position you want and sew on the body first, in order to determine how long your limbs need to be. I had a hard time deciding what position I wanted to sew my PuppyCat into, and ultimately, I decided on standing. It seemed more authoritative! Although, I really like the idea of sewing one into a flying position and Photoshopping myself riding it.
With Brown, make magic circle, or ch 3 and sl st to form ring.
Rnd 1: Ch 1, work 6 sc into ring. Don’t join rnds. (6)
Rnd 2: (2 sc) 6 times. (12)
Rnd 3: [(2 sc), 1 sc] 6 times. (18)
Rnds 4-5: Sc evenly around. (18)
Break off Brown and join White.
Rnd 6: Sc evenly around. (18)
Rnd 7: [inv dec, 1 sc] 6 times. (12)
Rnds 8-15: Work sc evenly around. (12)
If you want your limbs longer, just keep crocheting around until you’ve reached your desired length. I worked my Legs only to Rnd 13. Sl st to next st and then break off leaving about 12 inches of yarn for sewing.
Tail
With Brown, make magic circle, or ch 3 and sl st to form ring.
Rnd 1: Ch 1, work 6 sc into ring. (6) Don’t join rnds.
Rnd 2: [(2 sc), 1 sc] 3 times. (9)
Rnds 3-6: Sc evenly around. (9)
Break off Brown and join White.
Rnds 7-16: Sc evenly around. Break off leaving about 12 inches of yarn for sewing.
Peter Pan Collar
With Pink, ch 39.
Row 1: Sk 1st ch, then work , 2 sc evenly, 34 hdc, and 2 sc. (38)
Row 2: Ch 1, turn. Sk 1st 2 sts. Then (3 htr), (2 htr), (2 dc), 27 hdc, (2 dc), (2 htr), (3 htr), sk 2 sts, then sl st in last st. (42) Break off. Don’t weave in ends yet.
Assembly
1. Stuff Arms & Legs. If your PuppyCat is sitting upright, like mine, only stuff the bottom half of the Arms and Legs, so that you can just squish the top flat and sew the limbs on like that. This way, your arms will lay flat against PuppyCat’s sides and the legs will lay flat while sitting. If you want your arms and legs to stick out more, then stuff all the way.
2. Stuff Tail.
3. Sew on Arms, Legs, and Tail.
4. Wrap Peter Pan Collar around PuppyCat’s neck and use the ends to tie the collar in front and also attach a gold bell. You can either sew everything down, or just leave it tied around. I’m leaving mine unsewn, because I feel like I might get sick of the bell! You could always crochet a fake bell, too, by making a small ball in gold/yellow yarn, and stitching a big X on the bottom with darker yarn.
ch(s): chain(s)
dc: double crochet
dec: decrease
FLO: front loop only
hdc: half double crochet
htr: half triple crochet
rnd(s): round(s)
sc: single crochet
sk: skip
sl st: slip stitch
( ): work everything in the parentheses into the next stitch
[ ]: work everything in the brackets the number of times indicated