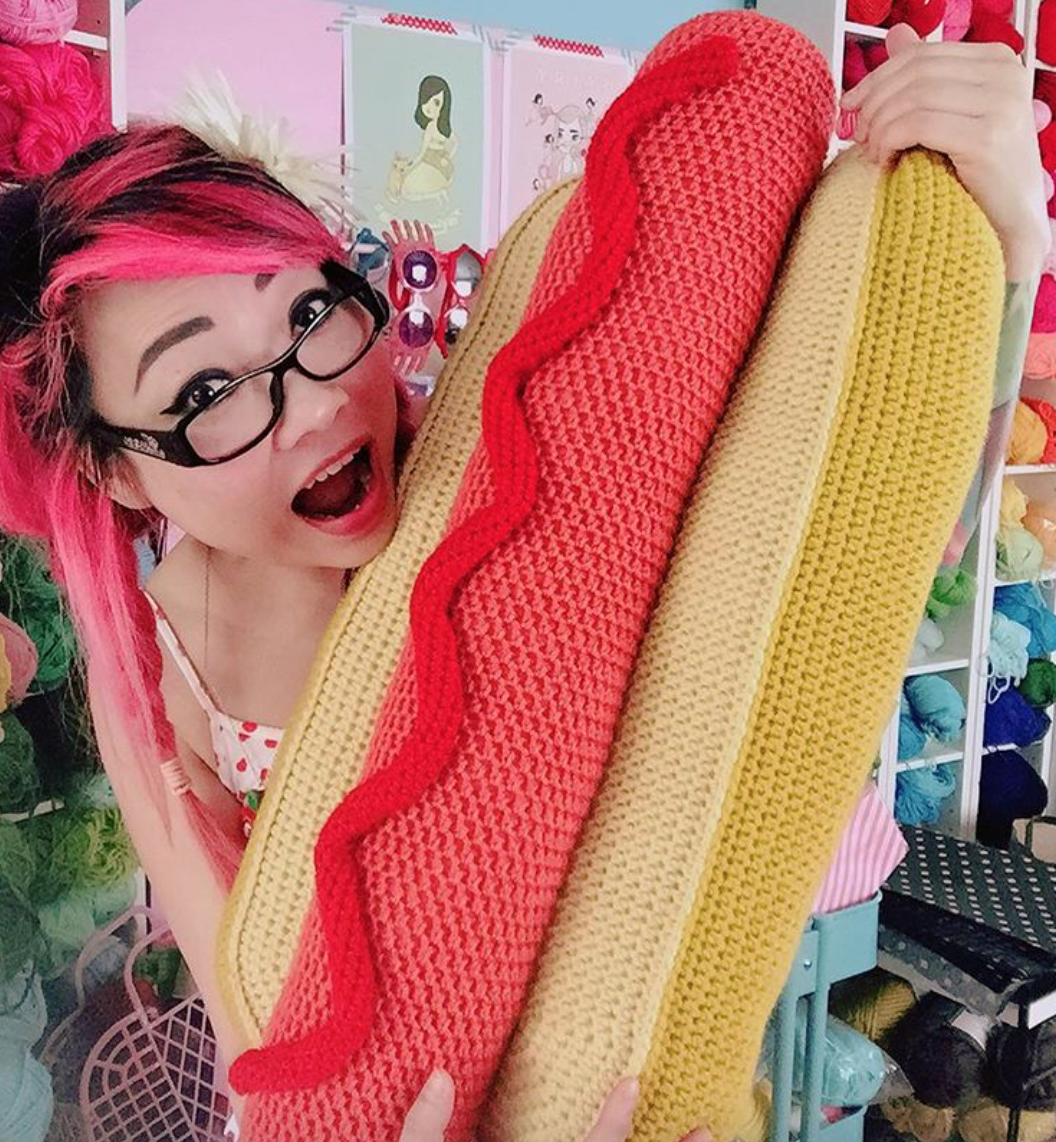
On the 4th of July, I showed up to the family bbq with this giant crocheted hot dog.
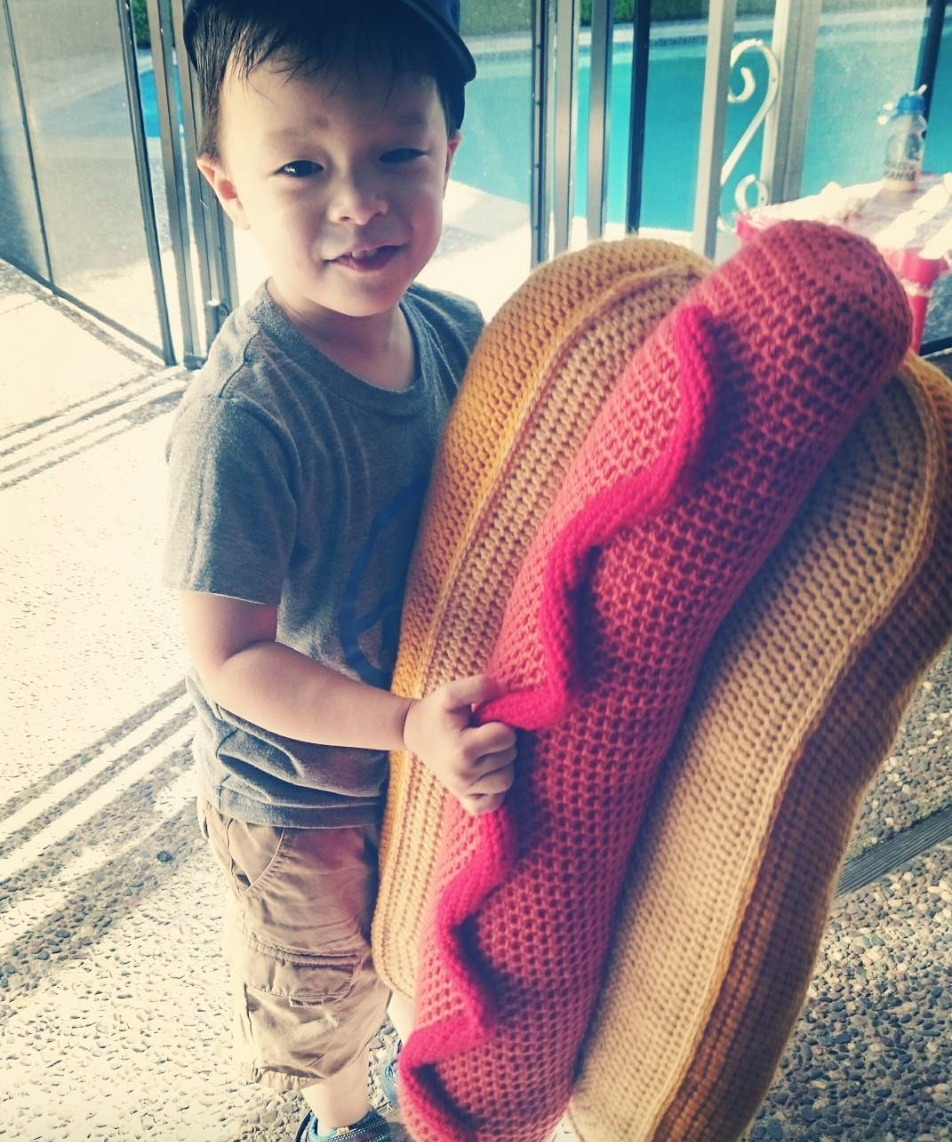
In all honesty, the hot dog was an extremely belated birthday present for my nephew who turned three. I was in L.A. for Vogue Knitting Live during his bday party, and then I kept making the wiener part of the hot dog too big, and now I have 2 extra wieners lying around the house. Anyway, I was FINALLY able to deliver my present!
Giant hot dog: here’s why. I made a big ol’ strawberry pillow for my mom a while ago, and for some reason, my nephew kept saying “thank you” to me for making it for him, so I thought I’d make him a giant food pillow, too. Also, this kid loves a barbecue, BUT, he actually only wants to eat the bun, not the dog. WE LOVE BREAD.
I didn’t have time to take a quality photos of the hot dog before I wrapped it up, so these phone pics will have to do for now (you know what a hot dog looks like anyway) until I happen to make another one again. Maybe for YouTube? Also, I didn’t have time to take down all the yardage info. I used Red Heart Super Saver for this project, so that should give you some idea. And just, like, a lot of stuffing… I spend a lot more time than I should trying to determine what the perfect hot dog color is, so I hope you enjoy Red Heart Super Saver in Coral. I enjoyed it a lot. Hotdoglicious.
(Please note that this pattern has not been tech-edited or proofread by anyone, so if you find any typos or errors, just let me know!)
Giant Hot Dog Pillow
Materials
- Worsted weight yarn in Beige, such as Red Heart Super Saver in Cornmeal – 1 skein
- Worsted weight yarn in Gold such as Red Heart Super Saver in Gold- 2 skeins
- Worsted weight yarn in Coral, such as Red Heart Super Saver in Coral – 1 skein
- Worsted weight yarn in Yellow or Red for mustard or ketchup, such as Lion Brand Vanna’s Choice in Scarlet – 1 ball (less than a whole ball, but I didn’t count the yardage)
- H8/5.00mm hook
- scissors
- tapestry needle
- stitch markers or small piece of scrap yarn
- polyester stuffing – at least one 2-lb bag, maybe two
- optional: straight pins
Abbreviations (US terms):
ch(s): chain(s)
hdc: half double crochet
invdec: invisible decrease
invhdcdec: invisible half-double-crochet decrease (what is the actual abbrev. for this!?)
rnd(s): round(s)
RS: right side
sc: single crochet
sk: skip
sl st: slip stitch
st(s): stitch(es)
WS: wrong side
( ): work everything inside the parentheses into the next stitch
[ ]: work everything inside the brackets the number of times indicated
Special Stitches
invdec – invisible (single crochet) decrease – insert hook in front loop of next stitch, then insert hook into front loop of following stitch, YO and pull through 1st 2 loops, YO and pull through remaining 2 loops.
invhdcdec – invisible half double crochet decrease – I have no idea what the abbreviation for this actually is, so just go with it for now 😛 . If this is driving you crazy, just substitute an hdc2tog – YO, insert hook in front loop of next stitch, then insert hook into front loop of following stitch, YO, and pull through 1st 2 loops, YO and pull through remaining 3 loops.
Gauge
Exact gauge is not super important here. If your toy turns out slightly larger or smaller than mine, it’s no big deal.
Notes
RS of your work should show on the outside of the project, unless noted.
Bun – Make 2
Bun Top
- The Bun Top is a long oval. This crocheted oval is essentially a rectangle that is 60 hdc long with two halves of an hdc circle on each side of that rectangle. You’ll notice “60 hdc” a lot in this pattern, with the half-circles getting larger as the rectangle grows wider. I hope this explains the way I wrote out the pattern, preserving those increase-motifs.
- Just in case this helps: starting with Rnd 2, the rnds begin in the middle of an increase-motif rather than just starting right away with an increase stitch. Working this way helped me to keep the center line of the oval straight (B), since the center lines of ovals tend to start rotating and angling when working in the round (A). I wanted to keep the beginning and ends of my rounds always at the top and center of my oval, or as close as possible.
- Also, starting with Rnd 2, you might be working extra stitches in each rnd, BUT, the final stitch count on the project should remain the same as what I note in the parentheses. So, let’s say, you might have worked 142 stitches at the end of Rnd 2, but your stitch count on the project is actually still 140, because you still only made 10 total increases. Hope that helps a bit. I do this to help fight the spiralling that occurs when you work in the rnd. At the end of each rnd, your hook ends up slightly behind where you started the rnd, and as this happens rnd after rnd, everything starts shifting slightly. So I add the extra stitches to help keep your hook as close to the center line as possible at the end of each rnd.

- With Beige, ch 63.
Rnd 1: Sk 1st ch, (sc, 2 hdc) in 2nd ch, 60 hdc until there’s 1 ch left, then (5 hdc). Working in opposite side of foundation chain, 60 hdc until there’s 1 ch left, then (2 hdc). Don’t join rnds. Use a stitch marker to keep your place. (130)
Rnd 2: hdc, (2 hdc) 2 times, 60 hdc, (2 hdc) 5 times, 60 hdc, (2 hdc) 3 times, hdc. (140)
Rnd 3: hdc, [(2 hdc), hdc] 2 times, 60 hdc, [(2 hdc), hdc] 5 times, 60 hdc, [(2 hdc), hdc] 2 times, (2 hdc). (150)
Rnd 4: hdc, [(2 hdc), 2 hdc] 2 times, 60 hdc, [(2 hdc), 2 hdc] 5 times, 60 hdc, [(2 hdc), 2 hdc] 2 times. (2 hdc), 2 hdc. (160)
Rnd 5: 2 hdc, [(2 hdc), 3 hdc] 2 times, 60 hdc, [(2 hdc) 3 hdc] 5 times, 60 hdc, [(2 hdc), 3 hdc] 2 times, (2 hdc), hdc. (170)
Rnd 6: 2 hdc, [(2 hdc), 4 hdc] 2 times, 60 hdc, [(2 hdc) 4 hdc] 5 times, 60 hdc, [(2 hdc), 4 hdc] 2 times, (2 hdc), 2 hdc. (180)
Rnd 7: 2 hdc, [(2 hdc), 5 hdc] 2 times, 60 hdc, [(2 hdc) 5 hdc] 5 times, 60 hdc, [(2 hdc), 5 hdc] 2 times, (2 hdc), 2 hdc. (190)
Rnd 8: 3 hdc, [(2 hdc), 6 hdc] 2 times, 60 hdc, [(2 hdc) 6 hdc] 5 times, 60 hdc, [(2 hdc), 6 hdc] 2 times, (2 hdc), 3 hdc. (200)
Rnd 9: 5 sc so that you’re back at the top and center of the oval. Leave remaining sts unworked.
- Sl st to next st to join.
- Break off and weave in ends.
Bun Bottom
- With Gold, work Rnds 1-8 of Bun Top.
Rnds 9-16: Work hdc evenly around. (200)
- Work 2 more sc evenly, then sl st to next st. You should now be at the center line of the hot dog bun. Do not break off.
- Place Bun Top over Bun Bottom. Use pins if you want to position the two pieces first, and then sl st Bun Top to Bun Bottom by slip stitching through both layers at the same time. Your hook will go through Bun Bottom first and then through Bun Top. Remembering to stuff as you sl st all the way around. I try not to overstuff the bun, because I want the Bun Top to remain somewhat flat instead of inflating outward, but you do want enough stuffing in there to be firm-ish so that it doesn’t get saggy with use.
- When you’ve worked all the way around, sl st to 1st sl st to join. Break off and weave in all ends.
Hot Dog
- With Coral, make magic circle, or ch 3 and sl st to 1st ch to form ring.
Rnd 1: Work sc, 9 hdc into ring. Don’t join rnds. Use a stitch marker to keep your place. (10)
Rnd 2: (2 hdc) 1o times. (20)
Rnd 3: [(2 hdc), hdc] 10 times. (30)
Rnd 4: [(2 hdc), 2 hdc] 1o times. (40)
Rnds 5 – ??: Keep working hdc evenly around and around and around until the Hot Dog is the same length as the Bun. After you finish and stuff the Hot Dog, it will end up slightly longer than the Bun, which is the look I was going for.
Start stuffing the Hot Dog now and continue to stuff as you finish it. I stuffed fairly firmly, but not so much that I could see a ton of stuffing bursting through the stitches.
I don’t know what rnd number this would be, so I’m going to make something up, like, 50, cuz it’s a nice round number.
Rnd 50: [invhdcdec, 2 hdc] 10 times. (30)
Rnd 51: [invhdcdec, hdc] 10 times. (20)
Rnd 52: invhdcdec 10 times. (10)
Rnd 53: invdec 5 times. (5)
- Sl st to next st to join.
- Break off leaving about 18 inches of yarn.
- With tapestry needle, weave through remaining 5 sts and pull to close. Tie off.
- While weaving in the end, you can also weave through any gaps you might find from working hdc decreases.
Mustard or Ketchup
I used ketchup here because I don’t know if my nephew has even tasted mustard, but you can put whatever toppings you like on your giant dog!
- With Red, make magic circle, or ch 3 and sl st to 1st ch to form ring.
- The WS of your work can show on the outside of this piece, which might make crocheting a bit easier. But you can pick whichever side you like.
Rnd 1: 7 sc into ring. (7)
Rnds 2 – ?: Work sc evenly around. (7)
- Just keep working sc around and around and around until your Ketchup is the same length as your Hot Dog. Before finishing the Ketchup, arrange it on top of the Hot Dog using pins, to see how much more you need to crochet. How much Ketchup you need depends on how much you want it to zig and zag, so use your best judgement re: how much you will ultimately need.
- When you have the length you need, sl st to next st to join. Break off leaving about 8 inches of yarn. With tapestry needle, weave through remaining 7 sts and pull to close. Tie off and weave in both ends.
Assembly
- String about a yard of Gold onto a tapestry needle. Place the 2 Buns next to each other with long sides touching. Use a whipstitch to sew the sides together where the Bun edges are straight and not on the ends where they are curved. You know, make it look like a split open hot dog bun.
- Place the Hot Dog inside the Buns. If I sewed the bottom of the Hot Dog to the bottom of my hot dog buns with one line of sewing, I would not get the look that I want. The buns would look too splayed open. So I put the Hot Dog in the position I want it to be in, leaving a bit of a gap between the bottom of the Hot Dog and the bun, and I sew each side of the bun, or each Bun Top, to each side of the Hot Dog. String about a yard of Beige on a tapestry needle and sew one Bun Top to to the Hot Dog, using somewhat of a mattress stitch, with the stitches traveling inside the three-dimensional pieces, then repeat on the other side of the Hot Dot with the other Bun Top.
- Pin Ketchup to top of Hot Dog. String about a yard of Coral onto a tapestry needle and sew the bottom of the Ketchup to the Hot Dog also using a mattress-ish stitch, zig-zagging up and down through the bottom layer of the Ketchup and the top layer of the Hot Dog. If you need more yarn, just tie off the old yarn, and string a new yard onto the needle.
- Hug, squeeze, share, and enjoy!