 I created this pattern for Michaels.com last year for a Mother’s Day promo.
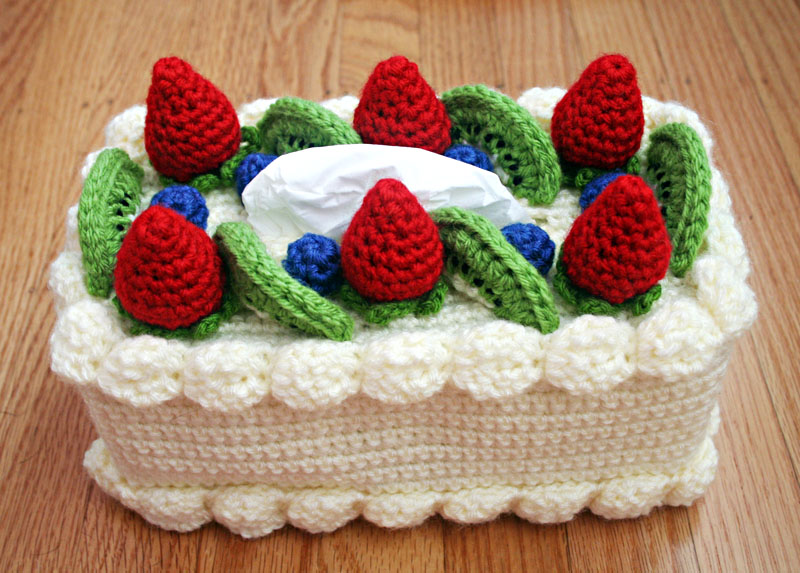
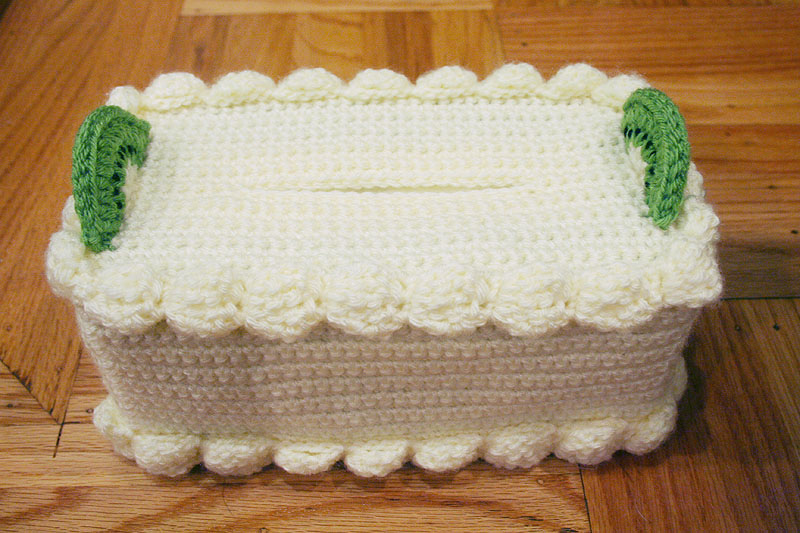
When I crochet gifts for my mom, I like to make cute things that she can use around the house. One of the first projects I ever made for her was a cake-themed tissue box cozy. So, this month, I had my mom in mind when I designed this crocheted chiffon cake with colorful strawberry, blueberry and kiwi topping. I remember eating delicious cakes just like it when I was little. I hope you have fun creating this yummy piece of my childhood memories. Consider making one as a gift to sweeten a special someone’s Mother’s Day!
Materials List
- Crochet Hook, size H/5.0mm, or whatever size needed to obtain gauge
- Lion Brand® Vanna’s Choice® Baby in Lamb – 2 balls
- Lion Brand® Vanna’s Choice® in Scarlet – approx. 70 yards
- Lion Brand® Vanna’s Choice® in Kelly Green – approx. 20 yards
- Lion Brand® Vanna’s Choice® in Fern – approx. 45 yards
- Lion Brand® Vanna’s Choice® in Black – approx. 6 yards
- Lion Brand® Vanna’s Choice® in Colonial Blue – approx. 18 yards
- 1 rectangular box of tissues (the box I used was 9 in. x 4.75 in. x 4 in.)
- scissors or yarn cutter
- tapestry needle for weaving in ends
- a handful of straight pins
Gauge
Gauge is only relevant when working the Cozy base.
Lion Brand® Vanna’s Choice®: 16 sc x 18 rows = 4 inches x 4 inches
Abbreviations
ch(s) = chain(s)
hdc = half double crochet
rnd(s) = round(s)
sc = single crochet
sc dec = single crochet decrease
sk = skip
sl st = slip stitch
st(s) = stitch(es)
YO = yarn over
[ ] = repeat what is inside the brackets the number of times indicated
Notes
Keep your tissue box close by, so you can check for good fit as you crochet. If your cozy ends up too big or too small, going down or up a hook size may help. For sizing the Cozy, the length of foundation chain corresponds to the length of the tissue box; the number of rows in the Cozy Top corresponds to the width of the tissue box; the number of rows in the Cozy Sides corresponds to the height of the tissue box. You can easily add or subtract to adjust to your tissue box size. The only semi-tricky thing to keep in mind is that the hole you create at the top for the tissue to come out should be centered.
Special Stitches
– Tall Bobble: I’m calling this a Tall Bobble because it uses a quadruple crochet stitch.
YO 3 times, insert hook into next stitch, YO and pull through 1 loop. [YO, pull through 2 loops] 3 times. You should have 2 loops on your hook.
YO 3 times, insert hook into same stitch, YO and pull through 1 loop. [YO, pull through 2 loops] 3 times. You should have 3 loops on your hook.
YO 3 times, insert hook into same stitch, YO and pull through 1 loop. YO, pull through 2 loops] 3 times. You should have 4 loops on your hook. YO and pull through all loops.
– sc dec: Single crochet decrease. In this pattern, work an “invisible decrease.” Insert hook into front loop of next stitch, then insert hook into front loop of stitch after that. You should have 3 loops on your hook. [YO, pull through 2 loops] 2 times.
Cozy
Cozy Top:
With Lamb, ch 37.
Row 1: Sk 1st ch, 36 sc evenly across. (36)
Rows 2-10: Ch 1, turn. Sc evenly across. (36)
Row 11: Ch 1, turn. 8 sc, ch 20, sk 20, and 8 sc, being careful not to twist your work. Your chs and sks create the hole for your tissue to come out of. (36)
Rows 12-21: Ch 1, turn. Sc evenly across. (36) Don’t break off.
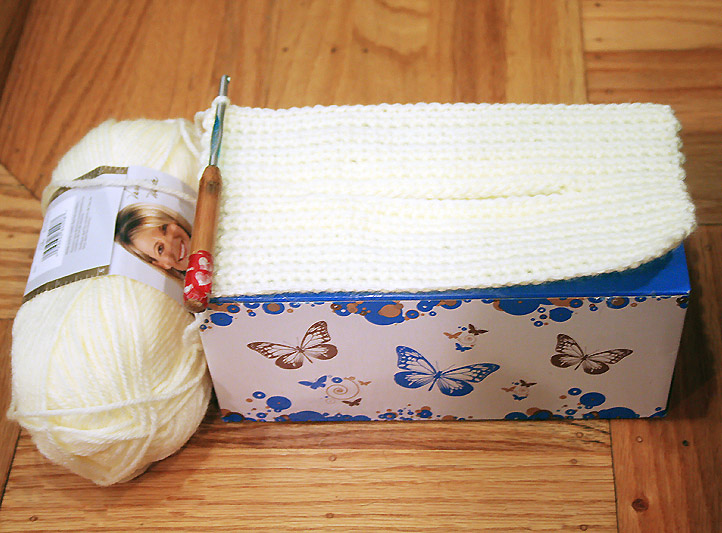
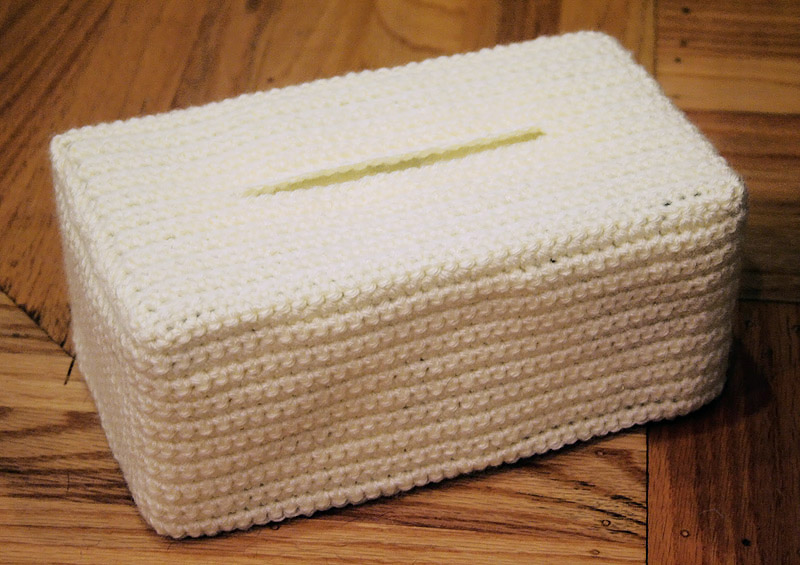
– You should now have a rectangle, with a slit in the middle for the tissue, that fits on top of your tissue box. (Photo 1)
– Now you’ll work around the rectangle to create the sides of the Cozy.
Cozy Sides:
Row 1: Without turning your work, ch 1 and work 21 sc (1 sc for each Row along the short side of the rectangle). Then work 36 sc evenly along the long edge. Work another 21 sc along the next short side. And then another 36 evenly along the last long edge. Sl st to 1st sc to join. (114)
Rows 2-19: Ch 1, turn. Work 1 sc in each stitch. Sl st to 1st sc to join. (114)
– Break off and weave in all ends. (Photo 2)
Frosting Trim (make 2)
With Lamb, ch 3.
Row 1: Sk 1st ch, 2 sc. (2)
Row 2: Ch 5, turn. [Tall Bobble] 2 times. (2)
Row 3: Ch 1, turn. 2 sc. (2)
– Repeat Rows 2 & 3 until you have enough Frosting Trim to fit all around the top of your Cozy. Check the length with the Cozy on your tissue box. Be sure to complete a Row 3 before breaking off, leaving an arm’s length of yarn for sewing. For the top of this Cozy, I ended up working 23 rows of Tall Bobbles.
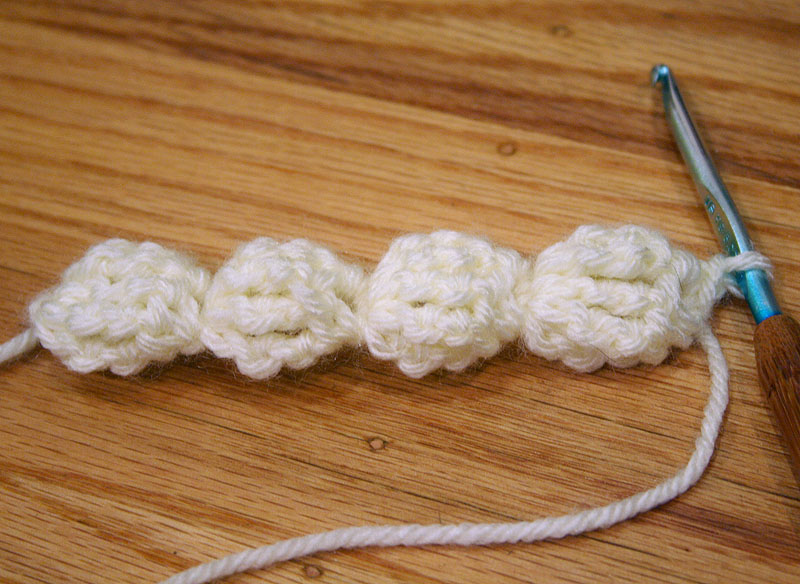
– In order for the 2nd Frosting Trim to fit around the bottom edge of the Cozy, you may need to work 1 or 2 more rows of Bobbles. Be sure to fit the Trim around your Cozy before breaking off and leaving an arm’s length of yarn for sewing. (See Photo 3 for a sample of 4 Tall Bobble rows.)
Strawberry (make 6)
With Scarlet, make adjustable ring, or ch 3 and sl st to 1st ch to form ring.
Don’t join rounds. Right Side of work should show on outside of Strawberry.
Step 1: Ch 1, 6 sc into ring (6)
Step 2: [2 sc into next st, 3 sc evenly] Repeat 12 times until you have 18 sc. (18)
Step 3: [Sc dec, 1 sc] 6 times. (12)
Keep hook in your work, but break off leaving an arm’s length of yarn to continue crocheting with later. Use more red yarn from the skein to stuff Strawberry.
Continue to crochet. [Sc dec] 6 times. Sl st to next st to join. (6)
– Break off leaving approx. 8 inches of yarn. With tapestry needle, use yarn tail to close hole by weaving through remaining 6 sts. Break off and weave in end.
Strawberry Top (make 6)
With Kelly Green, make adjustable ring, or ch 3 and sl st to 1st ch to form ring.
Rnd 1: Ch 1, 6 sc into ring. Sl st to 1st ch to join. (6)
Rnd 2: [Ch 8, sl st into next st] 6 times. (6)
– Break off leaving 18 inches of yarn for sewing later. Weave in beginning tail.
Kiwi Slice (make 6)
With Lamb, make adjustable ring, or ch 3 and sl st to 1st ch to form ring.
Rnd 1: Ch 2, work 10 hdc into ring. Sl st to 1st hdc to join, dropping Lamb and joining Fern. (10)
Rnd 2: Ch 2, work 2 hdc in each st. Sl st to 1st hdc to join. (20)
Rnd 3: Ch 2, [2 hdc in next st, 1 hdc in next st] 10 times. Sl st to 1st hdc to join. Don’t break off yet. (30)
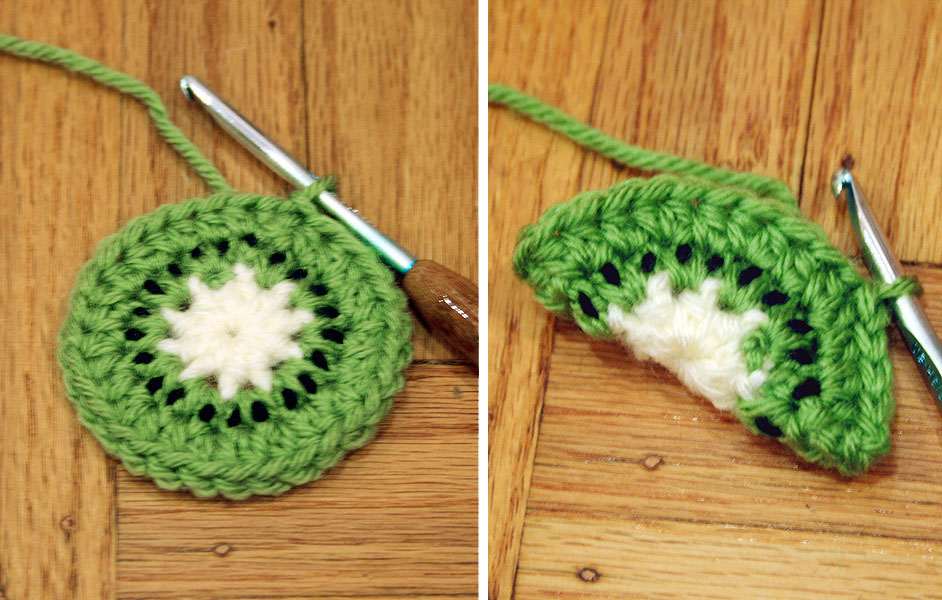
– Cut approx. 1 yard of Black. With tapestry needle, stitch small seeds all the way around. I stitch in the top half of the hdc’s in Rnd 2. Only the Right Side of the Kiwi will show, so the back can look messy. Tie off and trim the ends on the Wrong Side, except the Fern you are still working.
– Fold circle in half with Right Side on outside. Ch 1 with Fern and sl st the curved edge together through both layers to create a semi circular shape. Break off leaving 18 inches of yarn for sewing Kiwi Slice to Cozy later. (Photo 4)
Blueberries (make 6 or more)
With Colonial blue, unravel 12 inches of yarn. Make adjustable ring, or ch 3 and sl st to 1st ch to form ring. Don’t join rounds. Right Side of work should show on outside of Blueberry.
Rnd 1: Ch 1, 6 sc into ring. (6)
Rnd 2: [2 sc in next st, 1 sc in next st] 3 times. (9)
Rnd 3: 1 sc in each st. (9)
Rnd 4: [Sc dec, 1 sc] 2 times. Before opening gets too small, use beginning 12 inches of yarn to stuff Blueberry. Sc dec, 1 sc. Sl st to next st to join. (6)
– Break off leaving 12 inches of yarn for sewing.
– With tapestry needle, use yarn tail to weave through last 6 sts and pull tightly to close. Tie off but leave yarn tail for sewing Blueberry to Cozy later.
Assembly
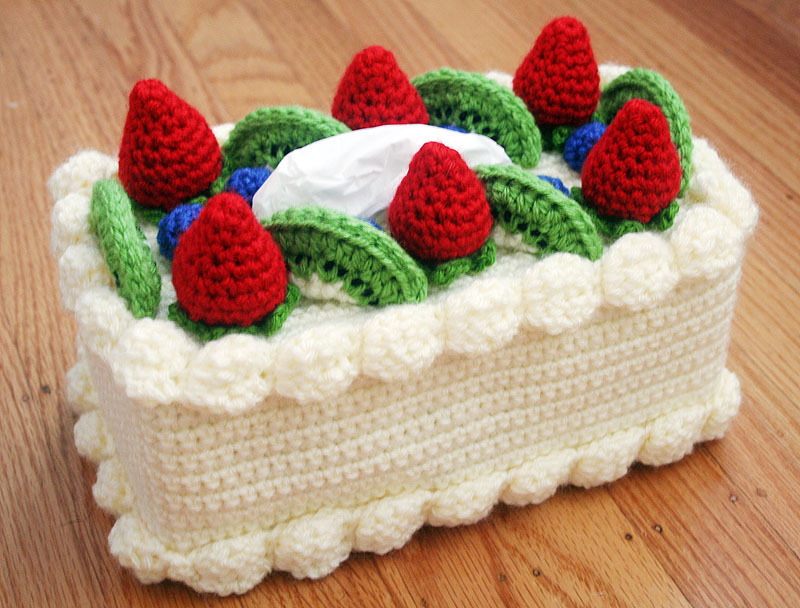
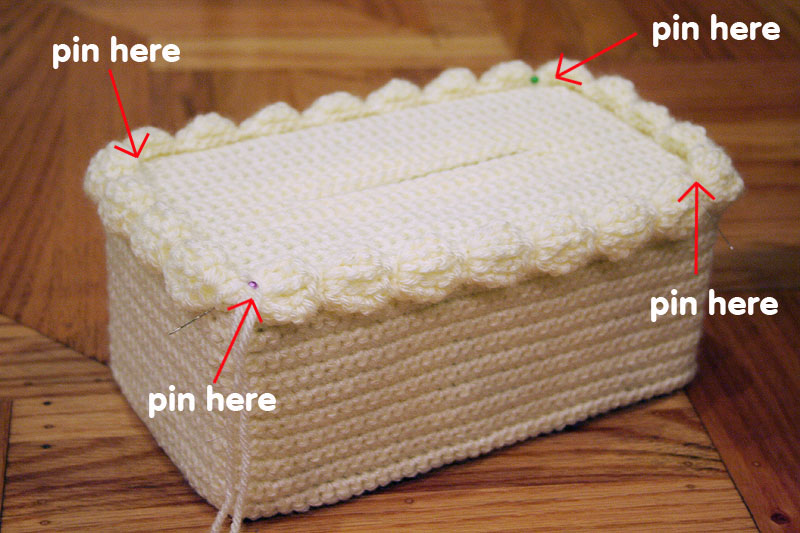
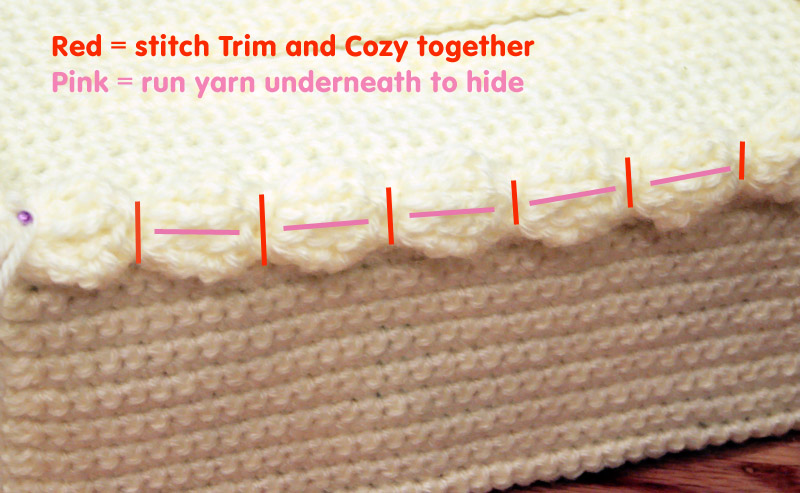
1.With the Cozy on your tissue box, pin Frosting Trim to top edge of Cozy and then sew down. (Photo 5)
 There’s no hard and fast rule for sewing, but here’s the method I used. I put a few stitches through the Cozy and the sc portions of the Trim, and then dipped my needle through the Trim and under the cozy, traveling the length of the Tall Bobbles to hide my yarn underneath both layers, and then I brought my needle back out in the next row of sc on my Trim, to work a few more stitches through Trim and Cozy. I repeated this for the entire length of Trim. (Photo 6)
2. Pin 2nd Frosting Trim to bottom edge of Cozy and then sew down.
3. Sew Strawberry Tops to all 6 Strawberries using Kelly Green yarn tail. Tie off but don’t break off, as you will be using the yarn tail to also sew Strawberries to Cozy later.
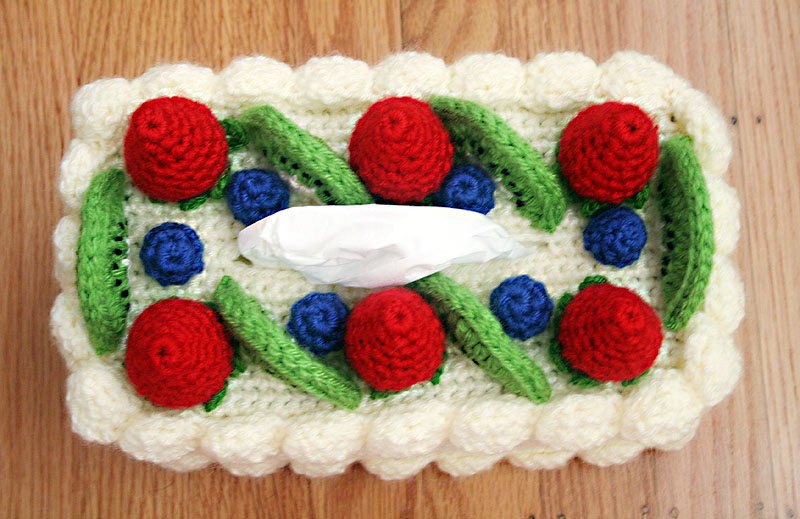
4. To help with even spacing of the fruit, first sew down 1 Kiwi Slice to each short edge of the Cozy, using Fern yarn tail. (Photo 6) (At this point, you could also hot glue the fruit into place instead of sewing, but you’re cozy will become spot-clean-only unless you use fabric hot glue.)
5. Using remainder of Kelly Green yarn tails, sew 1 Strawberry in each corner of the cozy. Then sew 1 Strawberry at each mid-point of the long edges.
6. Using Fern yarn tails, sew remaining Kiwi Slices at an angle, in between Strawberries.
7. Arrange Blueberries and use Colonial Blue yarn tails to sew onto Cozy.