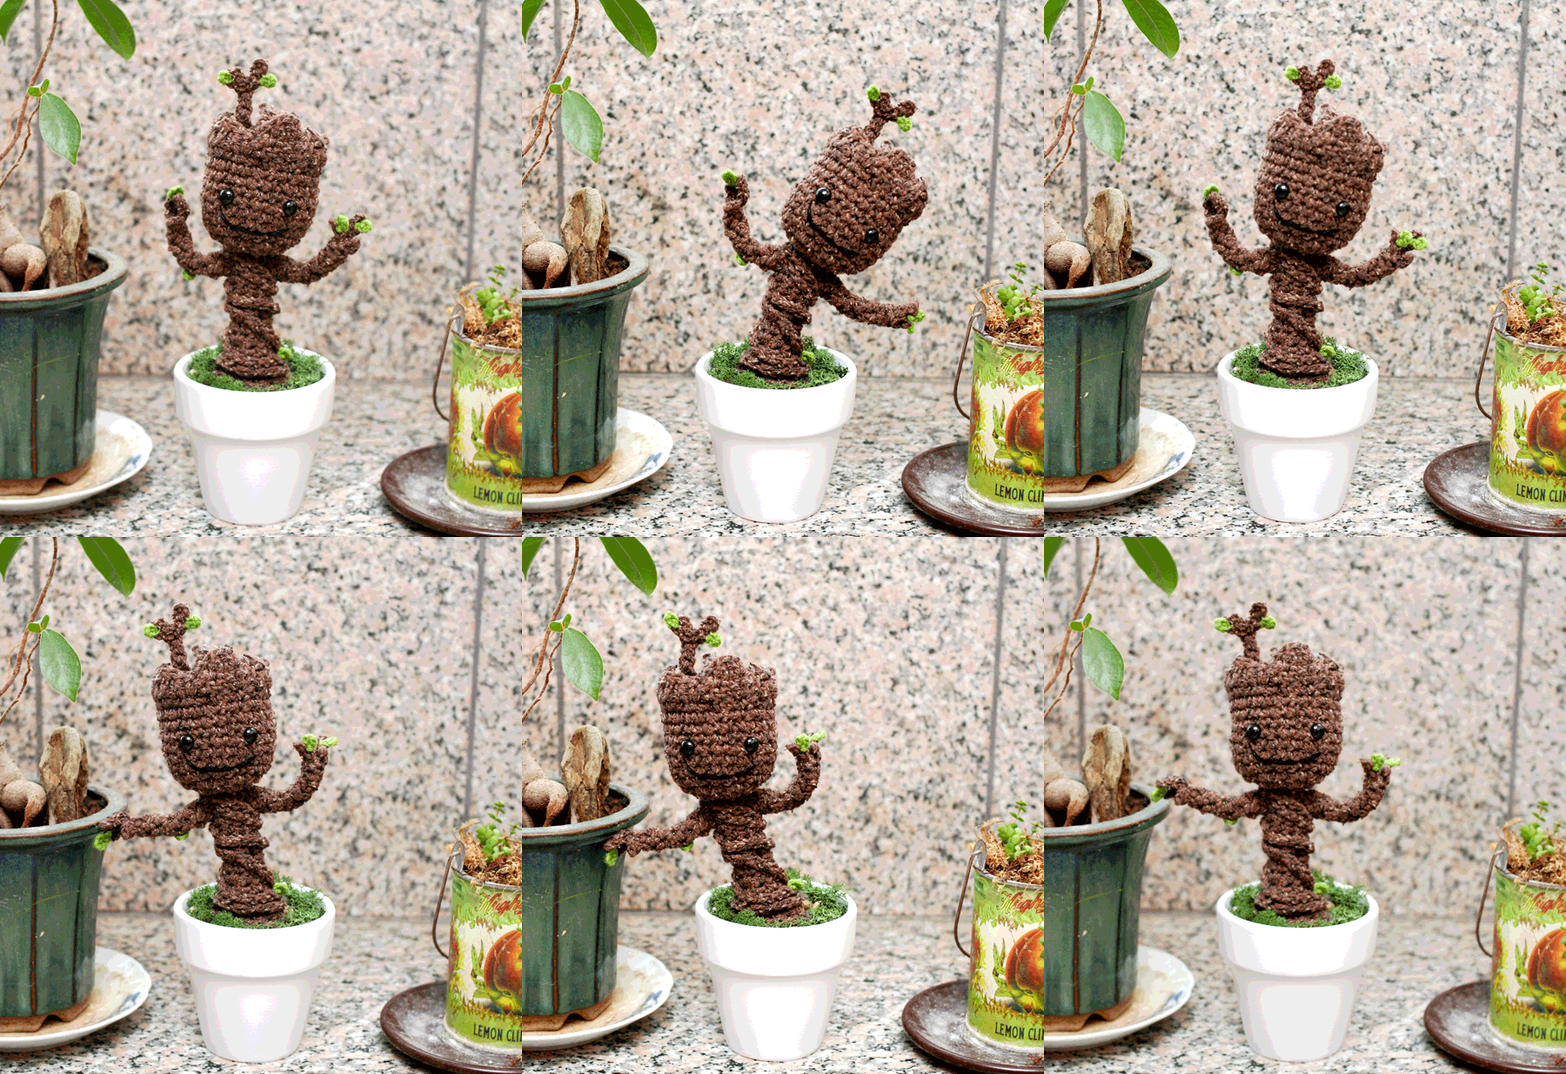
Free Crochet Pattern: Potted Baby Groot from Guardians of the Galaxy

GrootDancing(You have to watch this .gif while listening to Awesome Mix Vol.1) I saw Guardians of the Galaxy last weekend because Manda and our friend Ehren both wanted to see it.  A lot of my friends have been over the moon about it, but I’m really not a comic book person, and the trailer wasn’t really catching my attention. I said I would see it if someone bought my ticket :P.

My takeaway from the movie was that WE ALL NEED A BABY Groot, so here is your free crochet GROOTORIAL! If you haven’t seen the movie, Groot is this tree-like alien who is really big and strong and can grow stuff off his body and is basically like the Giving Tree on steroids.
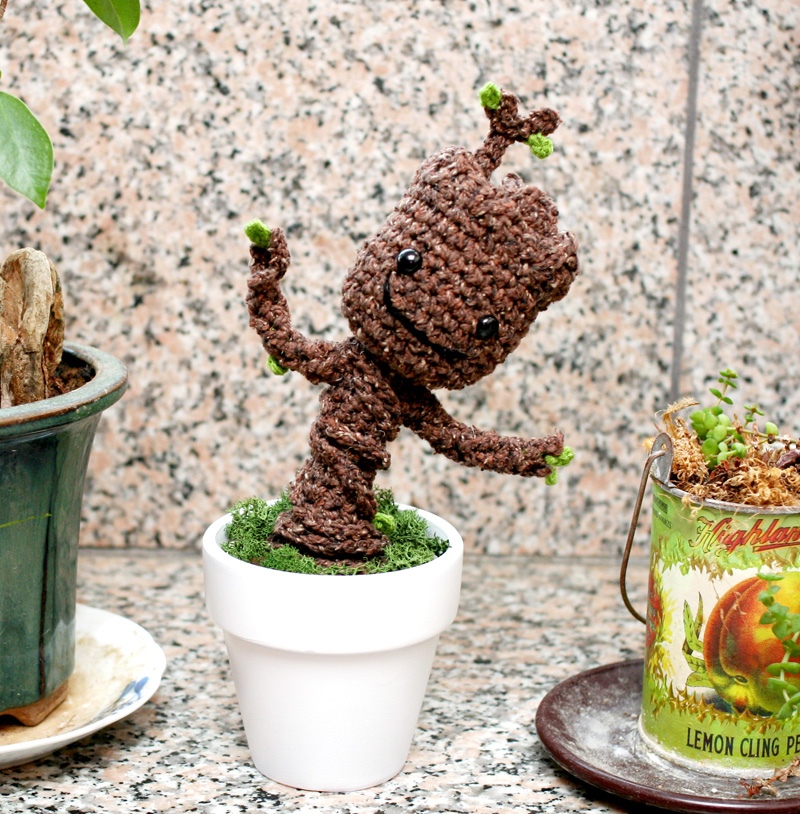
GrootDance8smI don’t want to spoil why there is a baby Groot and why people are going crazy about him if you haven’t seen the movie yet, so go see it and then it will all make sense!

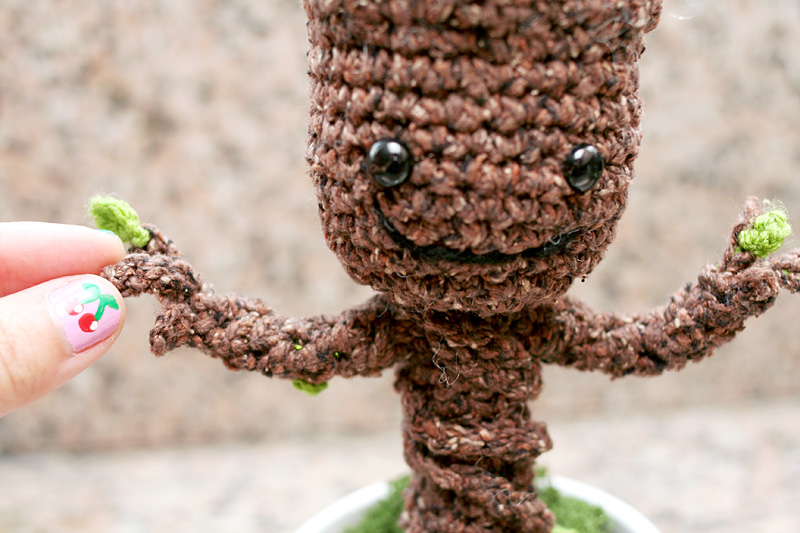
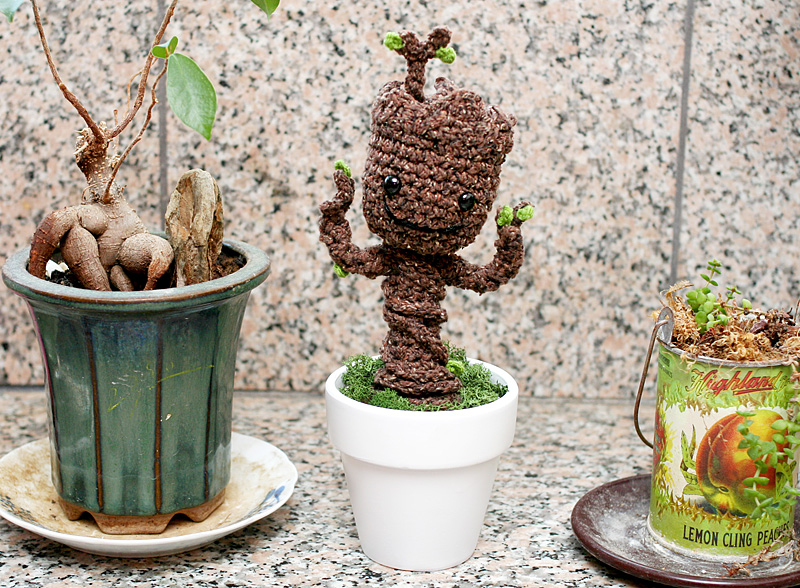
I put pipe cleaners in his arms so that he could “dance.” I tried wiring his body, too, but was running into complications with figuring out how to put stuffing in him AND a wire….plus the pipe cleaner wasn’t really strong enough to support his head and body and pipe cleaner was all I had in the house… so I need to play with that more at some point! Anyway, now you all can have your own baby Groot! And I am sure you guys will each put your own little spin on him!! I used online images of the Funko bobble head as my inspiration, cuz I think it’s super adorable!

Grootfinished7Grootfinished1csmGrootfinished5Grootfinished8smGrootfinished4smGrootfinished3sm

Also, here is a step by step video tutorial on YouTube to accompany the written pattern below.


P.S. Thank you for all your kind and excited inquiries about whether I will be selling finished baby Groots. I’m really so happy that you guys like him so much! I will not be doing so, since I currently do not have permission or a license from Marvel. I do plan to have a giveaway soon, though, so stay tuned! (And no, I will not be doing a giveaway directly to you only, which is something someone asked!)

Finished Size: Mine is approximately 7.5 inches tall.

What You’ll Need:

– H8/5.00mm and F5/3.5mm crochet hooks
– Worsted weight yarn in Brown (I used Rowan Summer Tweed in Chocolate Fudge, but it’s discontinued now. I believe Lion Brand Vanna’s Choice has a brown tweed, and Plymouth Encore Worsted definitely has a brown tweed, but any brown or tan/wood color will work!)
– Sport weight yarn in Green (I used Red Heart Designer Sport in Pistachio)
– Black embroidery thread or Black worsted weight yarn (I used Lion Brand Vanna’s Choice in Black) – If you’d rather not crochet tiny leaves, you can also use green felt to cut out leaves, and sew them on with green or brown thread.
– 2 9mm safey eyes (12mm looks cute, too!)
– small amount of Polyfil
– 1 12-inch pipe cleaner or some kind of wire for the arms
– scissors
– tapestry needle
– small plant pot
– a handful of small, smooth pebbles
– optional: fake moss, hot glue

Abbreviations in U.S. terms:

ch(s): chain(s)
sc: single crochet
sk: skip
sl st: slip stitch
dec: decrease – you can use invisible decrease (invdec) or sc2tog
( ): work everything inside the parenthesis into the next stitch
[ ]: work everything inside the bracket the number of times indicated

Notes:

I just busted out this pattern last night, and it has not been tested yet. If there are any booboos or weird spots, let me know! 🙂

Head Part A

Groot1sm

With Brown and H hook, make magic ring, or ch 3 and sl st to 1st ch to form ring.

Rnd 1: Ch 1, 6 sc into ring. (6) Don’t join rnds. Continue to work in a spiral.

Rnd 2: (2 sc) 6 times. (12)

Rnd 3: [(2 sc), 1 sc] 6 times. (18)

Rnd 4: [(2 sc), 2 sc] 6 times. (24)

Rnd 5: [(2 sc), 7 sc] 3 times. (27)

Rnds 6 -11: Sc evenly. (27)

Sl st to next st to join.

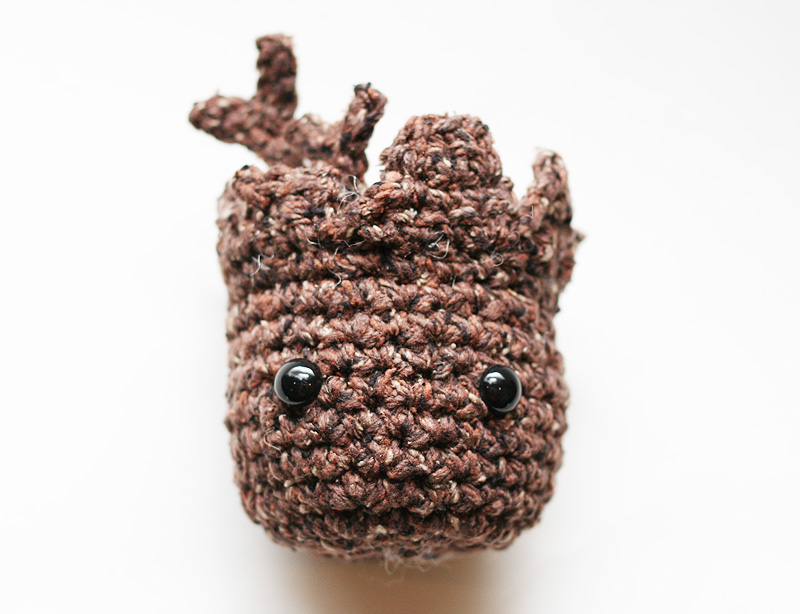
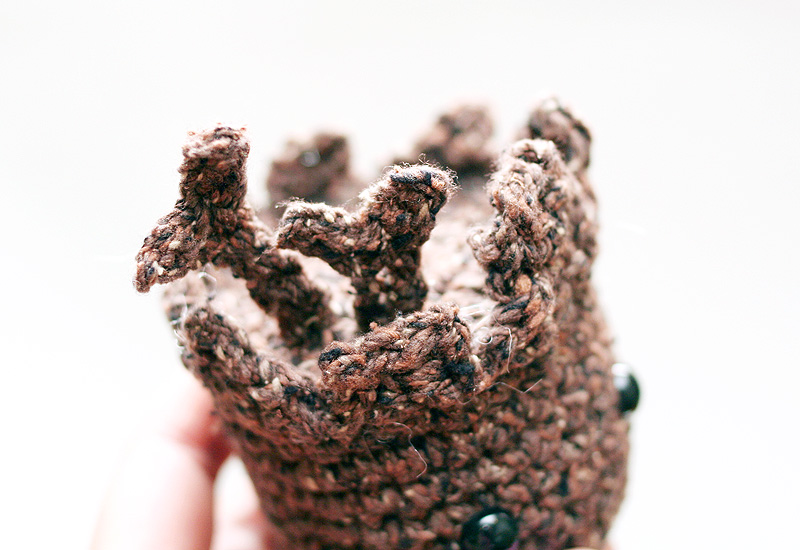
You’ll now work on his broken-wood head accents.

Rnd 12: You’ll be crocheting triangular-ish and rectangular-ish shapes, and then slip stitching down one side of each shape to get your hook back to Rnd 11. We do this so we don’t have to break off and re join over and over again to continue our work. I broke each shape into different paragraphs so that they are easier to see and organize.

Ch 1, 3 sc evenly. Ch 1, turn. 3 sc evenly. Ch 1, turn. Sk 1 st, 2 sc evenly. Sl st down the side of the rows you just worked until you are about to work into Rnd 11 again.

4 sc evenly. Ch 1, turn. 4 sc evenly. Ch 1, turn. Sk 1 st,  1 sc, sk 1 st, 1 sc. Ch 1, turn. Sk 1 st, 1 sc. Ch 1, turn. Sl st down the side of the rows you just worked until you are about to work into Rnd 11 again.

4 sc evenly. Ch 1, turn. 4 sc evenly. Ch 1, turn. 3 sc, sk last st. Ch 1, turn. 3 sc. Ch 1, turn. Sk 1, 1 sc. Sl st down the side of the rows you just worked until you are about to work into Rnd 11 again.

3 sc evenly. Ch 1, turn. 3 sc evenly. Ch1, turn. 1 sc, sk 1, sl st. Sl st down the side of the rows you just worked until you are about to work into Rnd 11 again.

4 sc evenly. Ch 1, turn. 4 sc evenly. Ch 1, turn. Sk 1 st,  1sc, sk 1 st, 1 sc. Ch 1, turn. Sk 1 st, 1 sc. Ch 1, turn. Sl st down the side of the rows you just worked until you are about to work into Rnd 11 again.

3 sc evenly. Ch 1, turn. 3 sc evenly. Ch1, turn. sk 1, 2 sc.  Sl st down the side of the rows you just worked until you are about to work into Rnd 11 again.

3 sc evenly. Ch 1, turn. 1 sc , sk 1, 1 sc. Ch1, turn. Sk 1, 1 sc. Sl st down the side of the rows you just worked until you are about to work into Rnd 11 again.

3 sc evenly. Ch 1, turn. 3 sc evenly. Ch1, turn. 1 sc, sk 1, sl st. Sl st down the side of the rows you just worked until you are about to work into Rnd 11 again.

Sl st into Rnd 11 and break off. Weave in end.

Insert eyes. You get to decide which part of the head should be the face.

Now you’ll finish the top of the head. You’re just making a circle to cover the hole.

Head Part B

With Brown, repeat Rnds 1-4 of Head Part A.

Sl st to next st to join. Break off leaving 24 inches of yarn.

If you want a branch or two sticking out of his head, crochet these now and sew them to the top of Head Part B before you sew it to the top of Head Part A.

Branch

With Brown and H hook, ch 8, sk 1 ch, work 2 sl st evenly. Ch 4, sk 1 ch, work 3 sl st evenly, then continue to sl st evenly down original ch. Break off.

Short Branch

With Brown and H hook, ch 6, sk 1 ch, work 2 sl st evenly. Ch 3, sk 1 ch, work 2 sl st evenly, then continue to sl st evenly down original ch. Break off.

Lightly stuff Head Part A.

Since Head Part B is 24 sts around and open hole of Head Part A is technically 27 sts around, you can’t sew stitch for stitch, so just sew it on as best you can and make it look good. I found that using a 27 st circle was too big for the opening. You can use Rnd 11 of Head Part A as a guide for sewing. While sewing, you also don’t want the head to look like it has Frankenstein stitches going all around it, so try to sew as invisibly as you can. Put in more stuffing if needed.

Groot2sm

Body

Repeat Rnds 1-4 of Head Part A.

Rnd 5: [(2 sc), 3 sc] 6 times. (30)

Rnds 6-7: Sc evenly. (30)

Rnd 8: [dec, 3 sc] 6 times. (24)

Rnd 9: [dec, 2 sc] 6 times. (18)

Rnd 10: [dec, 4 sc] 3 times. (15)

Put in some stuffing or your sack of poly pellets. If you plan to wire the Body, anchor the bottom wire now if you like, but you can also run the wire after you complete the Body if you don’t have a bag of pellets at the bottom.

Rnd 11: [dec, 3 sc] 3 times. (12)

Rnds 12-13: Sc evenly. (12)

Rnd 14: [dec, 2 sc] 3 times. (9)

Rnds 15 – 25: Sc evenly, stuffing lightly as you go. (9) (Note, I worked to 25 rnds because at first I was measuring the Body against a piece of pipe cleaner that I had. You can make him as tall as you like. For a longer Groot, I crocheted until the Body was about 6 inches long.)

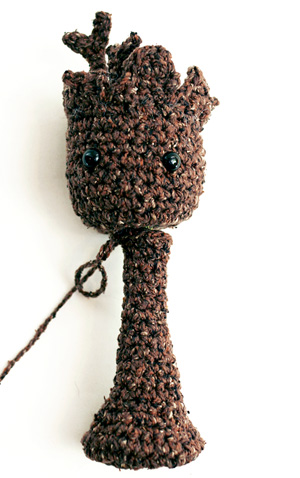
Sl st to next st to join. Break off leaving 18 inches of yarn for sewing.

Sew top of Body to bottom of Head Part A. If you are wiring the body, trim the wire so that it reaches about half way into the head, and then poke the wire into the bottom of the head before sewing.

GrootBody

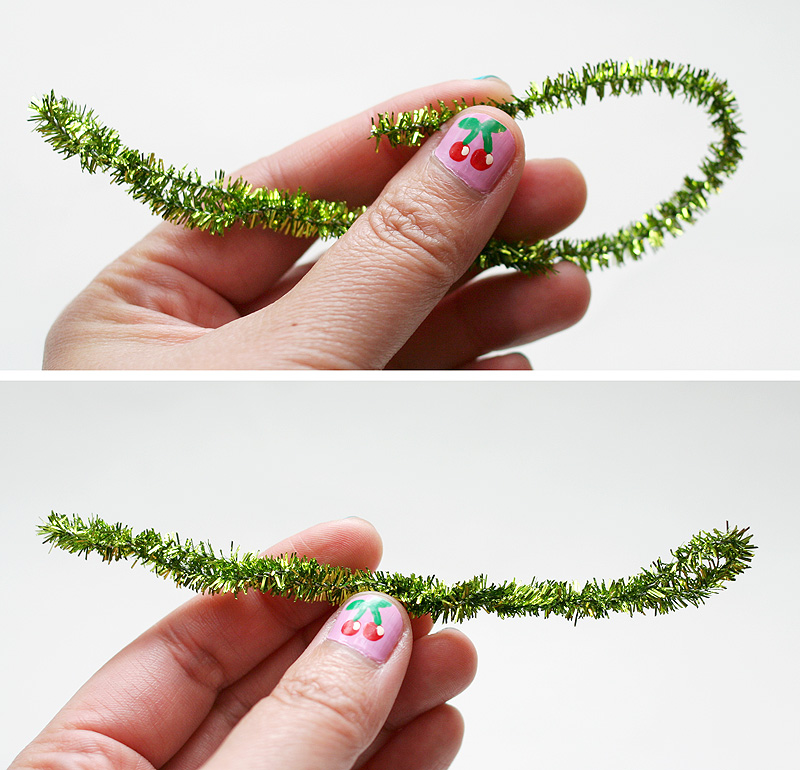
To prepare Arms, fold each end of the pipe cleaner to its center and then twist. If you are using wire, simply measure out the full length that you need for both arms.

Groot3sm

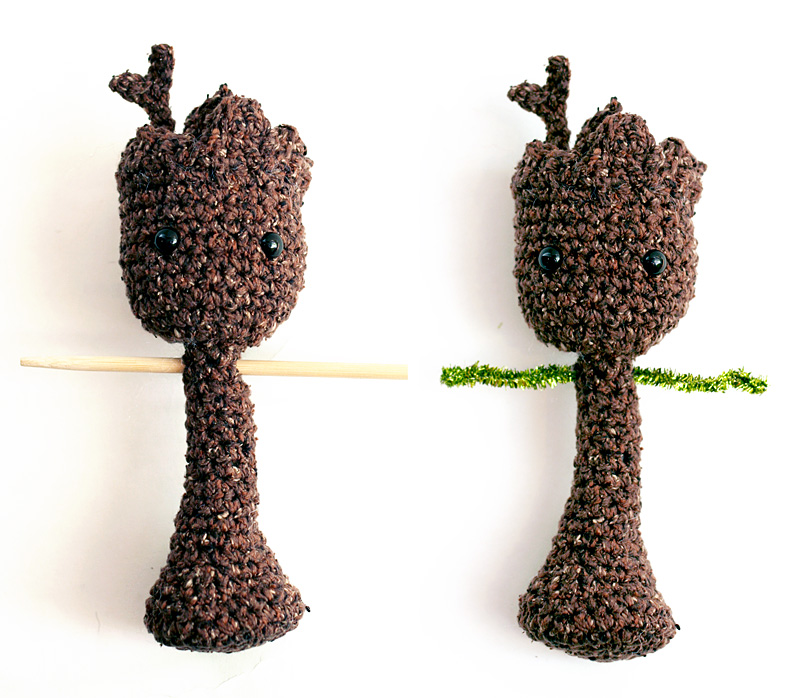
Use a pointy stick to stab through top of Body where Arms will go. I go 1 rnd below the the very top of the neck. This will help guide the pipe cleaner arms through the body, but is not necessary for wire. Slide twisted pipe cleaner into place.

Groot4sm

You can now determine how long you want the arms and lengthen/shorten the pipe cleaner/wire  accordingly. If you are using wire, bend the ends in now so that they are not so pokey.

Arms (make 2)

Pull out about 10 inches of Brown yarn for sewing later.

With H hook, ch 3 and sl st to 1st ch to form ring. (Don’t make a magic circle, or if you do, keep the opening loose because you need to fit the pipe cleaner through this hole.)

Rnd 1: Ch 1, work 4 sc into ring. (4)

Rnds 2 – 8: Sc evenly around. (4)

Slip Arm through pipe cleaner to see if it fits. Keep working evenly if you need more coverage.

When you reach the length that you need, create the finger branches.

Sl st to next st to join.

Ch 3, sk 1st ch, sl st 2 times. Sl st to next st.

Ch 5, sk 1 st ch, sl st 4 times. Sl st to next st.

Ch 4, sk 1st ch, sl st 3 times. Sl st to next st.

Sl st to next st. Break off.

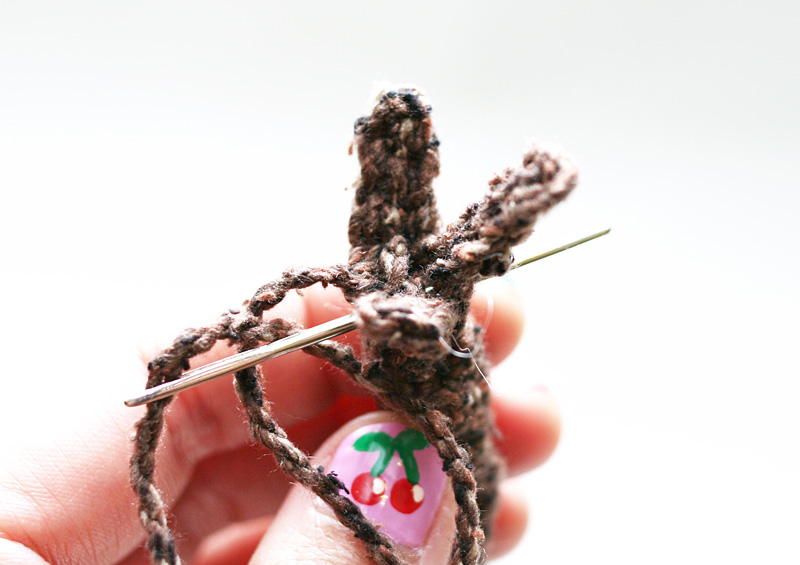
While weaving in your end, also sew through the base of the fingers to pull the fingers inward so they are not splayed too open.

Groot5sm

Slide Arm back onto pipe cleaner and then sew to body. Repeat on other side.

Groot6sm

Leaves

The number of leaves and their placement are up to you!

With Green and F hook, ch 5 or ch 4 and sl st to 1st ch to form your leaf. Break off.

Tie leaf onto tree with yarn tails and then carefully weave in ends and/or hide them inside the tree.

Twisty Body Bits

If you want to add some twisty/viney bits to the body, simply work a length of chains about 12 – 18 inches for a shorter tree and 24 inches for  a taller tree with Brown and H hook, then wrap chain lengths around Body, sewing down at each end, and also tacking down with a few stitches around the middle wherever you want to make sure the vine stays put. I only made 2 lengths of chain, but you can add more, or put some on the arms, if you like!

Final Assembly

– Embroider a smile with black yarn or embroidery thread.

– Place baby Groot inside a small pot.

– Fill in with smooth pebbles to keep him upright. You might also need some pebbles underneath, so that he is not sitting too low in the pot.

– Decorate with fake moss.

– If you are giving this as a gift, and you don’t want anything to move around, you can also hot glue your baby Groot to the bottom of your pot, or glue something to the bottom of the pot for him to stand on, and then glue him to that, then cover with pebbles, moss, or both!

– EDIT: A couple people have commented that their Groot is too top heavy to stand on its own. I did not design him to stand up by himself. I always keep mine in his little white pot. The next one I make for my friend, I am going to try putting a little sack of Poly Pellets at the bottom and see if that helps. Don’t use loose pellets, as they might leak out of the stitch spaces. I’ve seen on google that some people make a little sack with a dryer sheet, but I’ll probably use a small square of fabric and sew it up, place it at the bottom/feet of the body, and then fill the rest of the body with regular stuffing. I’ll let you know if it works! Also don’t use beans to weigh down your toys. I’ve heard that sometimes if there is too much moisture, the beans will sprout! Which, in this particular case, might be kinda funny, but would also probably ruin your toy :P.


GrootDance3sm

 * This free pattern is intended for personal use only. Please do not copy, redistribute, or sell this pattern. Groot and Guardians of the Galaxy are the intellectual property of someone else who is not me or you, I am guessing Marvel Comics? So I would advise you not to sell items from this pattern without permission.

537 Comments on “Free Crochet Pattern: Potted Baby Groot from Guardians of the Galaxy”

  • Marocco

    says:

    I love baby Groot! Thanks for the pattern!! I think I need more stuffing in his body cause he is wilting. Maybe I made him too tall or I need to put stronger wire from neck down- also floral styrofoam works great to keep him in the flowerpot! 🙂 thank you again I love your patterns!!!!!

  • Michelle

    says:

    I have NOT seen the movie but I just fell in love with him! I will be making one for myself and one for my sister in law very soon!!
    Thank you so much for sharing and blessed be.

  • Judy Currie

    says:

    Loved the Baby Groot!! I just finished one for my daughter-in-law. So cute & not too hard. I put a wire in the body. Stands up better. I now need the mechanism to make him dance—–looking. Thank you.

  • Kamoanui

    says:

    So very cute and fun to make! My kids (all teenagers) are fighting over him!! hahaha! I’m going to have to make him a few more times. We will have a baby Groot forest here! =) I used Vanna’s Choice yarn in Barley. He is a little darker brown, but still super cute!! Thank you so much for the awesome free pattern!!

    • TwinkieChan

      says:

      Barley is a great choice!

  • Terry

    says:

    Omg! This is an adorable pattern! I can’t wait to make this~ Thank you!

  • jazmin

    says:

    Hi! I loved your pattern! I’m from mexico and I’m having trouble finding the eyes. .. I live near to Texas and I could go to a Michael’s store, but I don’t know how to look for them . Do you know where I can find them? Or do I have to order them on ebay or something? ?? I will be happy if you help me 🙂

    • TwinkieChan

      says:

      Awwww! HE came out SOOOOO cute!!!

  • mercedes

    says:

    Also, thanks so much for the free pattern. Your baby Groot is TOTALLY adorable!

  • Sue Mitten

    says:

    Do you know of a knitted pattern for Baby Groot? I can’t crochet

    • TwinkieChan

      says:

      Nope! Sorry!!! I’d just google it if it were me!

  • Alexa

    says:

    Hey, I love the pattern!

    I already made three of the little cuties!
    Would it be ok for you, If I would translate this pattern in german to share it with my friends?

    Thanks, xoxo

    • TwinkieChan

      says:

      Hi! I am fine with that as long as you don’t sell the pattern, and if you print it out or post it online somewhere, please credit me as the designer with a link back to my original pattern. Thank you!

  • Gail Kazimer

    says:

    Do you have any idea what the mechanism is that makes him move and where it can be purchased?

  • Julie

    says:

    I used a pipe cleaner folded in half along with stuffing for the body and he stands up pretty well. Still planning on making a crochet pot to put him in.

  • XandersMama

    says:

    Hi, I am making Baby Groot in two different yarns to satisfy my curiosity. Lily Terra Firma and Red Heart Cafe Latte. I make lots of amigurumi but don’t like to sew things together so I started from the bottom of the body and worked up. To flatten out the base, I worked in the back stitches only on round 5. When it was time to add the head, I worked 12 sc in the front loop only to flatten out the bottom, then increased as directed, stuffing firmly to avoid top-heavy problems. I was also thinking, if you did want him to stand on his own, maybe you could add some roots of various lengths to the base, along the outside loops of row 5? (I hope it’s okay to have made slight changes, it just makes it easier for me.)
    Thank you so much for your well written pattern, so many patterns have problems and I haven’t had any so far 🙂

  • avidbeader

    says:

    Thank you so much for this pattern! I finished my baby Groot tonight, my very first amigurumi. I presented it to my tween son and the jawdrop and then falling on his knees to squee absolutely made my week. I will definitely be making more of these – they go so quick once you know what you’re doing.

    • TwinkieChan

      says:

      Awwwww such a cute story!!!!! I love it! Thank you for sharing with me!

  • kindra

    says:

    Have you filmed the tutorial yet? I feel a little stupid because I’m unable to follow you’re pattern while everyone says it’s so clear! Haha anyways it’s Very cute and I hope I’m able to grasp it soon

  • Lærke

    says:

    Hey.
    Lovely little fellow and lovely pattern..! 🙂
    I just finished mine, and made a few alterations to the pattern, because I used different yarn and hooksize.
    I was wondering if you would let me translate your pattern into danish, and let me put it on my blog.? Of course still with a reference to your site and pattern.

    Hope to hear from you.
    Check out my Groot here: http://kreaposen.blogspot.dk/2014/11/baby-groot-i-potte.html

  • Kaitlyn

    says:

    Where did you find fake moss?

    • TwinkieChan

      says:

      It’s at most craft stores, I think!

    • michelle

      says:

      If you go to one of those stores that sell the tiny figures you can paint (like the Warhammer ones), they sell them there, or if you live in the UK, HobbyCraft sells the moss

  • Lyndsi

    says:

    I love you and your patterns. Thank you for this!!

    Also, try some baling wire (you can get it at a home improvement store)

  • minta

    says:

    thank you for posting this design of yours =) I also LOVE the baby groot…& will be attempting to make a couple of these for my BF’s nieces. ((( hopefully my pups won’t figure out what I am doing & decide that they will be their toys. Have you done your giveaway you spoke of in the posting? I would luv to get in on that ….. THANX again..wish me luck =) .

    • TwinkieChan

      says:

      Hi! The giveaway already happened 🙂

  • tricia

    says:

    Thank you! This is amazing 🙂 I just love groot I literally cried when he died in the movie lmao! My boyfriend laughed…and for you to have a pattern for this amazingly adorable little guy is awesome!

    • TwinkieChan

      says:

      Aw well now he can live with you forever! 🙂

  • Donna B.

    says:

    This is a great pattern! Thank you so much! Very easy to follow. I used wool-ease worsted weight, number 232, called “wood”! I had a little trouble with arms but just kept going into whatever loops I could because it is wood anyway so it doesn’t have to be perfect! I also used puff paint for the eyes and mouth because this is what I had on hand!

    • TwinkieChan

      says:

      It is definitely a forgiving a pattern. The more weird and nubbly… probably the better! 🙂

  • Machelle

    says:

    I have no idea what beads you use for the eyes. Is the brand name Safey? We were at the store today! Just not sure what I am supposed to get.

  • Jenny

    says:

    Hi, Fab pattern, i love it, i made one for a guy in work i got in secret santa, 🙂 he loves comics and the like, we had a great chat about Guardians when it came out, hes going to love it, anyway I had an idea instead of the poly pellets to put in the base, i used some of the stones that i got to put in the pot, i also stuck a wire through the body up into the head to keep him upright, 🙂

    Thanks, Jenny 🙂

  • jenny b

    says:

    This is soooo cute! I can’t wait to make one! Thanks for the pattern!!!

  • Celeste

    says:

    Thank you so much for this adorable pattern! The pattern was very easy to follow. I made Groot for my sister for Christmas and I’m sure she’s going to love it as he came out super cute. I didn’t have a pot handy so I just crocheted one, but I think it turned out just as well. Thank you again for sharing!

  • Joseph Tavernier

    says:

    I just attached the head to the body and the body can’t support the head. I think I may have made the body too big or didn’t use enough stuffing. Is there a quick fix that doesn’t involve redoing the body?

    • TwinkieChan

      says:

      you might need more stuffing in the body so that it’s more stiff to support the head. if you have a small dowel, or some wire, or pipe cleaners, you could thread that between the body and the head?

  • Cameron

    says:

    thanks so much for the pattern! I took my 11 yr old brother to see Guardians when it first came out and he loved Groot so I made him this for Christmas. the head was a little unstable and floppy so I just inserted a thin dowel through the head and neck and that helped support him. thank you again, and happy holidays!

  • Maria

    says:

    Hi!
    I saw this crochet baby Groot on a friend’s Instagram. I thought it was super cute, but I hadn’t watched the movie yet so I didn’t understand the meaning. When I watched it I tried to find the pattern, because I definetely wanted to have my own crochet baby Groot and got here! 🙂
    I had no idea how to crochet, but my mom had already asked me several times if I wanted her to teach me and so she did. She helped me (she did most of the work, but now I think I could do it on my own), and here is our result http://imgur.com/RP6VB3S
    So thanks for creating this incredibly cute pattern which was the reason to make me learn crochet and which was a great activity with my mom this Christmas (I’m 28!) 😀
    I will be checking your blog for more 🙂

    • TwinkieChan

      says:

      YAY! Oh this is the best story. Thank you so much for sharing it with me :). I’m so happy you found crochet as well as something fun to do with your mom!!!! 🙂 xoxo

    • TwinkieChan

      says:

      Yay! Happy Holidays!!! I am so happy she loved it!

  • Elena

    says:

    Hello!! I love your groot, thanks for sharing it.
    Where I can buy online, this yarn?
    Thanks

    • TwinkieChan

      says:

      The only advice I have for purchasing yarn is just to google the name of the brand you want and see what pops up :). Online stockiest change what they stock all the time, so I would just google it if it were me 🙂

  • gabi

    says:

    WWWwwwooooowwww!!!!
    It is amazing !!!! My boys fell in it !!!!

  • Madison

    says:

    Thanks so much for this pattern! The steps were easy to follow and I was able to make it as a gift for my friend’s son, and my own son as well, who are fans of “Baby Groot”.

    • TwinkieChan

      says:

      Yay!!! I’m so glad! 🙂

  • Paula

    says:

    Found this pattern a couple of days ago and made the head today. I love it!! The pattern is so easy to read and it look sooooo cute 🙂 Thanks for sharing this with us.

    • TwinkieChan

      says:

      You’re so very welcome!! I”m glad the pattern is going well! 🙂

  • Bernadette

    says:

    I’m trying to understand what you mean by [(2 sc) 1sc]. Am I supposed to do 2 sc into the first stitch of every 2 sc made before, or am I supposed to make three sc in each, or what?! I really wanted to make this for my brother!

    • TwinkieChan

      says:

      I have an abbreviations section to try to help you guys make sense of the patterns. Work 2 sc into the next stitch, and then 1 sc in to the following stitch. Then repeat all of that as many times indicated.

  • Ephonic

    says:

    Hi, I absolutely love your pattern and thank you so much for making it. I am attempting to make Groot now, although I live in Australia and am trying to find a yarn that will work instead. I was wondering what your yarn is made of because it looks to be quite stiff, and I can not find anything that is like it.
    Thank you so much 😀

    • TwinkieChan

      says:

      If you want the same texture, try to find a yarn with a lot of cotton in it 🙂

  • Christina McMahan

    says:

    I love it! Thank you! You are my hero!! I adore baby Groot and have been wanting one for myself for a while! I can’t wait to start this!!

  • Christina

    says:

    I can’t wait to make these for my kids they love baby groot!! But I am having a hard time finding eyes to use. What exactly did you use for the eyes?

    • TwinkieChan

      says:

      I use safety eyes or doll eyes. They are at many craft stores, or you can also find them on Etsy 🙂

  • Deedee

    says:

    Thanks! this is great: I made 3 as gifts! This is how I made them stand up on their own: 1) before I sewed on the top of the head, I Added a spine: i twisted a small heart shape in the middle of 12 inch wire, twisted the rest of the wire together, and poked it through the little neck hole so the heart is in the middle of the head as an anchor, and the twisted wire spine is underneath where the body will be. I stuffed the head around the heart shape. 2) I put a good handful of those smooth decorative pebbles inside the widest & lowest part of the body, and stuffed the rest of the body as I went with regular cotton fluff 3) when it was time to sew the head to the body, I stuck a metal crochet hook up through the rocks and stuffing, hooked it to the wire spine on the head, and pulled the wire spine down through the middle of the body. 4)when done, I flattened the bottom a bit so it would stand up: if you leave it rounded though you can make little groot dance in the palm of your hand. THANKS again!!!

  • Chris

    says:

    This is such a great version of baby Groot! Love it!! My 3 daughters all want one now! thanks for sharing such a fun project.

  • Anjizilla

    says:

    I love your super-cute pattern! Weren’t able to give my little Groot away as a gift ^^*
    I’ve send you a message on ravelry some days ago asking you if it would be okay to translate your Baby Groot pattern in German. Most of my blog followers aren’t used to English patterns so they keep asking me to translate your pattern in German as they want to make little Groots for Valentines Day. ^^
    Many greetings from Germany!

  • Jamie B.

    says:

    Hi! I just finished my own Groot using your pattern and I wanted to say Thank You! It turned out so great! I adapted your pattern to fit a wire framework that my husband created to make a dancing robot. I wanted you to see how he turned out! You can see the video of him shaking his money-maker on Youtube: https://www.youtube.com/watch?v=66gfaXMAN1E&feature=youtu.be

    Thanks again!

  • Deszere

    says:

    This is the most adorable crocheted thing I have ever seen. As soon as I saw this I knew I had to make it. I am a beginner at crocheting and have only made a couple scarves and some coasters so I dont know how to do all of the types of crochet stitches used. Would it be possible for you to make an instruction video? That would be so helpful

  • Jessica

    says:

    Thanks a lot! When my niece saw your groot, she begged me to make it for her. So I did. Now a slew of family members want me to make it for them as well 🙂

    Your pattern is awesome and we so appreciate that you posted this pattern! Your a sweetie! Thanks!

  • Thank you very much for sharing! My niece wanted one for her birthday , I love how it turned out.

    • TwinkieChan

      says:

      Yay!!!! I am so glad she got something fun for her bday, lucky girl! 🙂

    • TwinkieChan

      says:

      He’s very cute!!! Thanks for the mention/link!! 🙂

  • LRoy

    says:

    I just love it and thank you for the pattern and great directions <3

  • Tiffany

    says:

    Thanks for the great pattern, I had lots of fun making a baby Groot!

Leave a Comment to linda spray Cancel

Your email address will not be published. Required fields are marked *

This site uses Akismet to reduce spam. Learn how your comment data is processed.

To top